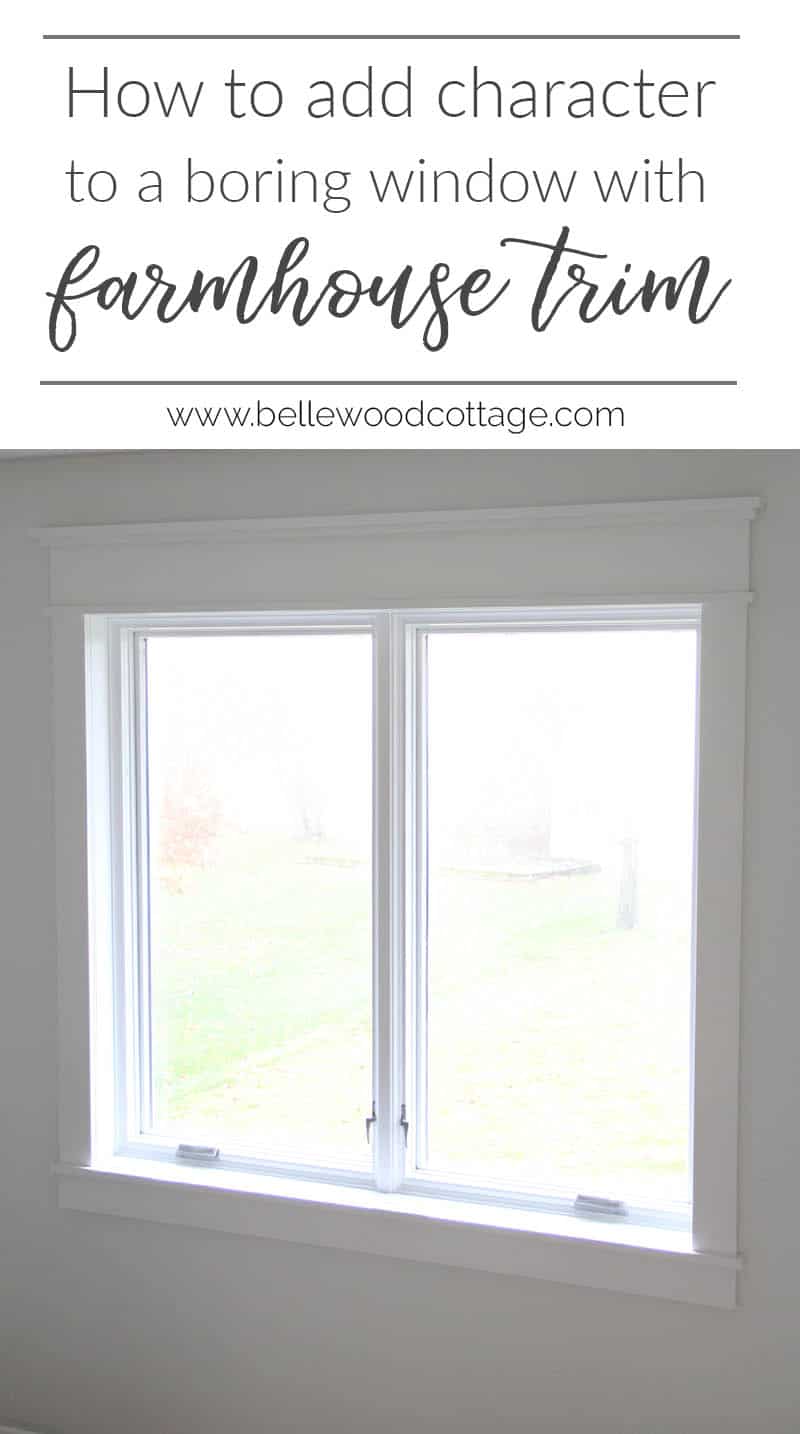
How To Add Character To Your Home With Farmhouse Trim
I’m so excited to share this reveal with you guys! I first saw farmhouse window trim over at Love Grows Wild and absolutely loved the idea. I knew it would be just the ticket to give our master bedroom some farmhouse charm.
This is seriously super easy to do. Plus, it’s affordable. If you are looking for a simple fix to update a boring builder-grade window, this post is for you. I’m sharing all the details on our DIY as well as some tips and tricks I learned along the way. I’m also sharing specifics on the paint and caulk I used so you can shop with confidence.
I wish these photos were a little more true-to-life, but we have had really crummy weather, and I was stuck photographing in some pretty bleak light. I’m planning to update these photos once the rest of the bedroom is done!
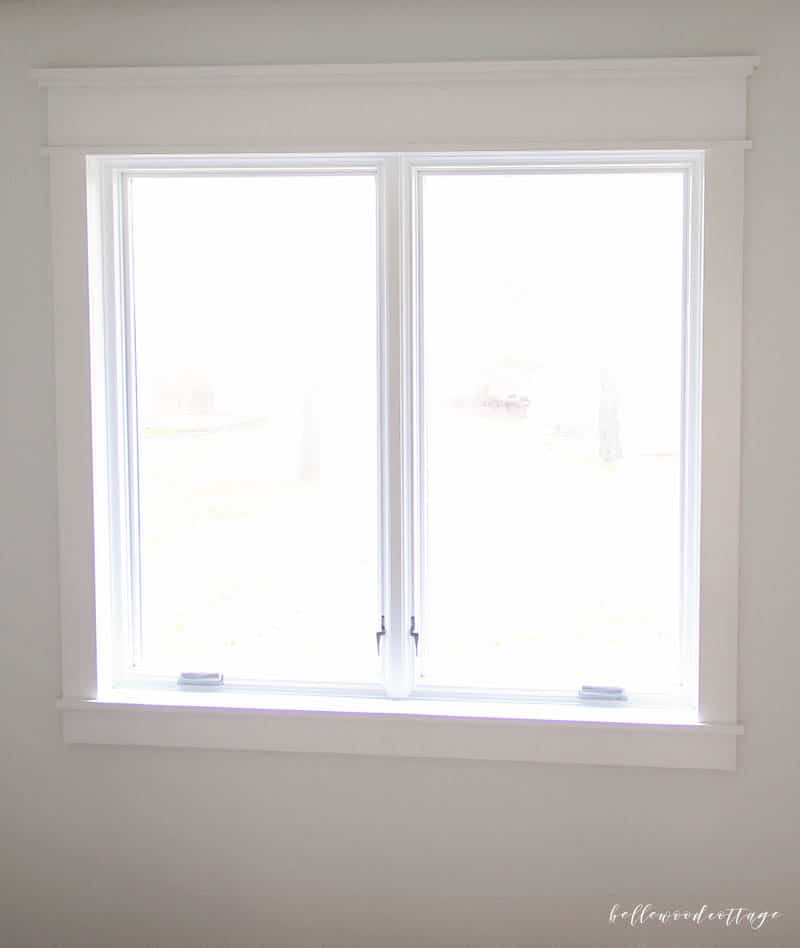
So first off, let’s review a little before and after:
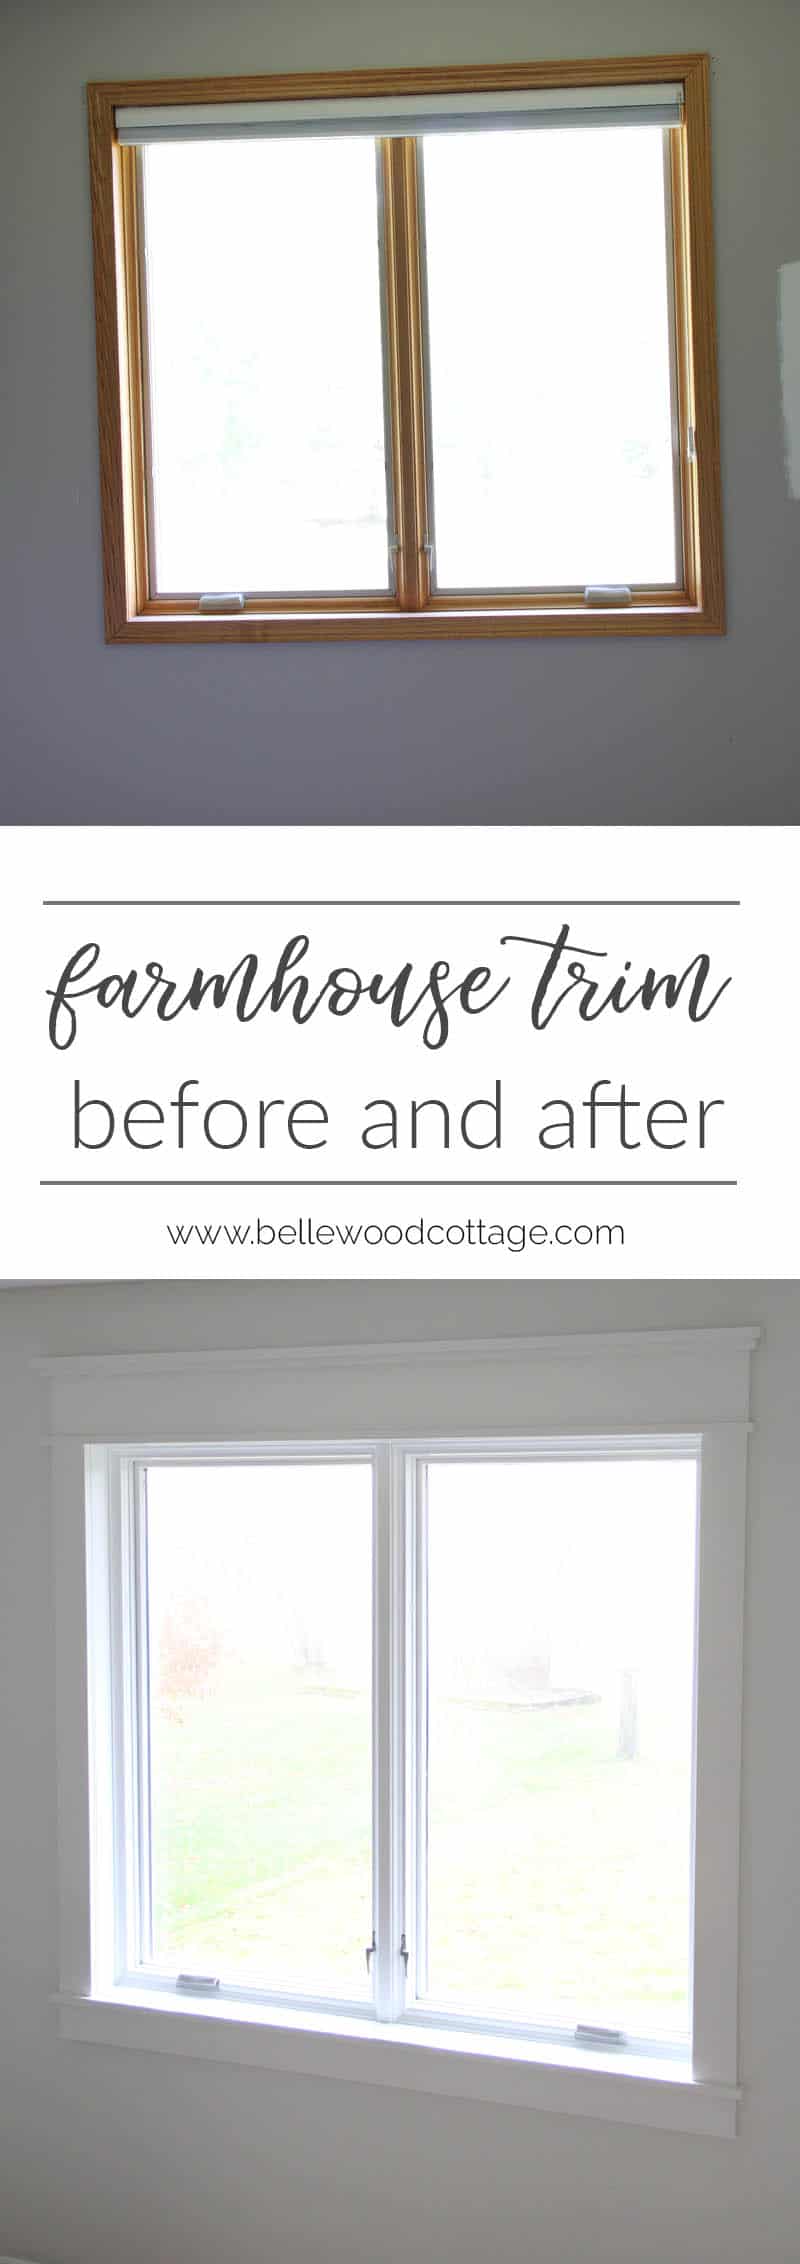
Quite the difference, right?
So how did we do it?
First off, here are the supplies you’ll need:
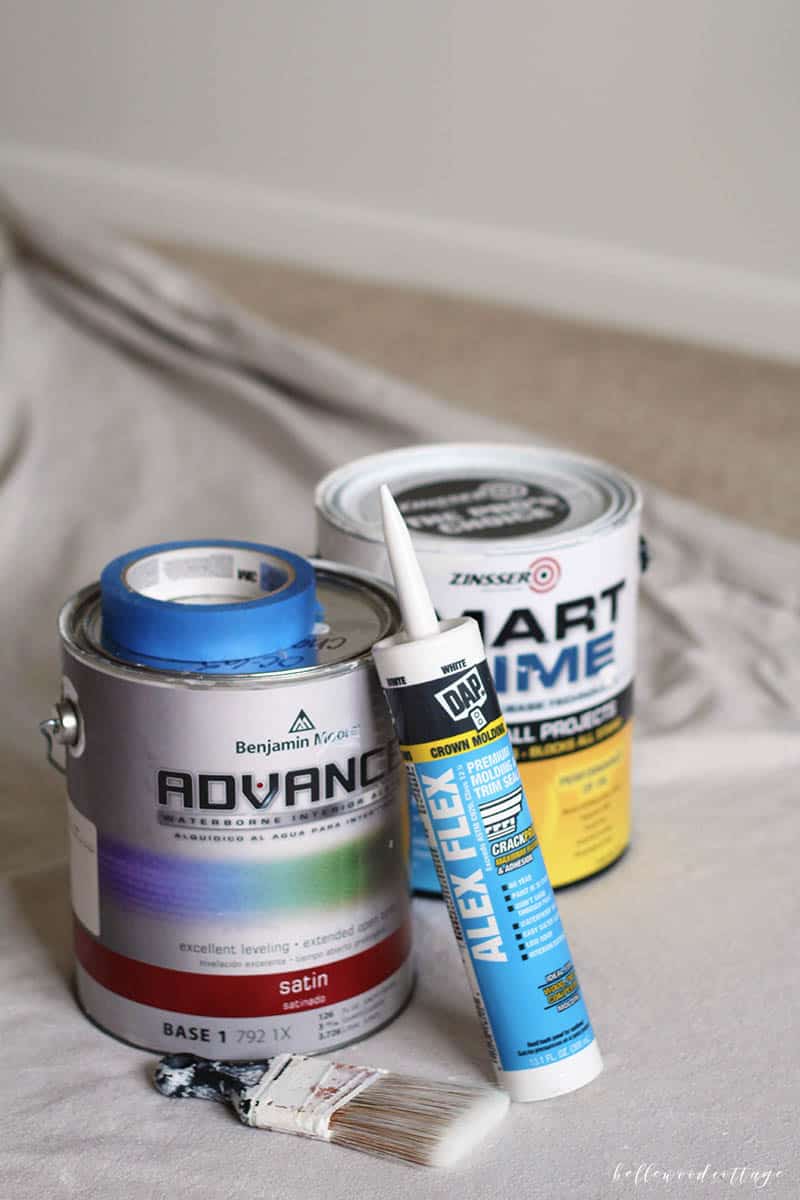
Supplies needed:
Wood (varies, see cuts we made below)
Paintbrush – I use this one
Primer – Zinsser Smart Prime
Paint – Benjamin Moore Advance in Chantilly Lace
Wood filler – Dap Plastic Wood All-Purpose Wood filler
Caulk – Dap Alex Flex (white)
Fine sanding block (use between coats if desired)
Method to secure boards to the wall (nail gun or drill and screws)
Project cost
The cost of this project honestly can vary quite a bit. I already had all the supplies on hand except for the wood and caulk. Caulk was less than $2 and the wood cost is what will determine how budget friendly the project is. We chose a higher quality wood, as I did not want to deal with knotty pine of any kind. If you’re unfamiliar with knotty pine, it can bleed through primer and paint and requires a pretty serious primer to solve the problem. I’ve seen people complete a window for $10-15, but ours cost more like $30-35 for the nicer wood.
Step by step – How to update a boring window with farmhouse trim
1 – After purchasing the appropriate supplies (see my list of wood and cuts below), cut your wood to the appropriate sizes. Hubby took care of this for me. Thanks Hubby! You could also bring your measurements to Home Depot and ask them to cut the wood.
Here is a list of the cuts we made and a diagram of how to assemble them:
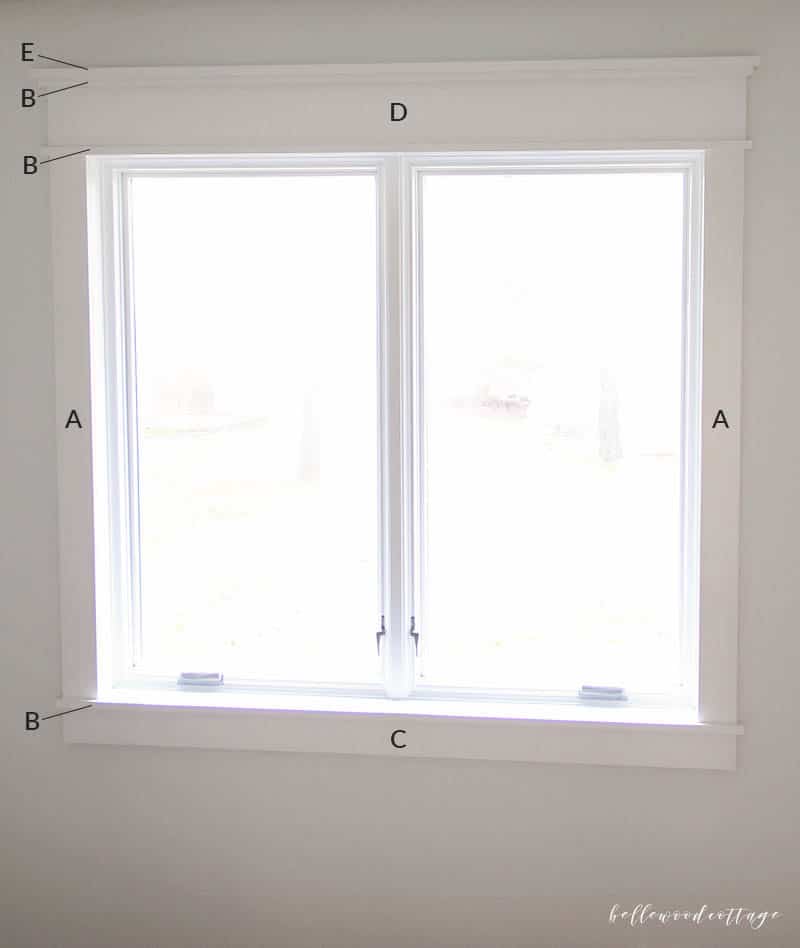
- A – cut two: Use a 1″x4″ board and cut to fit your window vertically
- B – cut three: Use a 1″x2″ board and cut the length to measure as wide as your window (while both pieces “A” are attached) PLUS 1″ (the extra 1″ is what allows the board to slightly extend past the window)
- C – cut one (lower apron): Use a 1″x4″ board and cut the board to measure as wide as your window while both pieces “A” attached
- D – cut one (upper apron): Use a 1″x6″ board and cut the board to measure as wide as your window while both pieces “A” are attached
- E – cut one: This is the very top piece, so use a 1″x3″ board and cut the board to measure as wide as “B” PLUS 1″ (the extra 1″ allows the top board to extend past both the window and “B”)
2 – Next up is securing the wood to the wall. You could use a nail gun and I think that would work pretty well. We don’t have a nail gun (even though I keep asking for one!) so we started by just securing the boards with finish nails. Yeah, that did not work. The way we suggest going about this part is to first secure all the “shelves” to each other with finish nails or screws (so you aren’t later pounding down on these pieces while trying to secure them to the wall because gravity will get you!). Then, secure the boards onto the wall (using studs if possible!) with screws. I didn’t want to use screws, but the stability difference was pretty overwhelming. So screws it was!
3 – Of course, with all those ugly screws visible, you will want to get those holes filled. This is where we used our wood filler. Tip: When you are drilling, make sure the screws are set into the wood so that you can fill them and paint over it. Heaven help the person that wants to take this trim off the wall if we ever move, because it’s not coming easy!
4 – Load up a caulk gun and apply caulk to all seams. This goes really quickly if you can grab a second person to help you. One person can apply the caulk and the second person can follow behind and remove the excess. We were really happy with the Alex Flex caulk.
5 – And now it’s time to paint! I used my preferred paint+primer combo of Zinsser Smart Prime and Benjamin Moore Advance. Generally, I like to do two coats of each. You can certainly use a roller, but I find that a brush is much faster for a project of this size. And who really wants to clean a roller anyway? You can also sand between coats for a really smooth finish, but it’s up to you if you want to tackle the dust! I skipped it and I am perfectly happy with the finish I got.
Tips for success
- Plan ahead: Before you start, check out photos of authentic farmhouse trim and determine the look you want. You can pretty much go as simple or fancy as you want with this project. Obviously, the simple versions will cost less, so factor that in as you are making plans.
- Paint last: I actually primed my boards before we secured them to the wall thinking it would be easier/save time. I don’t know how I came up with that idea, but it was NOT easier! At all. Follow the program of securing the boards, filling holes, caulking, and then priming/painting and you will be golden.
- Don’t forget to paint your window! Assuming your window itself is not white, you’re going to have to paint it. No, it’s not fun. And yes, you have to sand. BUT the results are so so worth it.
- Don’t skip caulking. Yeah it’s one extra step when you want to be done with your project, but it really adds a professional finish. Well worth it.
So honestly that is really about it! This farmhouse window trim is so so easy to diy, and I’d love to hear if you give this a try in your own home!
Thanks for stopping by!