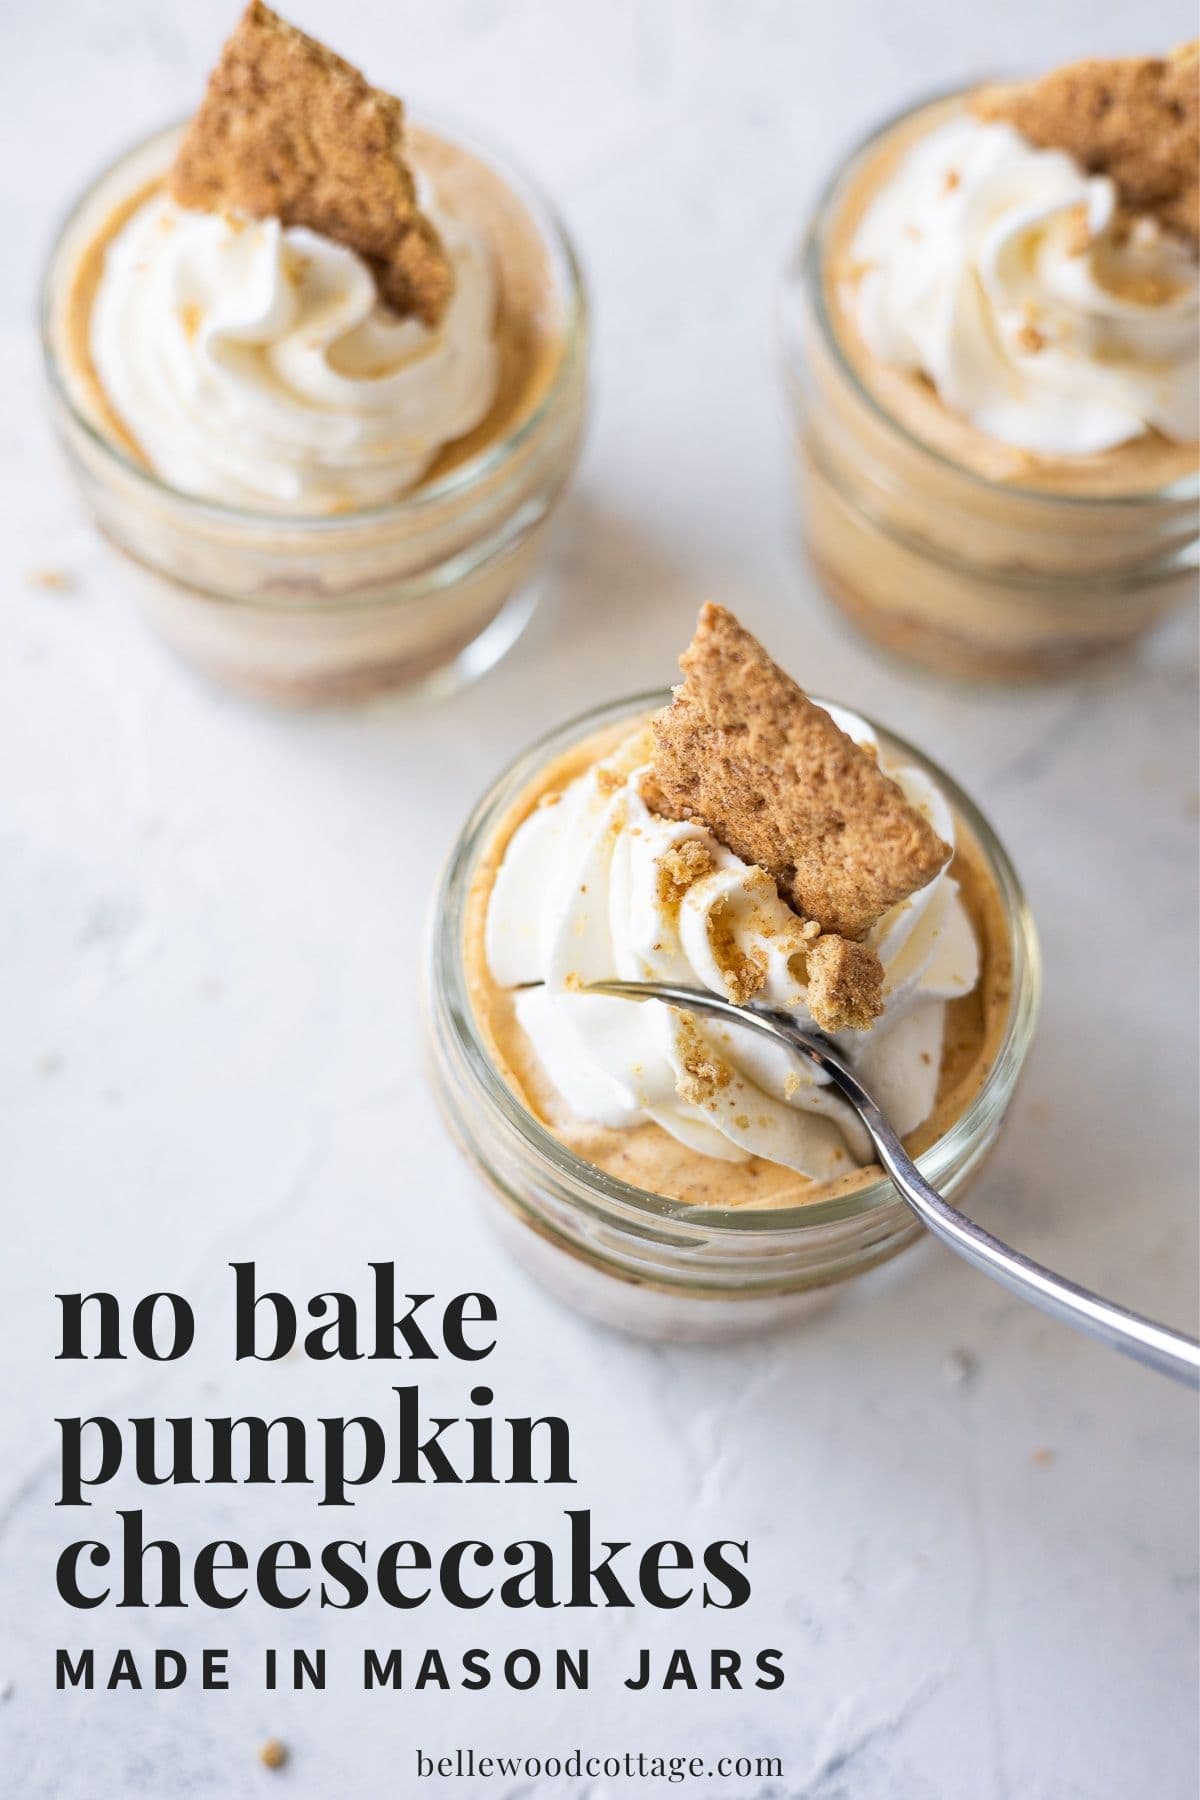
No Bake Pumpkin Cheesecake Mason Jars
These No Bake Pumpkin Cheesecake Mason Jars are the perfect little individual pumpkin cheesecakes. Save oven space, prepare them ahead of time, and don’t worry about fussing with cutting a cheesecake…these lightly-spiced and ultra-creamy mini desserts are ready to serve!
Please note that this post contains affiliate links which allow me to earn a small commission when a purchase is made at no additional cost to you. Read more here.
I am having so much fun with creating mason jar desserts lately. They are adorable of course, but they also make hosting a gathering of family or friends (whether that’s Thanksgiving or another event) a breeze.
Whenever I can make a recipe completely ahead of time, I find myself making it again and again. Goodness knows there are enough other things to worry about once guests begin arriving for a holiday!
Why You’ll Love Making These Mini Pumpkin Cheesecakes
Easy to Serve: Cutting a cheesecake neatly is a bit of an art. Done correctly it takes time. Skip the hassle and have dessert ready to go with these individual mason jar desserts.
Ideal Portion Sizes: These modest portions are the perfect dessert serving (about a slice of pie) but still leave a little room if you want to sample other treats on Thanksgiving Day!
Make Ahead & No Oven Needed: These pumpkin cheesecakes are a no bake dessert that can be made 100% ahead of time (up to a few days in fact). Just top with a dollop of whipped cream or whipped topping right before serving. No oven space and certainly no water bath needed for this dessert.
Streamlined Method: When I first tested this recipe, I used homemade whipped cream. While you can still serve it with homemade whipped cream on party day if you want (or the stuff in a can–no judgment here), the actual recipe is now streamlined by using a quick scoop of thawed frozen whipped topping (you know the one) which yields a creamy pumpkin filling in a fraction of the time.
Perfect for Traveling: These jars are perfect for traveling. Just top them with their lids and keep chilled while traveling. Then, when ready to serve, remove the lids and top with whipping topping and a sprinkle of graham cracker crumbles. No fussing with trying to pack a full-size cheesecake!
How Many Desserts Does This Recipe Make?
This recipe makes 8 Individual No Bake Pumpkin Cheesecake Mason Jars. These are 4-oz “mini” mason jars. The servings are about the same as a slice of pie and the recipe is easily doubled for more jars. The jars will be quite full (and if a spoonful remains, you know what to do), so you could also stretch the recipe to 10 jars if you like.
Some cheesecake mason jar recipes serve up their dessert in 8 oz jars, but I just found that amount to be too much. If you’d prefer larger portions though, double the recipe and serve in 8 oz jars or ramekins.
Where to Buy the Right Size Mason Jars
I like buying these small 4 oz mason jars for my desserts. You can also get the “quilted” 4 oz jars which are very cute and festive too.
Note: I usually get my jars locally if I can–they are often less expensive than buying online.
Ingredients You’ll Need:
For the Cheesecake:
Cream Cheese: Use full-fat cream cheese for this recipe. Also consider buying the name brand cream cheese, not generic. With a simple recipe like this, each ingredient will shine, so using top-quality is ideal for the best flavor!
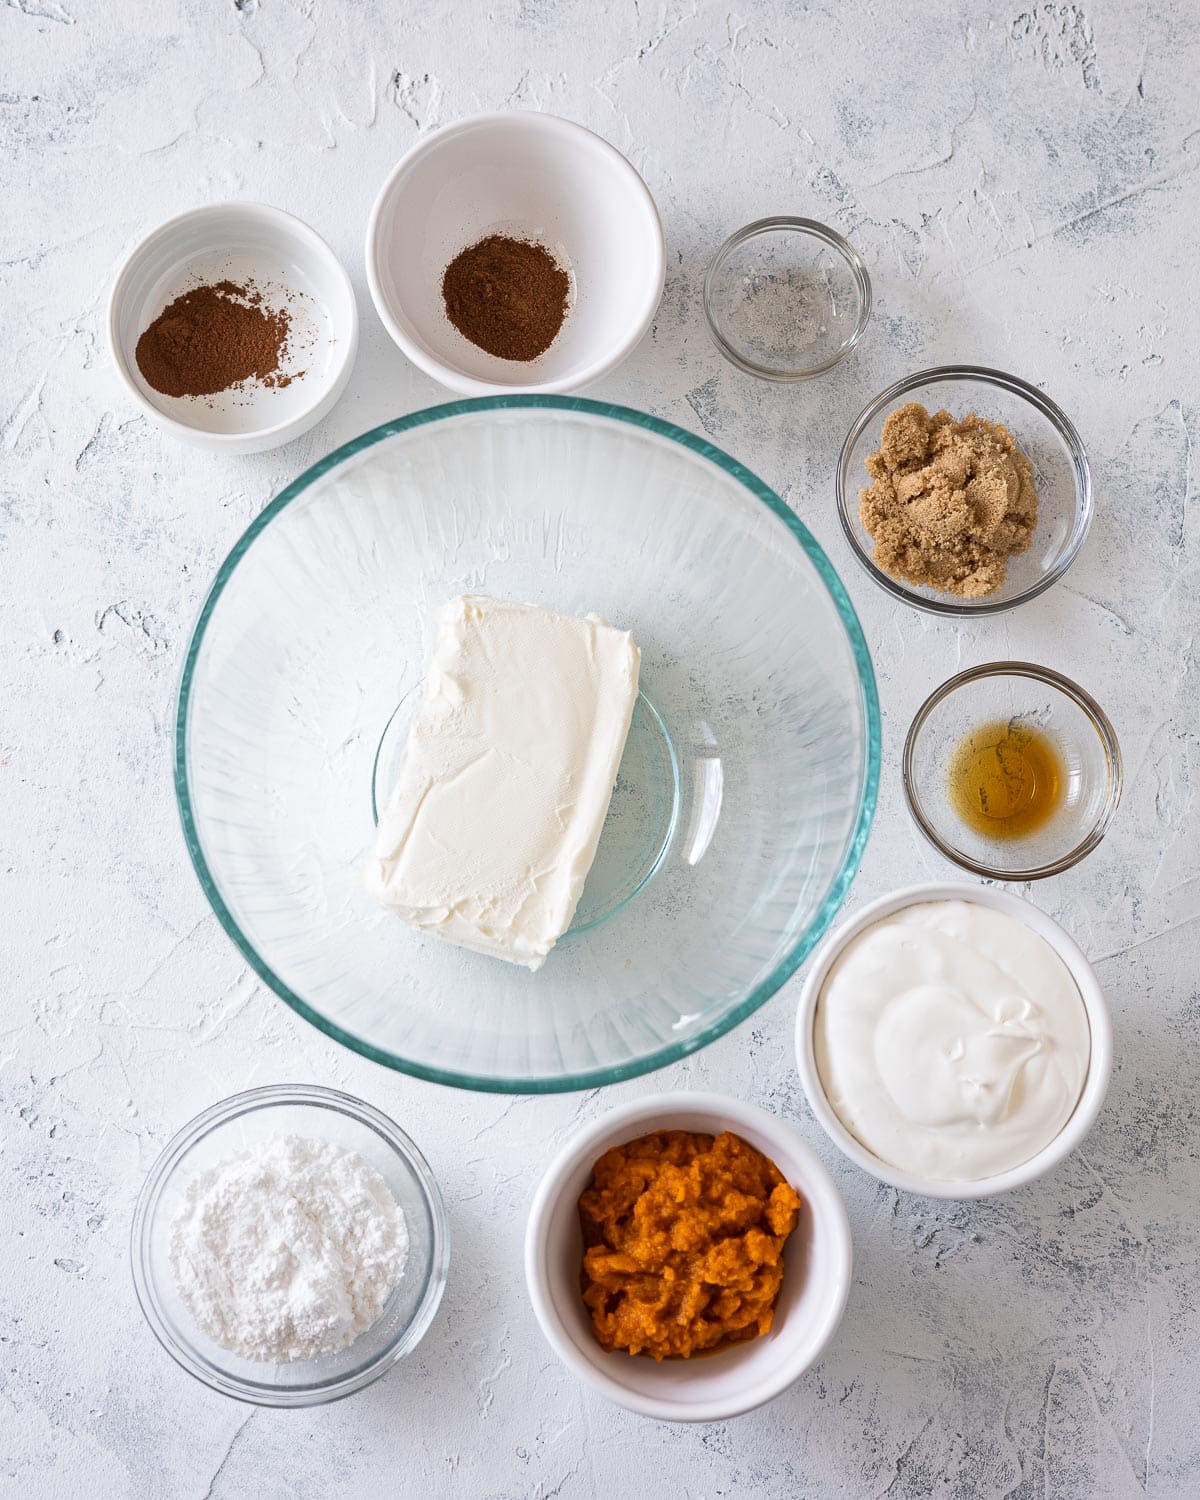
Powdered Sugar: A little powdered sugar (confectioner’s sugar) is ideal for blending smoothly into the filling. I didn’t try granulated, but if you are in a pinch, use your hand mixer to blend it first with the softened cream cheese for a few minutes (before adding the other ingredients) to help reduce any potential graininess.
Brown sugar: Brown sugar increases the depth of flavor here.
Pumpkin Puree: Use canned pumpkin puree and avoid the pre-spiced pumpkin pie mix. I suggest sticking with Libby’s or similar (I used a can from Aldi in one of my tests). I did try a can of organic pumpkin and it seemed to have a lot more liquid happening.
Pumpkin Pie Spice: Each pumpkin pie spice brand will have a slightly different spice mix. My preference is to make my own pumpkin pie spice mix and use that. Taste the cheesecake layer before spooning into your jars and adjust the spice if you like.
Ground Cinnamon: Just a bit extra cinnamon because yum!
Vanilla Extract: a 1/2 teaspoon of vanilla extract is nice addition to the flavors too.
Pinch of salt: I used regular table salt here–just a pinch.
Thawed Frozen Whipped Topping: Yes, the stuff that goes by “Cool Whip”. Thaw it in the fridge ahead of time and don’t be tempted to thaw on the counter–it’ll turn into soup!
For the Crust:
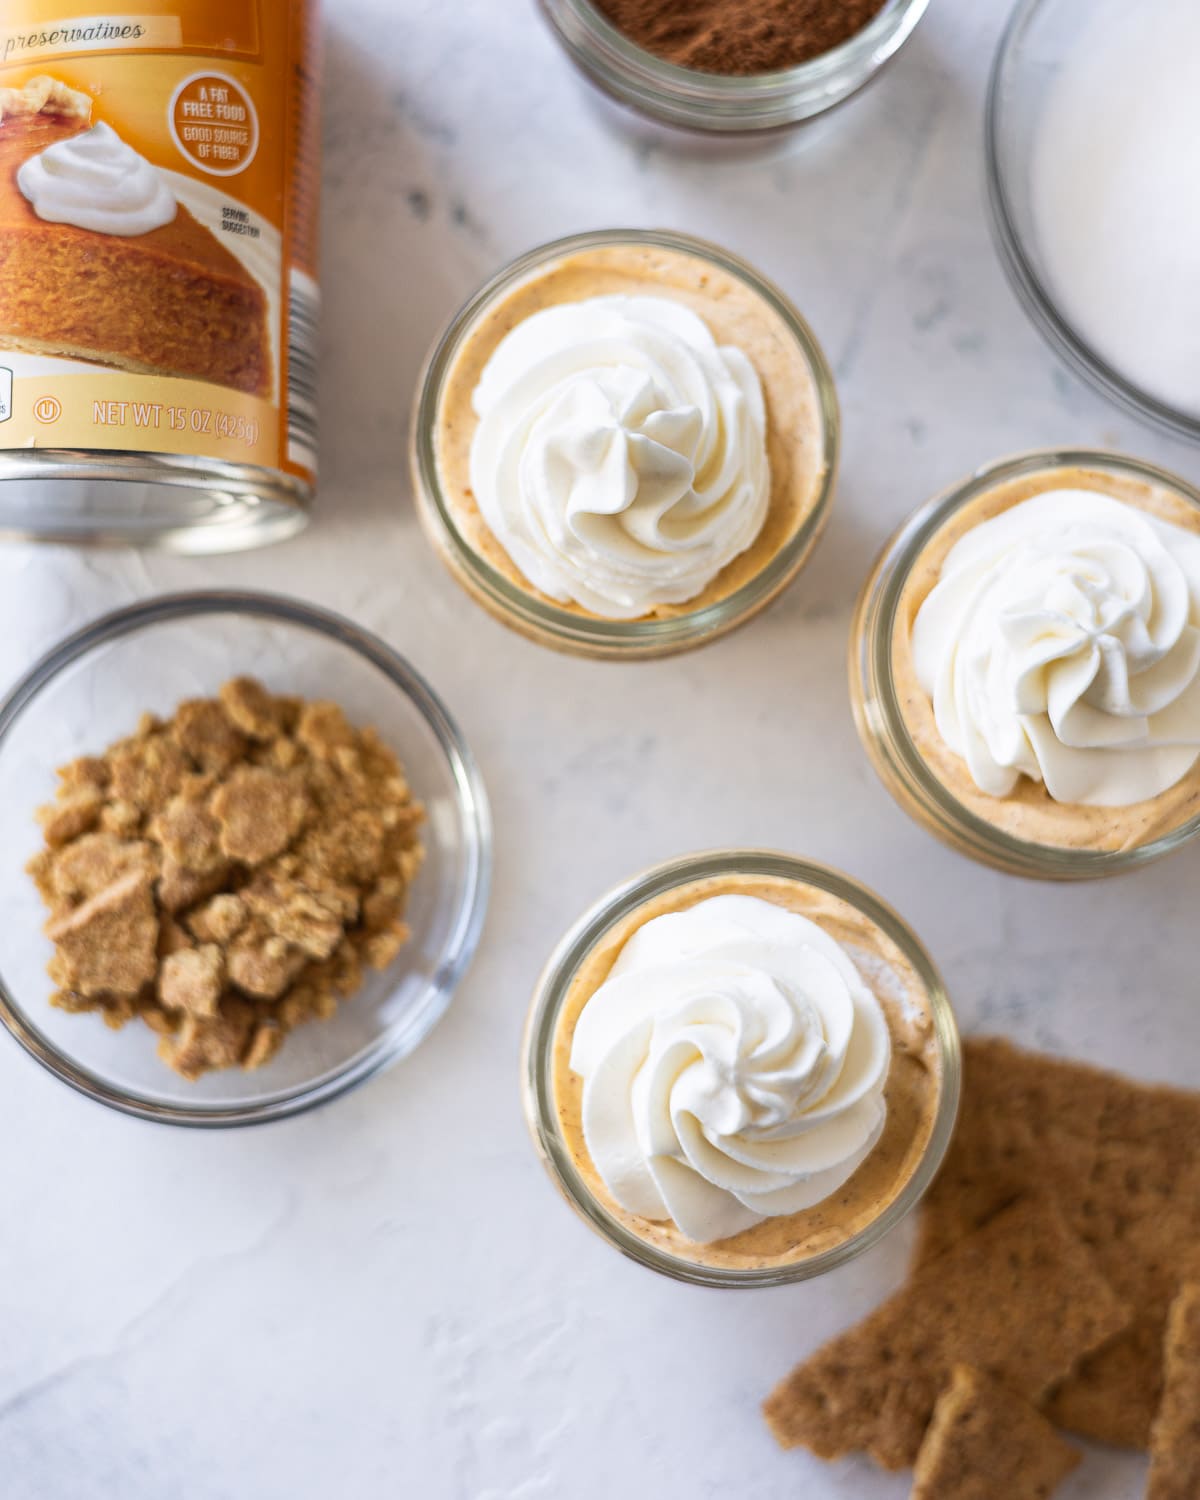
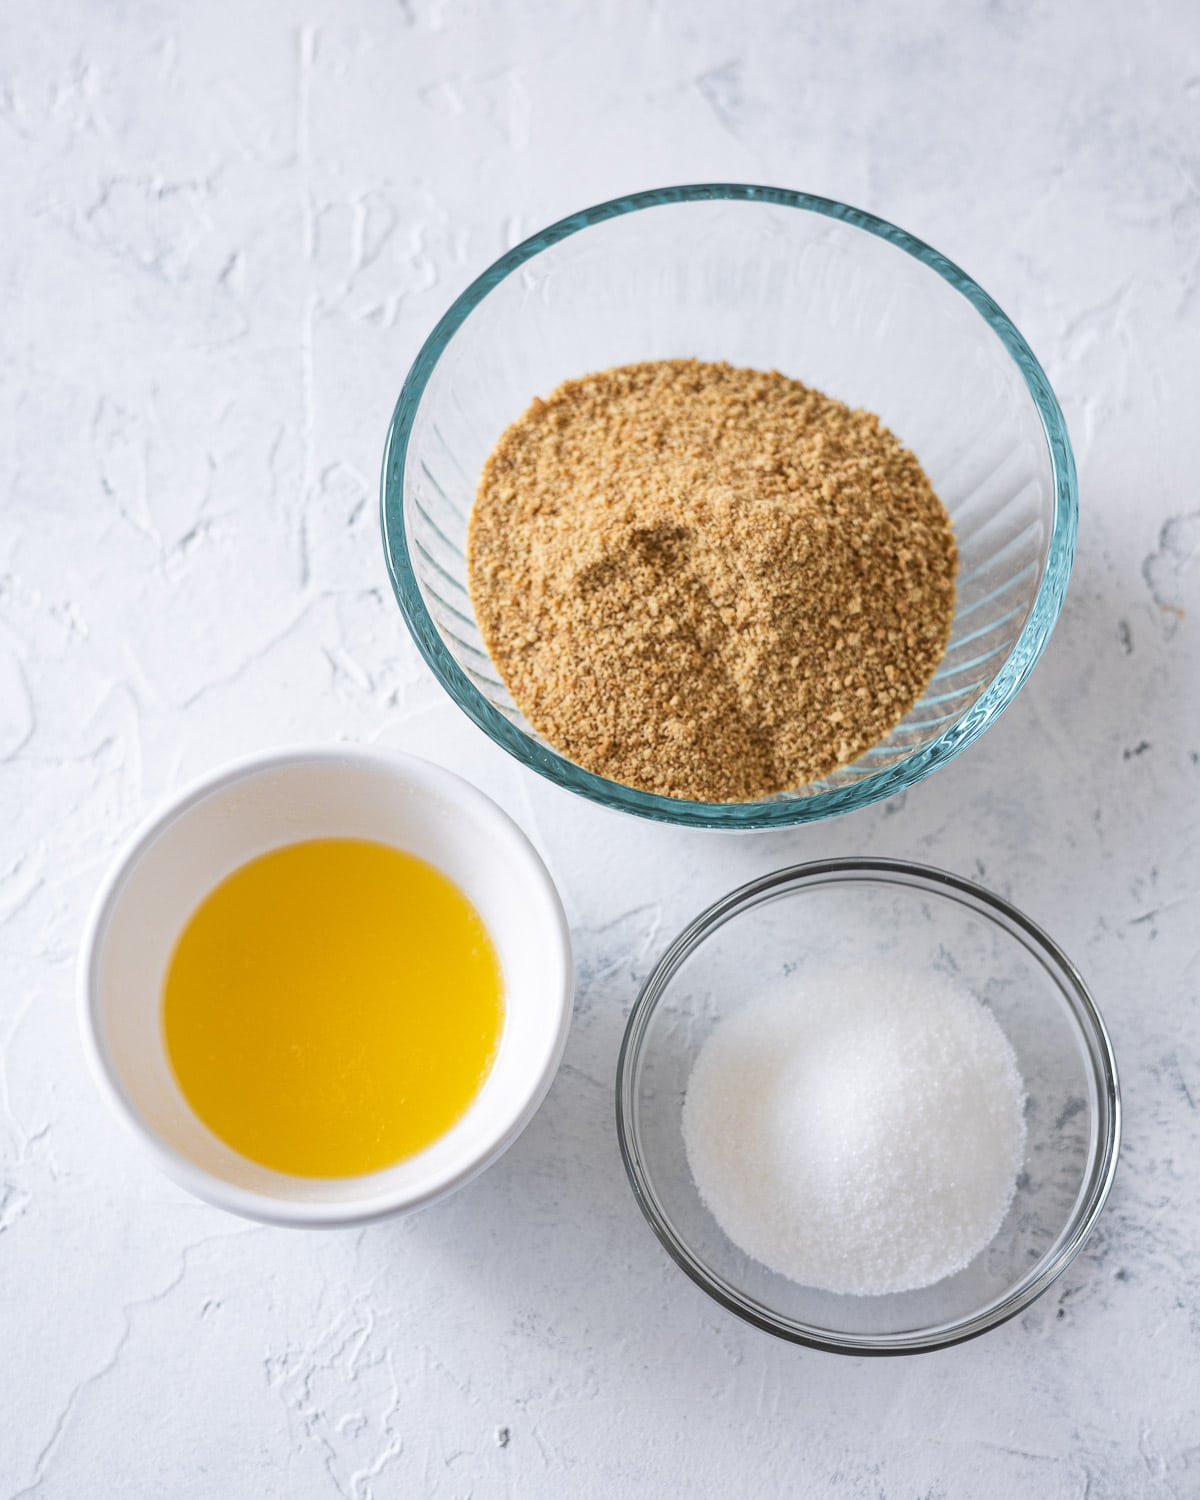
Graham Crackers: Use crushed regular or cinnamon graham crackers for this dessert.
Sugar: Regular granulated sugar.
Unsalted butter, melted: You can melt the butter in the microwave using 10-15 second intervals. Watch for explosions!
To serve:
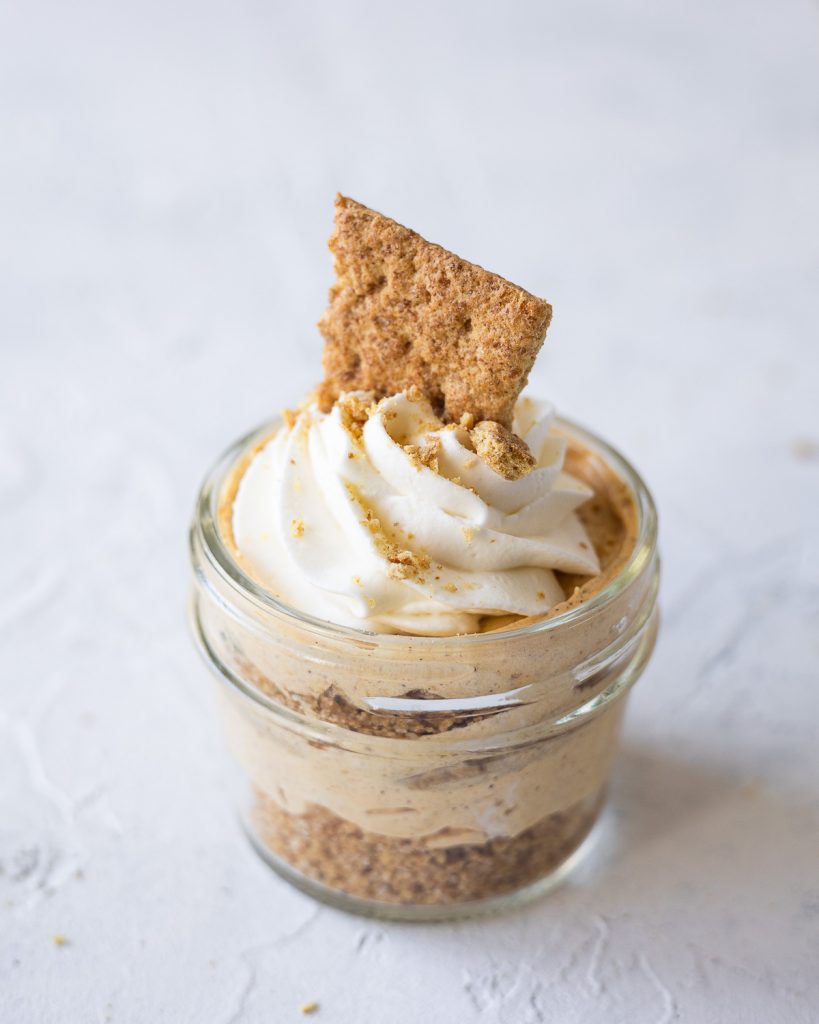
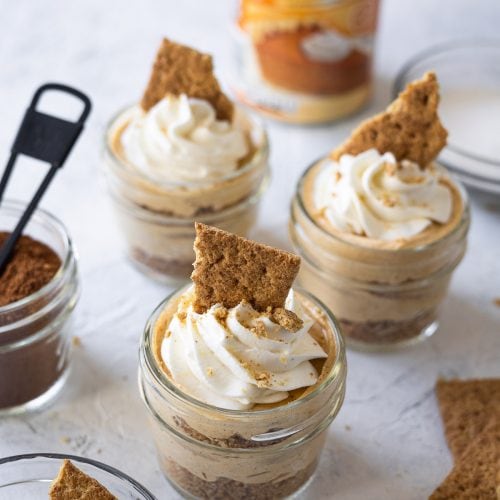
Whipped Cream or Frozen Whipped Topping: Whip up homemade whipped cream to serve (I whipped up 1 cup of heavy cream to top these and had plenty for the rosettes you see in the photos) or go the quicker route and use thawed frozen whipped topping (Cool Whip).
A few crumbles of graham crackers and some shards make a pretty presentation too! Oh–and caramel. Yeeeees.

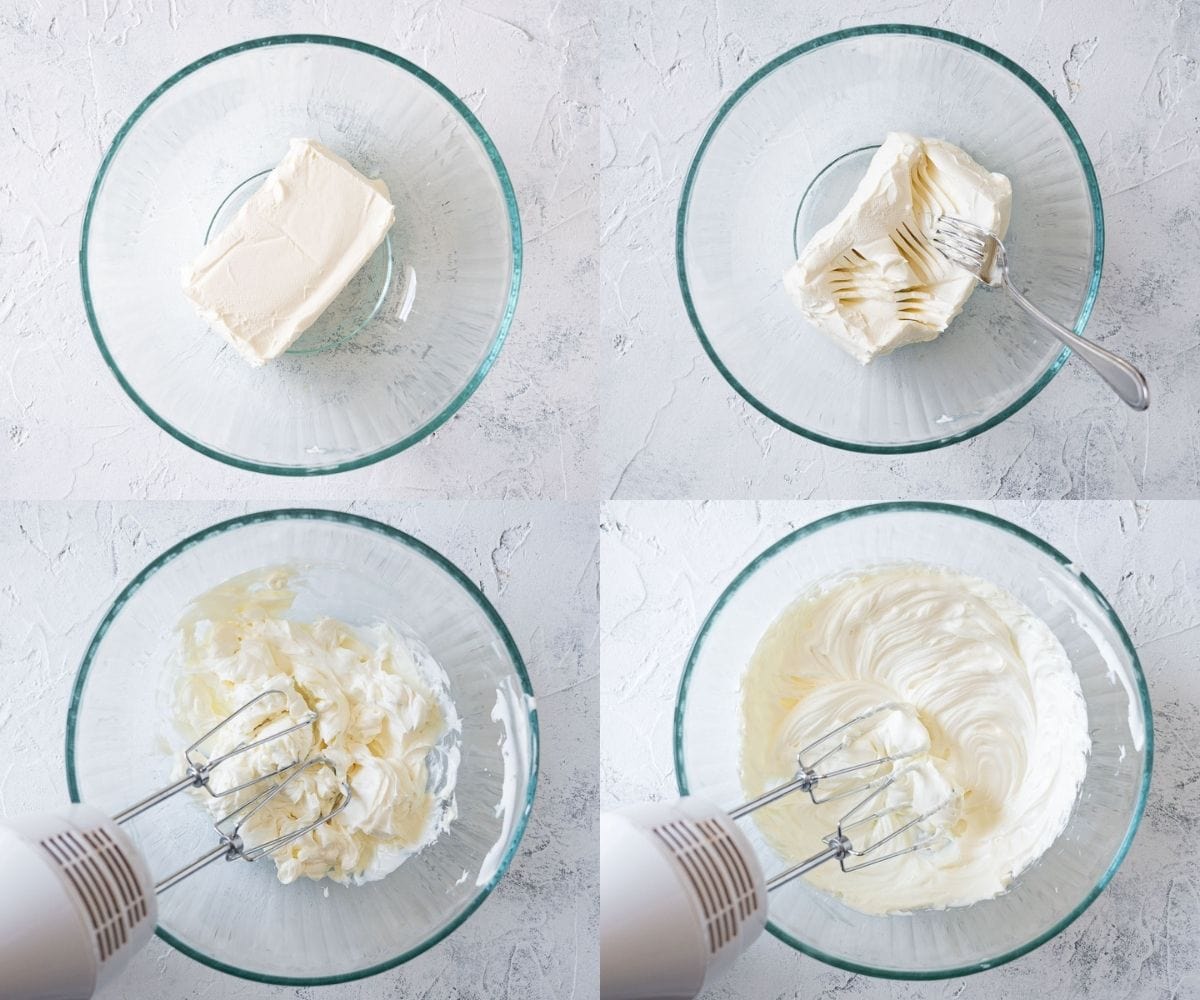
How to Soften Cream Cheese – Microwave Version
This recipe requires softening the cream cheese to start. While there are several easy ways to soften cream cheese, I find that I never remember to remove it from the fridge soon enough in advance. Microwaving it is a quick solution.
Remove the cream cheese from all the packaging, including the foil wrapper of course. Set on a plate or in a bowl and microwave on high for 10 second intervals until softened. After each interval give the brick a little mash with a fork to distribute the heat and prevent hot spots from forming. Don’t accidentally melt the brick.
Once it’s soft, you are ready to use it in your recipe. I avoid reduced fat products here—these can do funny things to your dessert.
How to Make No Bake Pumpkin Cheesecake Mason Jars
I like to include step-by-step photos with my recipes, so this is a quick overview of how to make these mini desserts. Find the complete recipe at the end of this post!
Soften your cream cheese in a bowl (see instructions above) and beat for a minute or two with a hand mixer to ensure it’s soft and free of lumps.
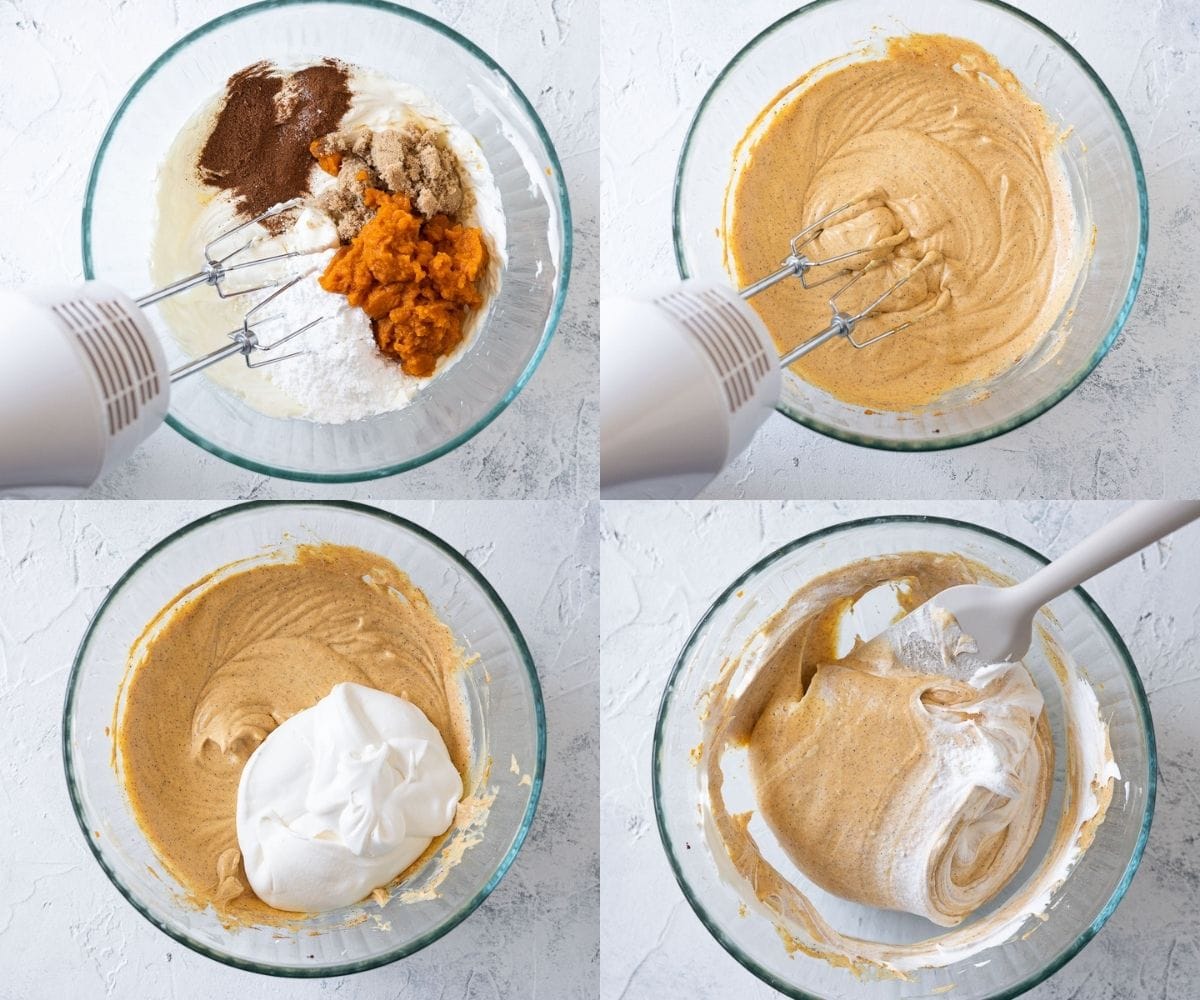
Add in the remaining ingredients for the pumpkin cheesecake except for the frozen whipped topping (it’s going to smell so yummy) and beat until completely combined.
Remove the beaters, grab a spatula, and gently fold in the frozen whipped topping to the pumpkin mixture. At this point it’ll be thick, creamy, and basically irresistible. Set aside.
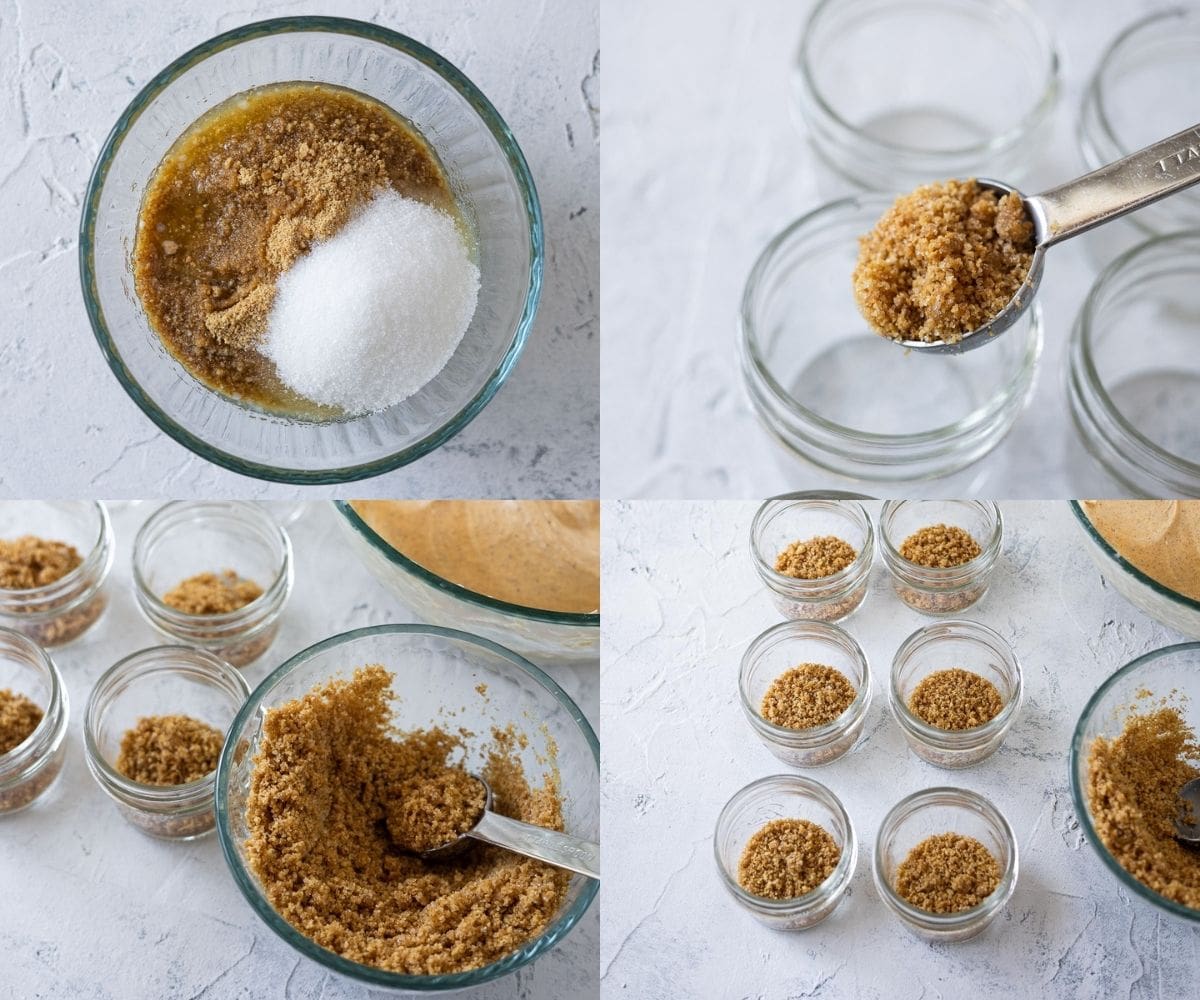
Mix up your crust ingredients: graham cracker crumbs, sugar, and melted butter. Distribute half the mixture onto the bottom of eight 4-oz mason jars. Wiggle the jars to even the crust.
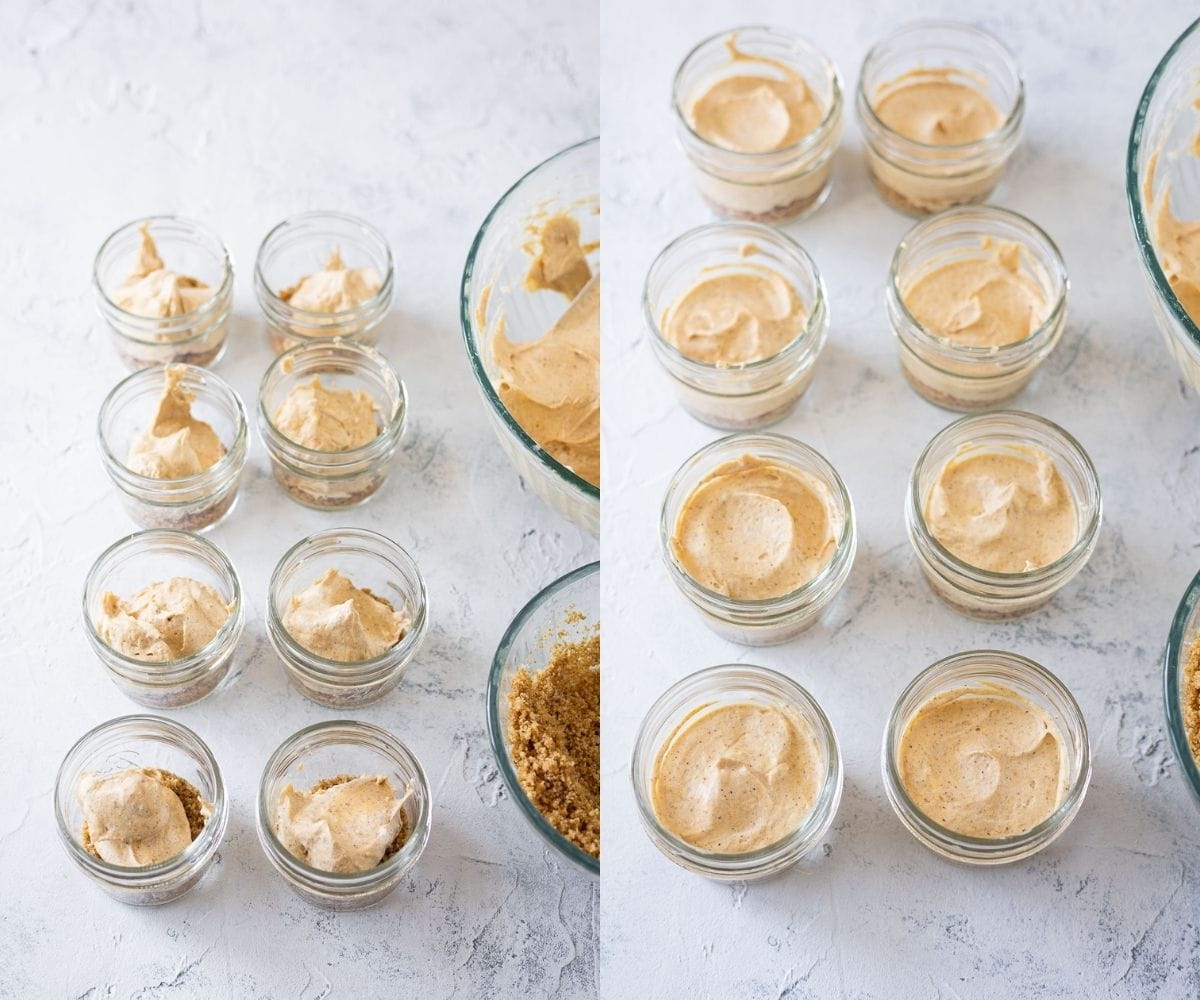
Next, fill jars with a big spoonful of the pumpkin cheesecake filling–about halfway up the jars. You’re aiming to use about half the filling on this first layer.
Here’s a quick tip to smooth the filling: I take my spoon, gently press it down in the jar touching the outside edge and then I hold the spoon steady while I spin the jar with my opposite hand. This gives a smooth top to the dessert. Wipe away any smudges with a damp paper towel if you like.
See the before and after?
Now, layer the remaining crust mixture evenly inside each of the jars. Again, wiggling them a bit to even the crust. Add the remaining filling and repeat the smoothing technique and cleaning up the edges of the jars as needed.
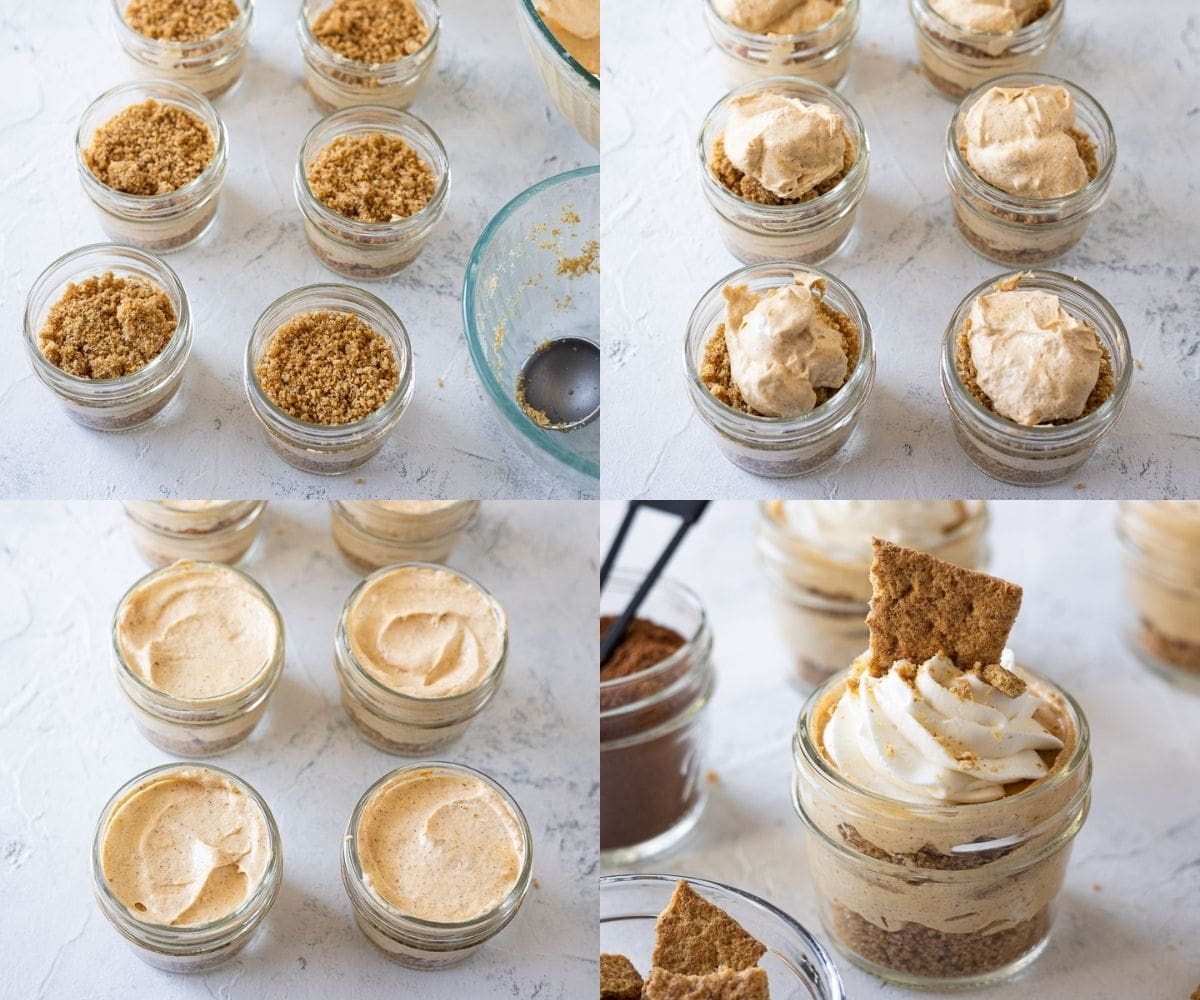
To store: Chill for about four hours or until set.
For serving: I like to pipe a large rosette of whipped cream on top of each dessert. Sprinkle with some graham cracker crumbs and/or drizzle with some caramel sauce too!
More Mason Jar Desserts & Ideas
- Baby Yoda Mason Jar Pistachio Desserts
- No Bake French Silk Pie Mason Jar Desserts
- 15+ Mason Jar Crafts and Décor Ideas
- Pumpkin Pie Spice Mix in a Jar + Printable Gift Tags!
No Bake Pumpkin Cheesecake Mason Jars
Ingredients
Cheesecake Layer
- 8 oz cream cheese (1 package)
- 1/3 cup powdered sugar
- 3 tablespoons brown sugar
- ½ cup pumpkin puree (canned, not fresh)
- 1 teaspoon pumpkin pie spice
- 1/2 teaspoon ground cinnamon
- 1/2 teaspoon vanilla extract
- pinch of salt
- 3/4 cup thawed frozen whipped topping
Crust Layer
- 1 cup graham cracker crumbs (about 7 sheets)
- 3 tbsp sugar
- 4 tbsp unsalted butter melted
To Serve
- whipped cream or frozen whipped topping to serve
Instructions
Cheesecake Layer
- In a large bowl, soften the cream cheese in the microwave using 10 second intervals and stirring/mashing with a fork after each interval (don't overheat). When it's completely soft, beat with a hand mixer for a minute or two to remove any lumps.
- Add powdered sugar, brown sugar, pumpkin puree, pumpkin pie spice, cinnamon, vanilla extract, and pinch of salt and beat until smooth and completely combined (usually around 1 minute).
- Gently fold in the thawed frozen whipped topping using a spatula until the mixture is combined. Set aside.
Crust Layer
- Mix the graham cracker crumbs, sugar, and melted butter together thoroughly.
Assembly
- Line up eight 4-oz mason jars. Fill each one with a heaping tablespoon of the crust mixture. I learned that it is best to avoid smoothing the crust with a spoon (it gets too packed and hard to eat). Instead, lightly wiggle each jar back and forth until the crust evens out.
- Fill jars with a big spoonful of the pumpkin cheesecake filling–about halfway up the jars. You're aiming to use about half the filling on this first layer. To smooth the filling: I take my spoon, gently press it down in the jar touching the outside edge and then I hold the spoon steady while I spin the jar with my opposite hand. This gives a smooth top to the dessert. Wipe away any smudges with a damp paper towel if you like.
- Now, layer the remaining crust mixture evenly inside each of the jars. Spoon about a heaping tablespoon into the jar and wiggle it a bit to shake down the crust.
- Add the remaining filling and repeat the smoothing technique to get a nice smooth top. Again, wipe away any smudges with a damp paper towel. If your jars are getting too full, feel free to eat that last spoonful or two of filling!
- Cover the jars with their lids (or arrange on a small baking tray and cover with plastic wrap and foil if you prefer). Chill for about four hours or until set. You can eat them right away of course, but the texture is best after chilling.
- Store in the fridge until ready to serve. When ready to serve, top with freshly whipped whipped cream or (thawed) frozen whipped topping.I used a large star tip with a pastry bag to pipe rosettes on the top of my cheesecakes (I whipped up one cup of heavy cream and had plenty for this). Sprinkle with a few crushed graham crackers or break a few crackers into shards and stick one in the top of each whipped cream rosette. Caramel sauce is also amazing on these!