How to Underline Hyperlinks (with Kadence Theme)
There’s lots of great reasons to underline hyperlinks in your blog posts, but one of the primary reasons is to help make sure your blog is readable and meets accessibility guidelines. Learn how to underline hyperlinks in one click with the (free!) Kadence WordPress Theme.
Please note that this post contains affiliate links which allow me to earn a small commission when a purchase is made at no additional cost to you. As an Amazon Associate I earn from qualifying purchases. Read more here.
Please note that I am not an expert on the topics discussed in this post, particularly web accessibility and website law. This post has been shared as a resource to hopefully help other bloggers in the quest to make their sites compliant with accessibility guidelines. Read my full terms and conditions for more information about my blog and my complete disclaimer.
Why should my hyperlinks be underlined?
Underlining hyperlinks in your blog is one criteria of meeting WCAG 2.0 (Web Content Accessibility Guidelines). The guidelines are extensive and also include things like larger font sizes and higher-contrast color choices.
Besides meeting the Accessibility Guidelines, there are other benefits to underlining hyperlinks. Making sure your links are clear means more readers will click on them. This benefits you as site visitors follow your links to more of your related content (and as they click affiliate links).
This can even help increase your presence in search results! Google likes to see that readers are visiting more than one piece of content. This can demonstrate that your site is authoritative within its niche.
So, underlining hyperlinks is a functionality and design upgrade on your site that will help you meet WCAG 2.0 guidelines, increase time-on-site, and help your visitors notice (and click) your affiliate links.
There’s certainly plenty to explore in the area of website accessibility, but today I just wanted to focus on a single area that you can improve today–with just one step!
What Are Accessibility Guidelines?
Websites should meet WCAG 2.0 (Web Content Accessibility Guidelines). If they do not, it may mean your website isn’t able to be utilized by all readers–and can even put you at risk for lawsuits. This Medium article is a helpful read if you would like to learn more about accessibility on websites.
Underlining hyperlinks is easy to do if you are using the free Kadence Theme, and helps out your readers quite a bit. In the old web days, hyperlinks used to be blue and underlined. They were obvious, but not very aesthetically pleasing.
These days, we can opt for a color and style that fits our site–but it’s important to make sure the color chosen provides enough contrast to be readable! You can run all your colors (great time to check your font colors) through a contrast checker like WebAIM to ensure your site is readable.
Let’s underline those hyperlinks!
I’m guessing you are here because you are working with the Kadence Theme (yay!). I’ll show the steps in just a minute.
But perhaps you are here because you know your blog links need to be underlined and you have no idea how to get it done. In Kadence this change is a one-click situation. No code knowledge needed. Kadence is so flexible and customizable–as a content creator, I love it!
Don’t have Kadence yet? Grab the free theme here and give it a try. You can also read my list of 10 reasons why I love using Kadence for my blog. Plus, you can use the theme with a gorgeous child theme too.
How to Underline Hyperlinks with the Kadence WordPress Theme
If you are using the Kadence Theme (free or premium), look at the sidebar of your WordPress Dashboard Admin page and find “Appearance”.
Then navigate as follows: Appearance > Customize > General > Colors:
Once you are in Colors you’ll see all the options you have for editing your global color palette and look of your site. At the end of the options, you’ll see the spot where you can change your hyperlink display within posts, “Content Links”.
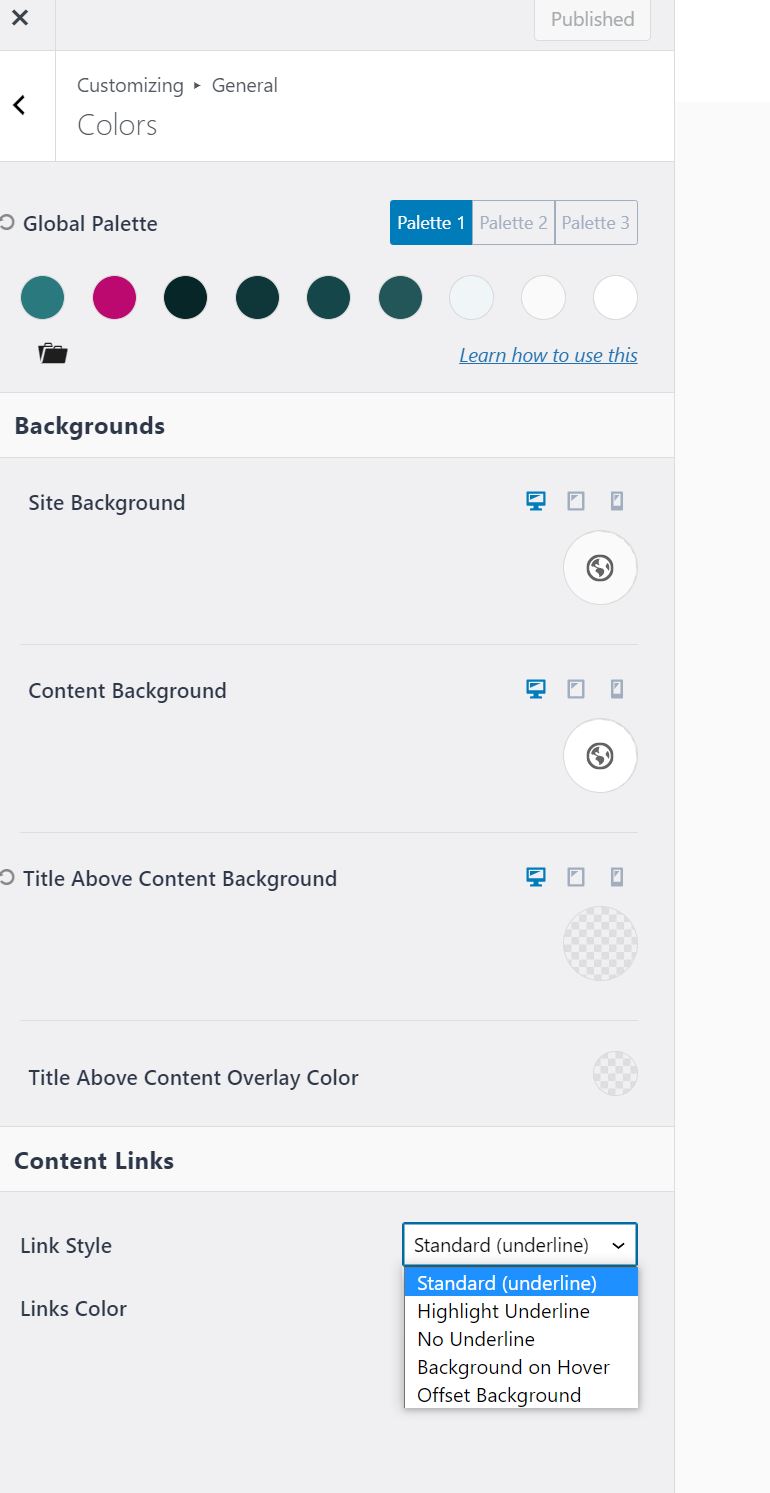
Here you can set your preferred link colors as well as how the underline displays. Standard Outline and Offset Background are probably the most common.
“Offset background” looks nice, but I’m never 100% sure if it fulfills accessibility guidelines and sometimes it can make your links harder to read. I stick with the Standard Underline option for meeting accessibility guidelines.
You can also set your link colors. It’s great to make sure that the link changes color when it is hovered over. Remember to double check the contrast of your colors on the WebAIM Contrast Checker before you publish.

And that’s all there is to it! Just one of the many reasons I love using Kadence for blogging. Hope that helped!
More About Blogging
- The Best WordPress Themes for Craft and DIY Bloggers
- 11 Things I Learned From My First Year Blogging
- My Honest Review of Restored 316 Themes
- DIY Photography Backgrounds for Food and Crafts
- 10 Quick Tips for Running a Successful Blog
Weekly Crafting Fun!
Join my list and get a weekly email with relaxing craft ideas, freebies, sewing tutorials, and more!


Thank you very much 🙂