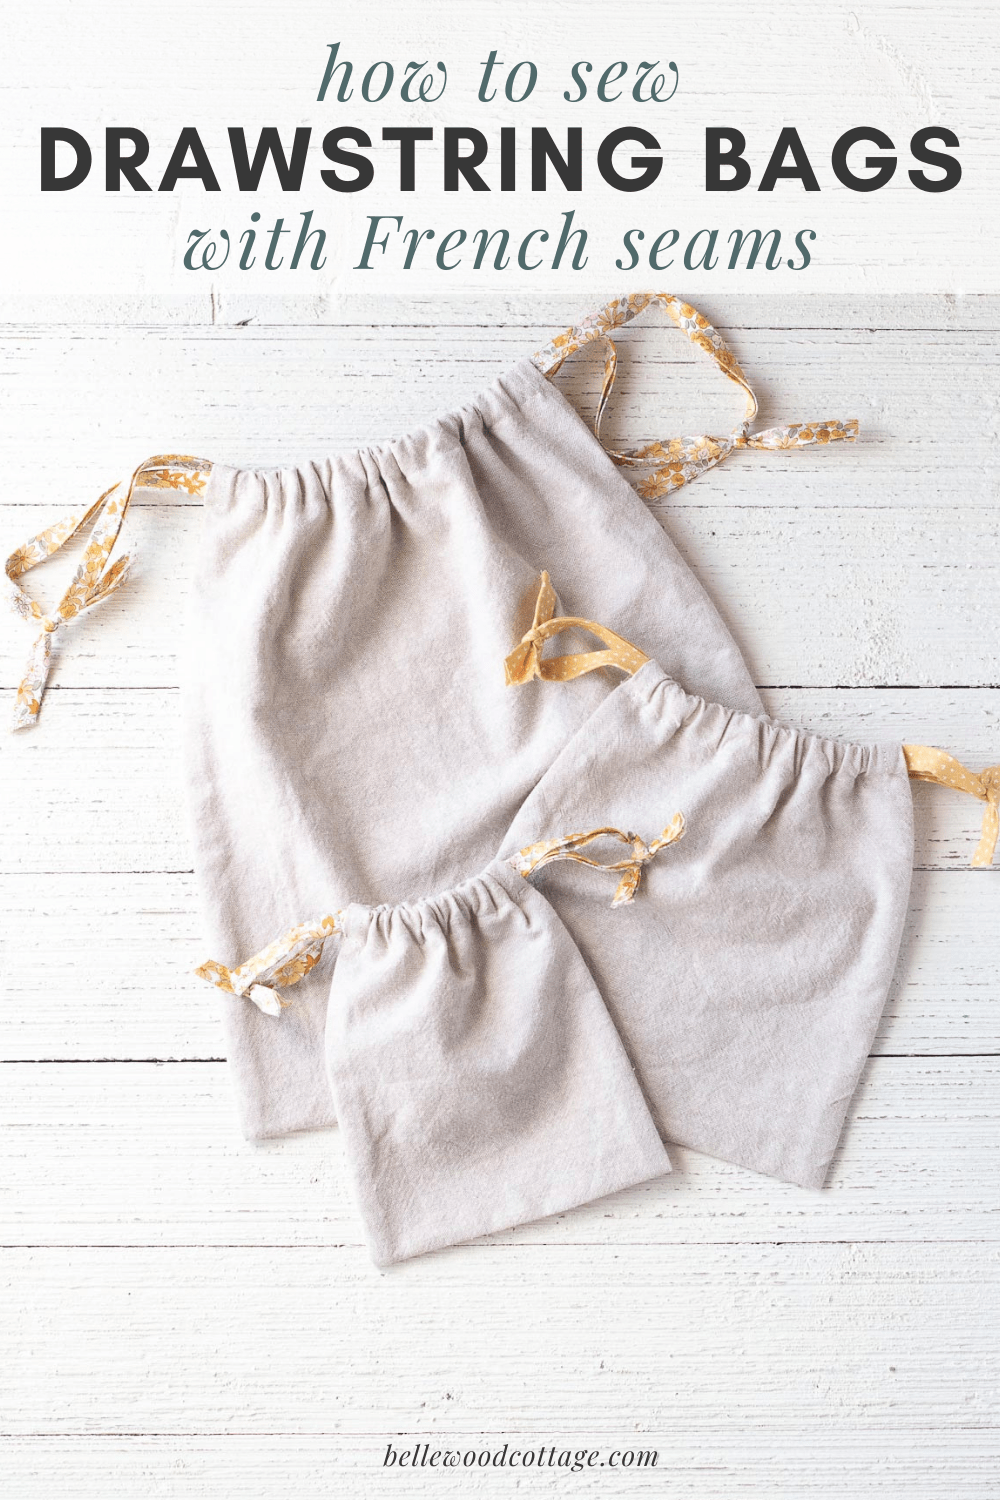
How to Sew a Drawstring Bag with French Seams Tutorial
Learn how to sew a drawstring bag with elegant enclosed French seams. Make any size (or one of the three sizes I’ve provided) and use these bags for homemade gift bags, organizing around the house, or just about anything else you can think of!
Please note that this post contains affiliate links which allow me to earn a small commission when a purchase is made at no additional cost to you. As an Amazon Associate I earn from qualifying purchases. Read more here.
Learning how to sew can be challenging! There is a lot to learn. But, it’s way more fun when you have simple, yet practical, projects you are excited to work on. Bags like these are excellent for beginners–but they are so useful that even advanced sewists will enjoy making them too!
Tip: If you are looking for easy beginner sewing projects, don’t miss my list of Easy Sewing Projects for more ideas!
Weekly Crafting Fun!
Join my list and get a weekly email with relaxing craft ideas, freebies, sewing tutorials, and more!
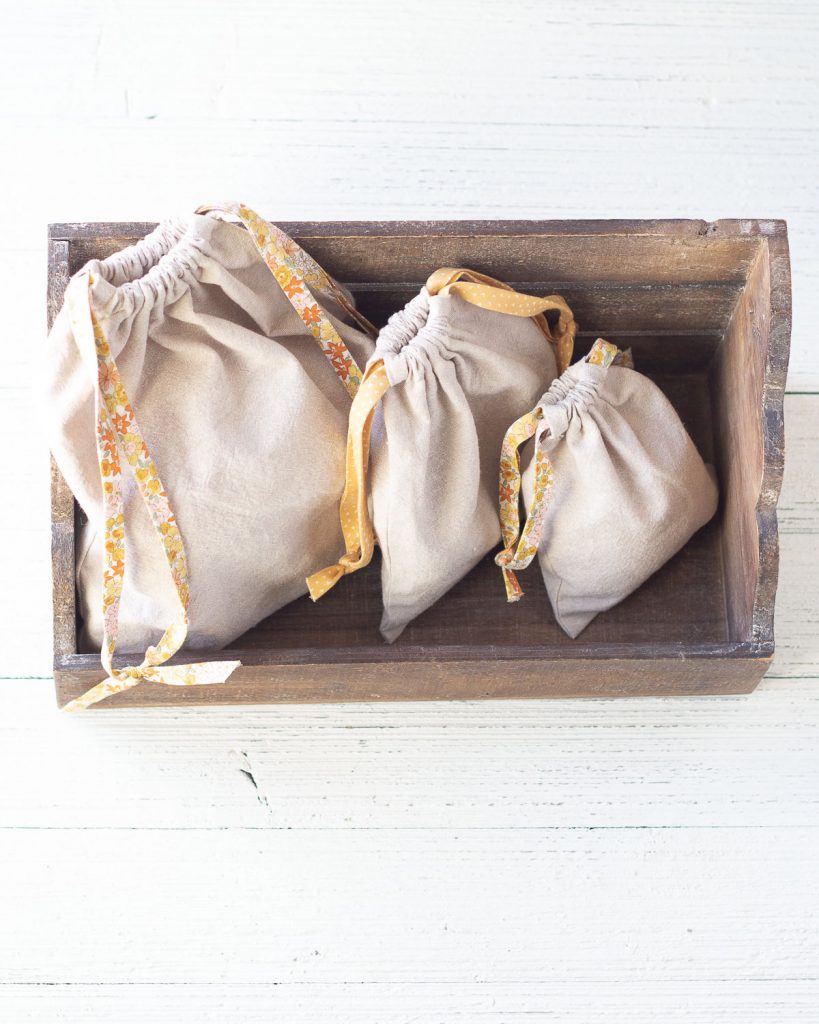
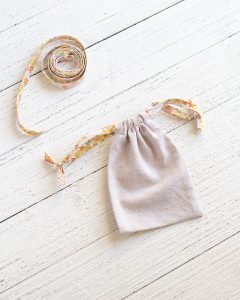
About These Homemade Linen Drawstring Gift Bags
Don’t miss it! Check out the printable instructions and tutorial video at the end of the post!
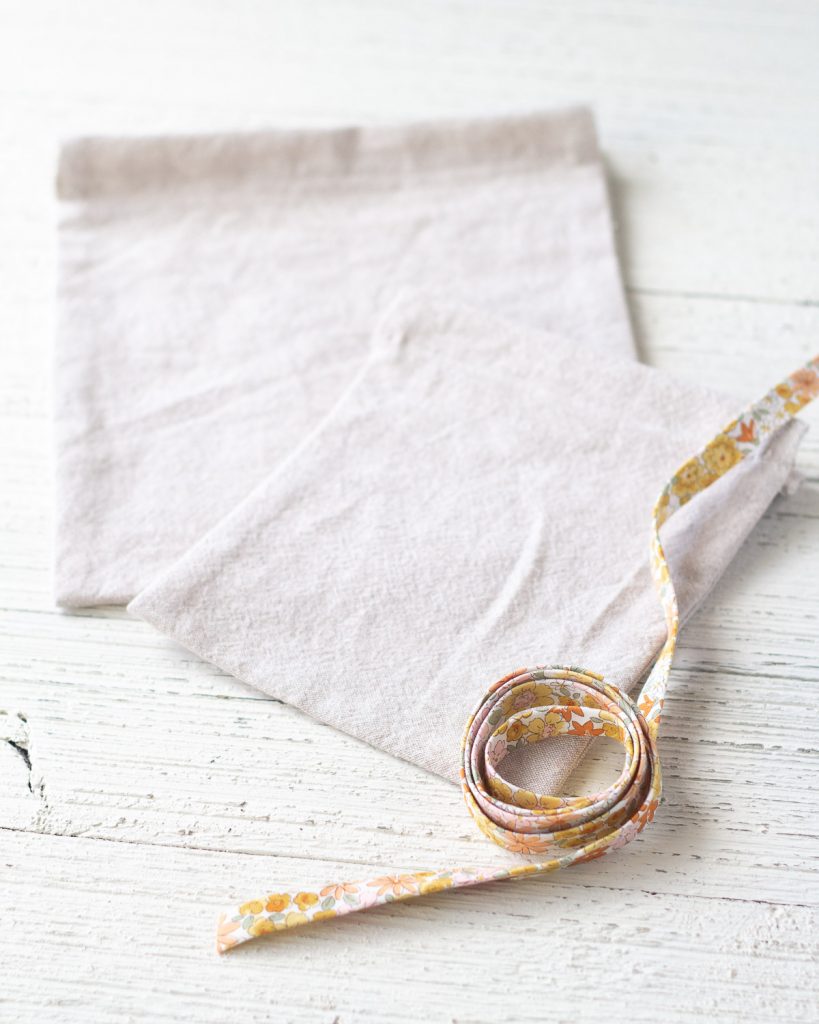
Working with the beautiful handmade bias tapes I found on Etsy inspired me to create these homemade linen gift bags. I loved the idea of reusable linen gift bags for packing small (or large) gifts.

Using a homemade gift bag is a special touch that can then go on to be reused in a variety of ways. Of course, you can really use these bags however you would like!
About the Fabric & Bias Tape I Used
I love this Robert Kaufman cotton/linen blend. I have tried this creamy beige color (“flax”) and this chambray color as well. Both are really soft and beautiful. I like that the fabric is less expensive than a 100% linen.
One yard of this fabric should allow you to make each one of the sizes (small, medium, large) that I have detailed here, depending on shrinkage of course. Always wash first!
I also opted to use handmade bias tape for the drawstrings for these drawstring bags/homemade gift bags because I love the varieties in this Etsy shop so much. If you enjoy making your own bias tape or have leftovers from a recent project, this is a great way to use it up!
With that said, some less expensive alternatives include drawstring cord, ribbon, or even a thin lace trim.
Also see how I made these into Valentine’s Day Gift Bags by using pink linen and lace trim ties!
Supplies You’ll Need
- Linen fabric (see instructions below for dimensions needed)
- Matching thread
- 1/2″ wide double fold bias tape (see instructions for length)
- Ribbon, cord, or lace trim (only if you don’t want to use bias tape)
- Sewing machine
- Fabric pen
- Ruler
- Rotary cutter
- Cutting mat
How to Sew a Drawstring Bag
Basic drawstring bags are easy to sew and are usually constructed with two rectangles (or one long rectangle folded in half) that are seamed together and have a casing at the top to thread a drawstring through.
You can also make lined drawstring bags, which are nearly as easy, but they do use more fabric.
This tutorial is a bit of a spin on those classic designs. Here, I’ll show you how to sew a drawstring bag with beautiful enclosed French seams. No lining needed. It’s easy–I promise! You’ll save fabric, learn a new skill, and create a bag that looks beautiful–perfect for reusable gift wrapping!
How to Sew a Drawstring Bag with French Seams
I’ve included a full step-by-step video and printable instructions (end of post) in this tutorial, but here’s a quick overview of the process:
You’ll cut a long rectangle of fabric, stitch French seams (detailed below–or just follow the tutorial instructions), and leave some unsewn edges at the top of your bag. These unsewn edges later get hemmed and turned down to create a casing for a drawstring.
Thread a drawstring through the casing, trim and knot edges, and you have a beautiful homemade drawstring bag.

What are French seams?
French seams are a simple method of making enclosed seams. You divide your seam allowance amount and stitch each seam twice. You can check out my French seams tutorial for step-by-step instructions that’ll help you learn this technique for future projects too!
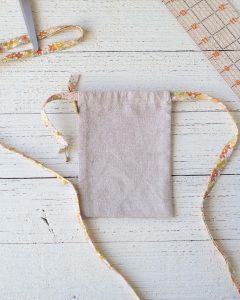
This is what the finished bag looks like in the inside:
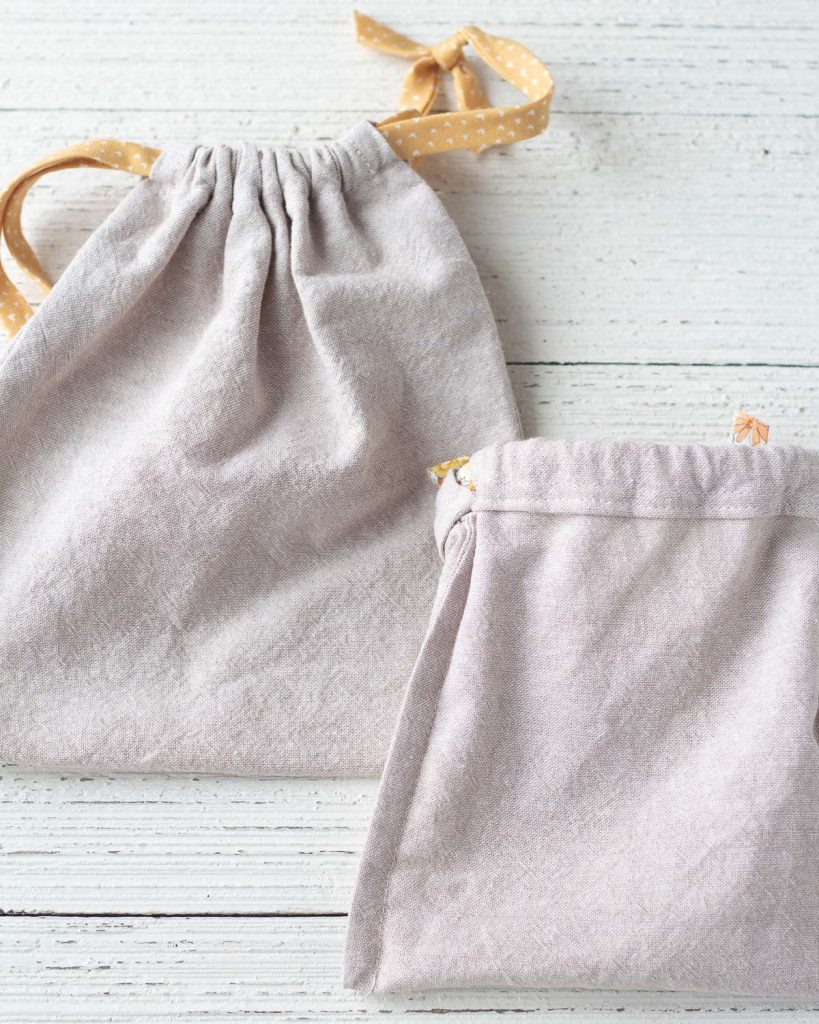
How I Sew French Seams
Divide seam allowance: making sure the seam allowance for the second seam is LARGER than the first. For example, a 5/8″ seam allowance (like in this tutorial) gets divided into a 1/4″ seam and a 3/8″ seam.
Sew twice: Rather than placing right sides together as for a normal seam, you start with WRONG sides together…weird right? Trust me, it works! Sew the 1/4″ seam and then turn out. Now, with RIGHT sides together, stitch the 3/8″ seam. Turn out and voila! Perfectly placed and totally enclosed seams.
It is really important to be aware of the seam allowance you are sewing when making French seams. If the first seam allowance is too large, the unfinished edges will poke out the final seam. Not the end of the world since it will be inside the finished piece, but it’s worth taking a few extra moments to get it right!
This technique is really handy for a situation where you don’t own a serger to finish seams, would like to use a lining but are limited on time or fabric, or are using a delicate fabric that frays easily.
Note: You can also divide your seam allowance and trim the first seam before moving onto the second seam allowance (so it doesn’t poke through). This can be useful if you are working with a pattern than uses a 1/2″ seam allowance for example.
Most tutorials suggest trimming your seams, but I like using the method I explained for this tutorial. If you sew carefully, you shouldn’t have any trouble with seams poking through.
How to Sew a Drawstring Bag in Just About Any Size
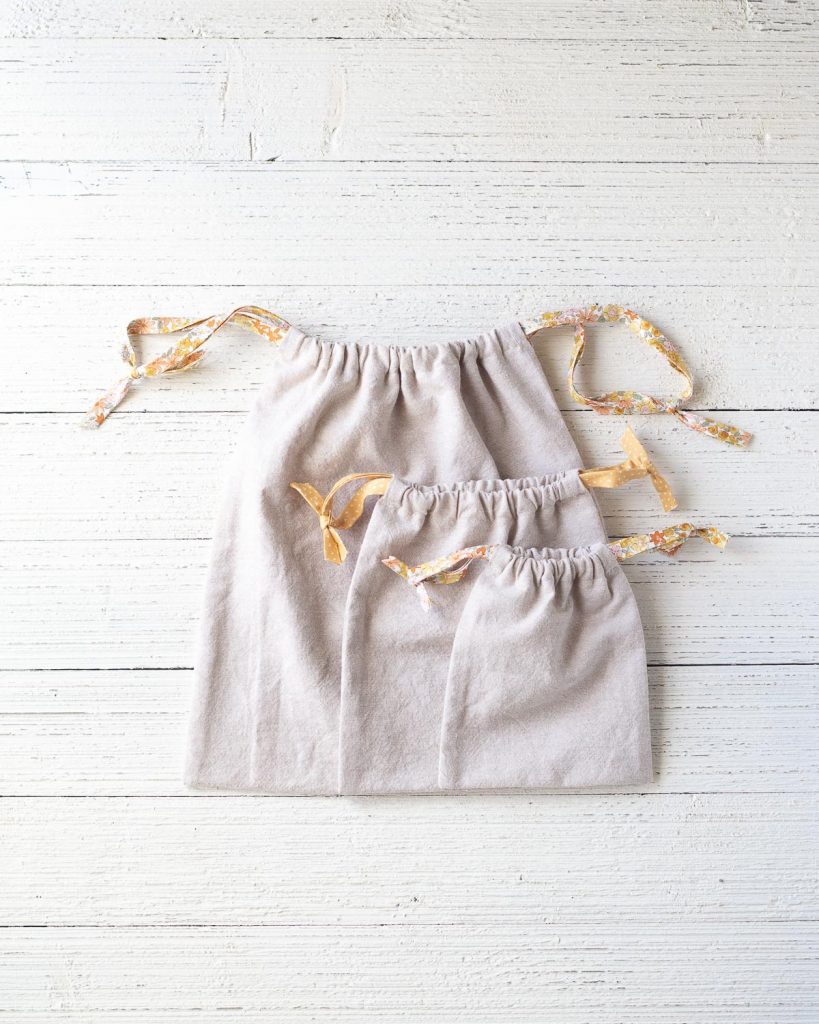
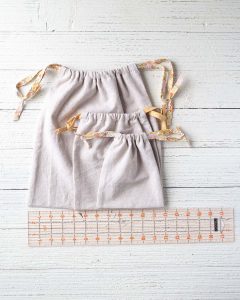
What size can I make these drawstring bags? Pretty much any size you want! I have provided three sizes here, a 6″, 8″, and 12″ bag. I also give instructions for how to create your own sizes.
You might find that sewing anything smaller than a 5-6″ bag could get a little bulky with the casing area (thinner fabric will help you make even smaller bags), and I have not made anything larger than my 12″ large bag, but the tutorial technically scales to any size! It’s more of a method than a pattern, which is great for beginners.
Are These Drawstring Bags Easy Enough for a Beginner?
Yes! You can be very flexible with these bags–if you stitch something a little funky, or accidentally cut your fabric longer/shorter/wider/thinner than you wanted, you will still end up with a drawstring bag at the end. This tutorial is great for those beginners who have used their sewing machine a bit, understand basic sewing terms, and are eager to try a new technique (French seams!).
My best advice if you are new to sewing is to just start. Don’t be afraid to mess up. Maybe grab some basic cotton fabric (that you don’t love) to get started making the first bag and then continue from there.
The skills you need here are essentially just sewing straight seams. French seams might sound intimidating, but they really are easy and give a beautiful result.
Plus, these bags are quick. You can make several in an afternoon. I love easy sewing projects and I hope you enjoy making these handmade gift bags!
What to Use These Handmade Drawstring Bags For?
So many things!
For homemade gift bags: You can use the finished bags for homemade gift bags (I love reusable gift wrapping). The variety of sizes (and thick linen) make them a great choice for packing many gifts.
For organizing: Use these bags to tidy up a dresser drawer (I have a feeling Marie Kondo would approve) or even use a small bag in a purse or backpack to corral essentials.
In the diaper bag: I love keeping a small bag of “diaper bag” toys packed in one of these bags (remember safety–these bags have long drawstrings and should not be given to young children or babies!) to have ready to stash in my diaper bag.
For projects: I don’t knit as frequently as I used to, but when I do have a project on the needles it is always stored in one of these handmade drawstring bags.
For anything else you might use a plastic bag for…get creative and see what you can replace with these reusable linen bags!

How to Sew a Drawstring Bag with French Seams
Tools
- Sewing Machine
- Rotary cutter
- Cutting mat
- scissors
- Safety pin
Supplies
- 1 yard of cotton/linen blend fabric see instructions for exact measurements
- Matching thread
- 1/2 ” wide double fold bias tape ribbon, lace, or cord for the drawstrings
Instructions
Before Starting
- I've provided sizes for three bags in this tutorial. A small 6", medium 8", and large 12" bag. I will note the dimensions and cutting dimensions for each bag here, but the actual construction of the bag is the exact same no matter the size you choose to make. See notes for figuring out how much fabric to cut for a bag in any size.

- Always wash/dry your linen fabric to account for shrinkage before cutting.
- You may want to stitch your bias tape closed before adding it to the bag (especially for handmade bias tapes). This way it won't come unfolded and start fraying if you opt to toss the bag in the wash.
- Don't forget to watch the video. I always find that sewing instructions make far more sense when I can see them, versus reading what I'm supposed to be doing!
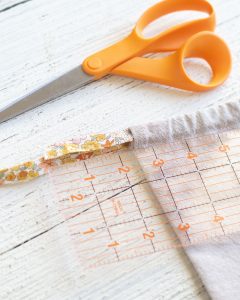
Cutting Instructions
- Finished dimensions do not include the drawstring casing. Seam allowance is 5/8" using French seams. A. Small bag (finished dimensions: 6"x6"): Cut a rectangle of linen fabric measuring 7.25" x 17". Have two 17" lengths of bias tape (or other drawstring) on hand for finishing.B. Medium bag (finished dimensions: 8"x8"): Cut a rectangle of linen fabric measuring 9.25" x 21". Have two 21" lengths of bias tape (or other drawstring) on hand for finishing.C. Large bag (finished dimensions: 12"x12"): Cut a rectangle of linen fabric measuring 13.25" x 29". Have two 29" lengths of bias tape (or other drawstring) on hand for finishing.
Time to Sew:
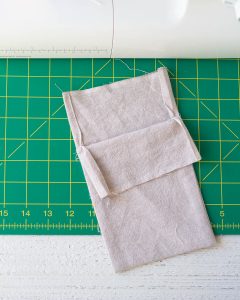
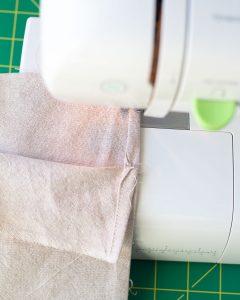
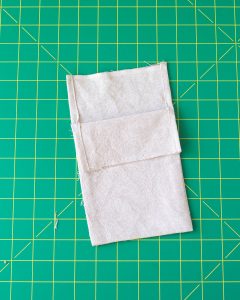
- With WRONG sides together, fold the bottom short edge of your linen rectangle up to meet the top short edge. From the opening, mark down 2.5" on the left and right sides. Stitch 1/4" seams on each side of the bag from bottom to top–stop sewing when you reach the line you have marked. The unsewn edges will be the casing later.
- Trim the corners of the seam allowance carefully at an angle (this makes nice sharp edges to turn out) and turn bag out. Press. Now the RIGHT sides will be together. Re-mark the 2.5" marking you made earlier.
- Stitch a 3/8" seam on each side of the bag from bottom to top–again, stop sewing when you reach that 2.5" mark. This 3/8" seam will completely enclose the earlier seam.
- Turn the bag right sides out. Press.
- You now have four side edges that are raw and need to be hemmed. Fold each of these edges towards the wrong side of the bag, roughly 1/4" over and then a 1/4" again.
- Hem each of the raw SIDE seams this way. Leave the top edges until the next step.
- Here's what it'll look like:
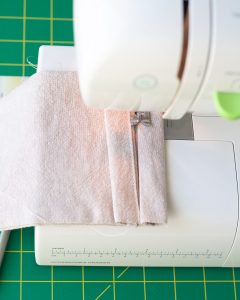
- On the top open edges of the bag, starting with one side, fold down 1/4". Press. Fold this edge down 1/4" again and press. To be honest, I just eyeball this. If you make it too thick, your bias tape might get a little squished when you add it in, so try to be accurate, but it’s really not the end of the world. Repeat on the other edge.
- With the top edge folded over as pressed (1/4" and 1/4" again) stitch the seam. Repeat on the other edge. NOTE: I realized that half the time I make these, I don’t even bother with this seam, instead I just press my fabric well and go right on to the next seam. Feel free to do it whichever way you like. Fold the first edge down in half (it will now line up right where that original 2.5" mark was from the beginning) and stitch. Repeat on the other side.
- Use a large safety pin to thread bias tape through both sides of your bag. When you arrive at the entrance point, measure about 2.5" extra on each side and trim. Use this excess to tie a tight knot.
- Now, starting at the opposite side of your bag, thread the bias tape through again and repeat.
- Trim any excess threads and you are done!
Video
Notes
How much bias tape (or other drawstring) do I need?
Two lengths of bias tape that measure the width of your bag x 2, then add about 5" for tying a knot and leaving some excess. So, the small bag (6") would need two lengths of bias tape about 17" long. Another way to say it is to prepare two lengths of bias tape that each measure the long edge of your cut fabric before sewing.
More From Bellewood Cottage
- Sew These Easy Valentine’s Day DIY Gift Bags!
- DIY Muslin Swaddle Blankets
- How To Bleach Drop Cloths Successfully
- DIY Drop Cloth Pillows with Antique Lace
- How to Sew Baby Bibs from Kitchen Towels
Weekly Crafting Fun!
Join my list and get a weekly email with relaxing craft ideas, freebies, sewing tutorials, and more!


Thank you for this wonderful tutorial! I’m new to sewing and this was my first “project” to try out the skills I’ve been working on. I used the linen you linked to above (in sage) and some beautiful floral bias tape from the etsy shop you linked and am so pleased with the result 🙂 The drawstring pouches are so adorable and were as easy as you said. Thank you for the instructional video! Written instructions can be so hard to follow for sewing. There were two small issues I ran into which I realize were mostly because I’m such a newbie at sewing, but thought I would share here in case any other beginners read this.
The first was sewing over the seamed edges once you’ve doubled them up, and even more so when folding that top down for the final stitch (three layers of fabric with two extra layers on those side edges). I ended up jamming my machine a few times before googling how to sew over edges like that (use other fabric to keep the presser foot level!)
The second small issue was having a hard time threading the bias tape through the small tunnel in the top seam. I eyeballed the 1/4″ both times and think I should have measured instead — I must have been too heavy handed and then there wasn’t as much fabric for that final fold down. If you’re a beginner, measure!
Thanks so much Natalie! =)
I love the tip you offered to keep the machine from jamming! I have that problem whenever I’m sewing with drop cloths and I am going to give it a try next time. I’m so glad you enjoyed making the bags!
~Ellen =)
Hi, I love the look of your bags and would love to make some. However, it seems the link to your tutorial and instructions are missing. Have you taken them down? Thank you!
Hi Astrid! I am so sorry about that! I had kind of a major website issue yesterday and it took some time to get things back up and running. I have now turned the resource back on that displays the printable step-by-step instructions and the video. I hope you enjoy making the bags! =)
Here’s also a direct link to the Youtube video, but I think everything on the post should be normal now! https://youtu.be/jLOm92N4JWs
Thanks for reaching out!
Ellen =)
I think the tutorial is great. I just wonder why you folded down 1/4″ TWICE before folding down your casing. Folding down once would have been enough.
Hi Carol! That is so that the drawstring isn’t rubbing up against a raw edge of fabric inside the casing each time the bag is opened or closed. So mostly just for durability. Feel free to only fold down once if you would like. 🙂
Thanks for stopping by!
~Ellen
Thanks! I am trying to transition from single-use gift wrap to reusable gift bags. I wanted something that was unlined but had no raw edges, so I searched for “French seam drawstring gift bag tutorial” and your tutorial came up. I know how to sew but it’s lovely to have the math done for me along with step-by-step instructions. I found a 40″ square tablecloth at the thrift store made of Christmas quilting cotton and sliced it into three 13″ strips for bags. Much cheaper than buying fabric from the quilt shop and the top hems were already done for me!
I how how you repurposed a tablecloth! Excellent idea. Thanks so much Kim! =)
Thank you for the easy-to-follow instructions for this project. I am making 10 bags for my adult daughter’s kindergarten room to each hold the student’s headphones so the cords aren’t dangling and being stepped on, etc. I did have to modify the 12×12 pattern a bit for the cord casing. I increased it to 3″ so I could insert a latch-hook tool to help thread the cording (left over from when I thought I’d use it for mask making when there was a shortage of elastic). I also used only one cord and knotted the ends to minimize defraying and then knotted the two ends together. Also, after making one bag, I realized the material she gave me is directional so I had to do some thinking on reversing the measurements and sewed 3 sides (so seams looked consistent) so all the rainbows are right side up all the way around. 😊
Thanks so much for your feedback Donna! I’m so glad the tutorial worked out for you! =)
This is a great pattern for shoe bags – I was looking for a pattern with neat seams and edges but without a lining (so shoes can breathe). Linen is my go-to for nearly everything! Thanks for this instruction!
Thank you for a great tutorial,it looks easy.
Love it.
Amazing tutorial, your linen drawstring bags turned out so cute! I’ve featured your tutorial on Crafts on Display. I hope you enjoy it, and keep up the amazing work! https://craftsondisplay.com/sewing/bags-and-purses/diy-drawstring-bags-158018/
Thank you so much for your kind words! I’ll check it out! =)
Thank you for this post and especially the video. I have about 10 tutorials on making a drawstring bag pinned on Pinterest but I could not understand how to the the strings to “draw” (for some reason it just wasn’t clicking for me 🤦🏻♀️). But watching your video finally made it click that I had to thread one strand through both sides going one way and then do the opposite with another strand. I made my first bag in about half an hour (not counting the time I spent fighting with my sewing machine 😆)! Anyway, thank you so much!
Oh yay! I’m so glad the video helped! =) Thanks so much for taking the time to leave such a kind comment!
~Ellen
Wonderful tutorial…many thanks!