Key Lime Pie Mason Jars (No Bake)
Looking for an easy dessert to prepare for large gathering like a baby shower or wedding shower? Key Lime Pie Mason Jars are an easy no bake dessert recipe that you can prepare ahead of time.

Everyone will love the sweetness and tanginess of the lime filling (and they are so darn cute too!). I’ve made things extra quick and easy for you by opting for bottled lime juice in the filling and a simple 3-ingredient graham cracker crust.
Pair these jars with other cute desserts in jars, including French Silk Pie Jars, Oreo Jars, and Pumpkin Cheesecake Jars for a spread of single serving desserts your guests will love!
Fellow Crumbl Fans!
Join my list and get a weekly email with fresh Crumbl news, delicious copycat recipes, and more!
Desserts in jars are a fun way of serving dessert. It’s great for parties where you don’t want to be stuck in front of cakes cutting messy slices and trying to plate up dozens of desserts. Mason jar recipes are some of my favorites!
Do I Need Key Limes to Make a Key Lime Dessert?
The answer I’ve settled on for this question is no. I highly suggest reading this extremely informative piece on Key Limes from Stella Parks if you are curious to learn more. For this recipe I use a high-quality bottled lime juice that is more easily sourced, but still perfectly delicious and provides all the lime flavor you are looking for.

Ingredients You Will Need
Graham Cracker Crust: Three ingredients are all you need for a graham cracker crust. Graham crackers, granulated sugar, and unsalted butter.
Key Lime Filling: For the lime filling, you will need heavy whipping cream, sugar, cream cheese (brick-style only!), sweetened condensed milk (from a can), bottled lime juice, and the zest of 1-2 limes. Again, conventional limes work great here.
Leftover sweetened condensed milk:
Be sure to grab a can of sweetened condensed, not evaporated milk. We will only need 1/2 the can for this recipe so if you want to use up the entire can you can double the recipe.
Or, use the leftover sweetened condensed milk for sweetening coffee or pouring over pancakes or waffles.
A few notes about bottled lime juice:
Key Lime juice is excellent if you can find it, but sometimes it’s hard to find or crazy expensive. I use a high-quality lime juice (Santa Cruz Organic) that seems to work well (paired with some lime zest too). If you opt to use fresh lime juice, I suggest tasting the filling as you slowly add the lime juice (and zest) to achieve your ideal flavor.
Leftover lime juice:
If you have leftovers of the lime juice, simply pour it into ice cube trays and freeze. Pop the cubes out and store in freezer bags. So handy next time you need a tablespoon or two of lime juice for a recipe.

Why You Should Make This Recipe
- No Bake Filling: I love a no bake filling–it’s so easy!
- Easy to Serve: Skip the hassle of cutting desserts. Everything is ready to go with these individual mason jar desserts.
- Ideal Portion Sizes: The 4-ounce jars are the perfect dessert serving (about a slice of pie).
- They Travel Well: Desserts in jars travel well. Just top them with their lids and keep chilled while traveling. When ready to serve, remove the lids and top with the whipped cream and a slice of lime if desired.

How Many Desserts Does This Recipe Make?
This recipe makes eight individual dessert jars. These are 4-ounce “mini” mason jars. The servings are about the same as a slice of pie and the recipe is easily doubled for more jars.
If you want larger desserts, double the recipe and do two layers each of crust and filling in 8-ounce mason jars.
Where to Buy the Dessert-Size Mason Jars
I like buying these small 4 oz mason jars for my desserts. You can also get the “quilted” 4 oz jars which are very cute and festive too.
Note: While you can purchase jars online, I usually get my jars locally if I can–they are often less expensive that way.
How to Make Key Lime Pie Jars
This is an overview of the recipe. Find the complete printable recipe at the end of the post!
Key Lime Pie Filling
Since the Key Lime filling needs to chill before filling the jars, we will start by preparing the filling.
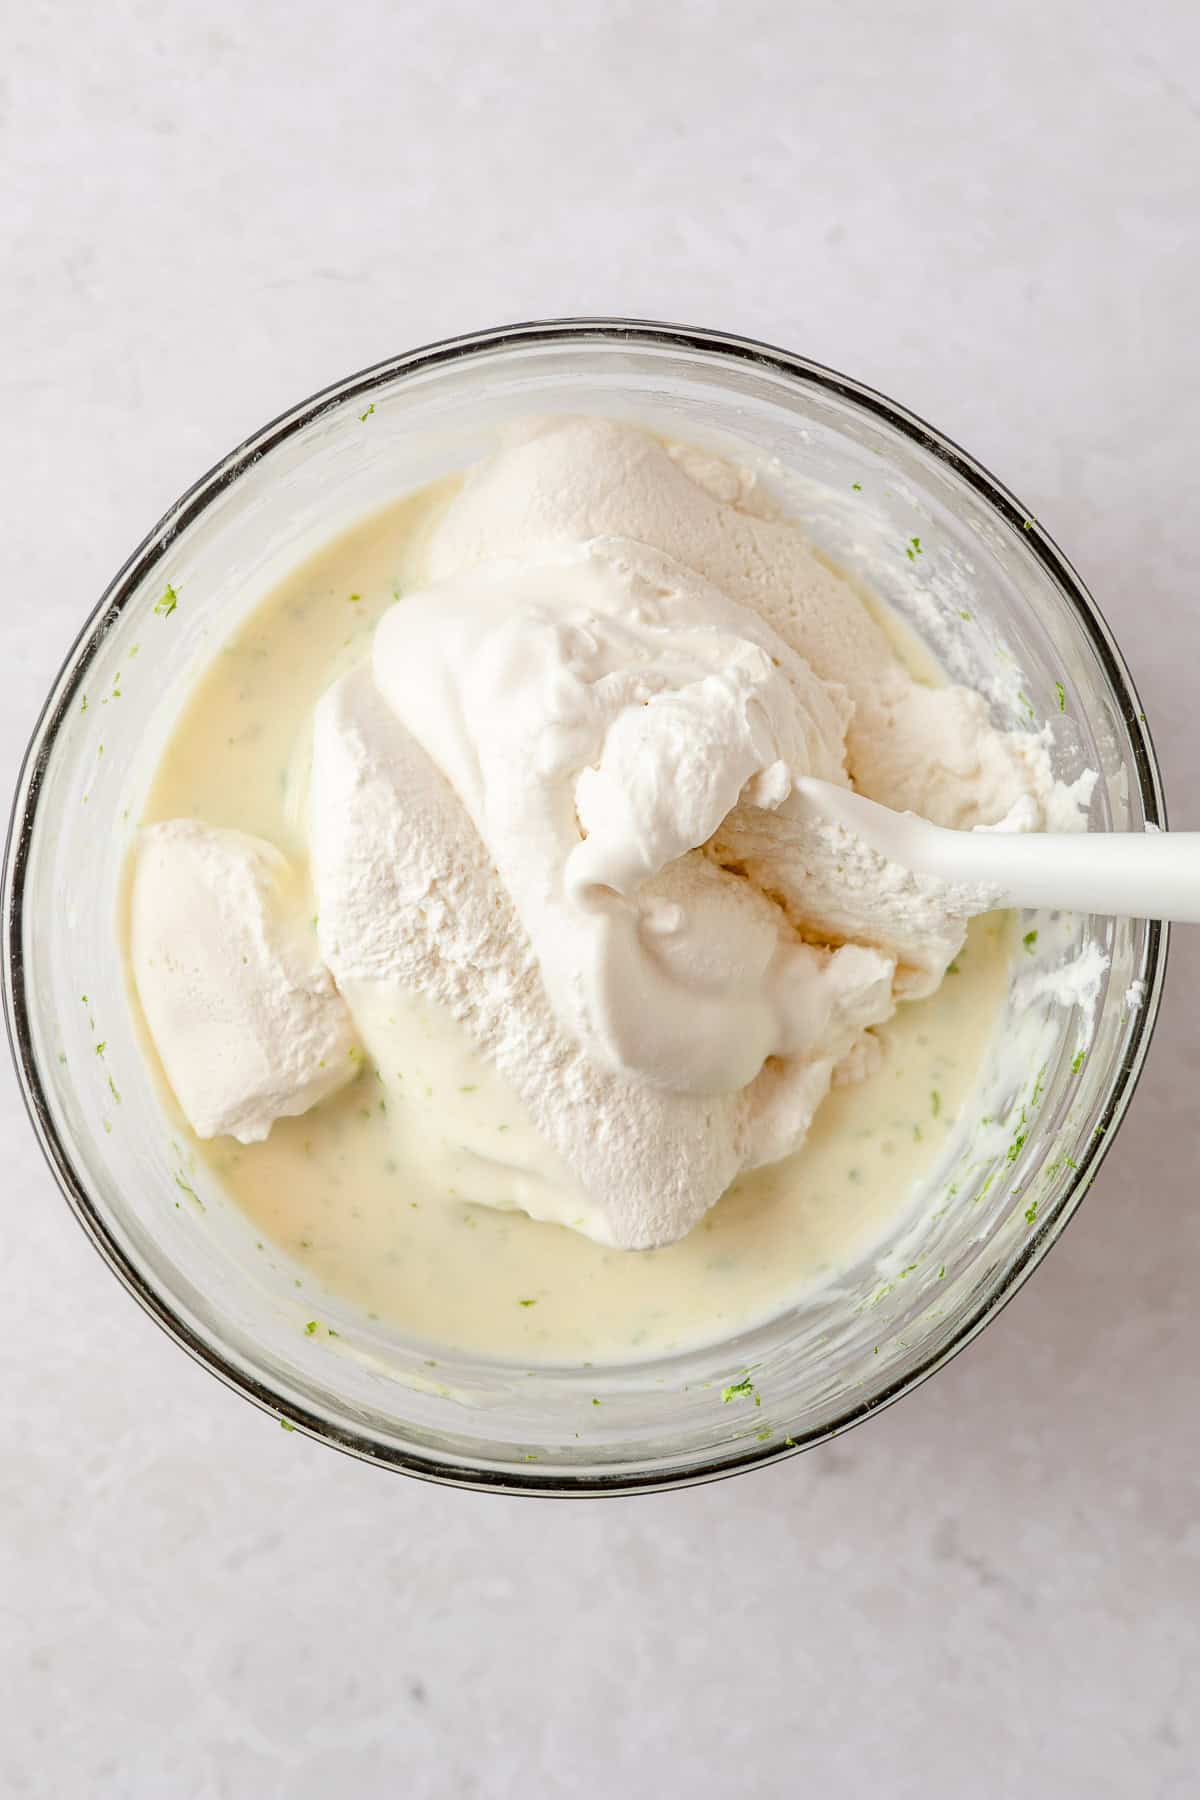
First, whip the heavy cream to stiff peaks and set aside.
Then, whip the cream cheese until smooth. It’s important that the cream cheese be soft before beginning. Mix in the sweetened condensed milk and then the lime juice, slowly, until the mixture is smooth.
Taste test the mixture as you add the lime juice and lime zest and add these ingredients to taste.
Fold in about 3/4 cup of the whipped cream (reserving the rest for topping the jars) and chill the mixture for 6 hours (longer or even overnight is fine too).
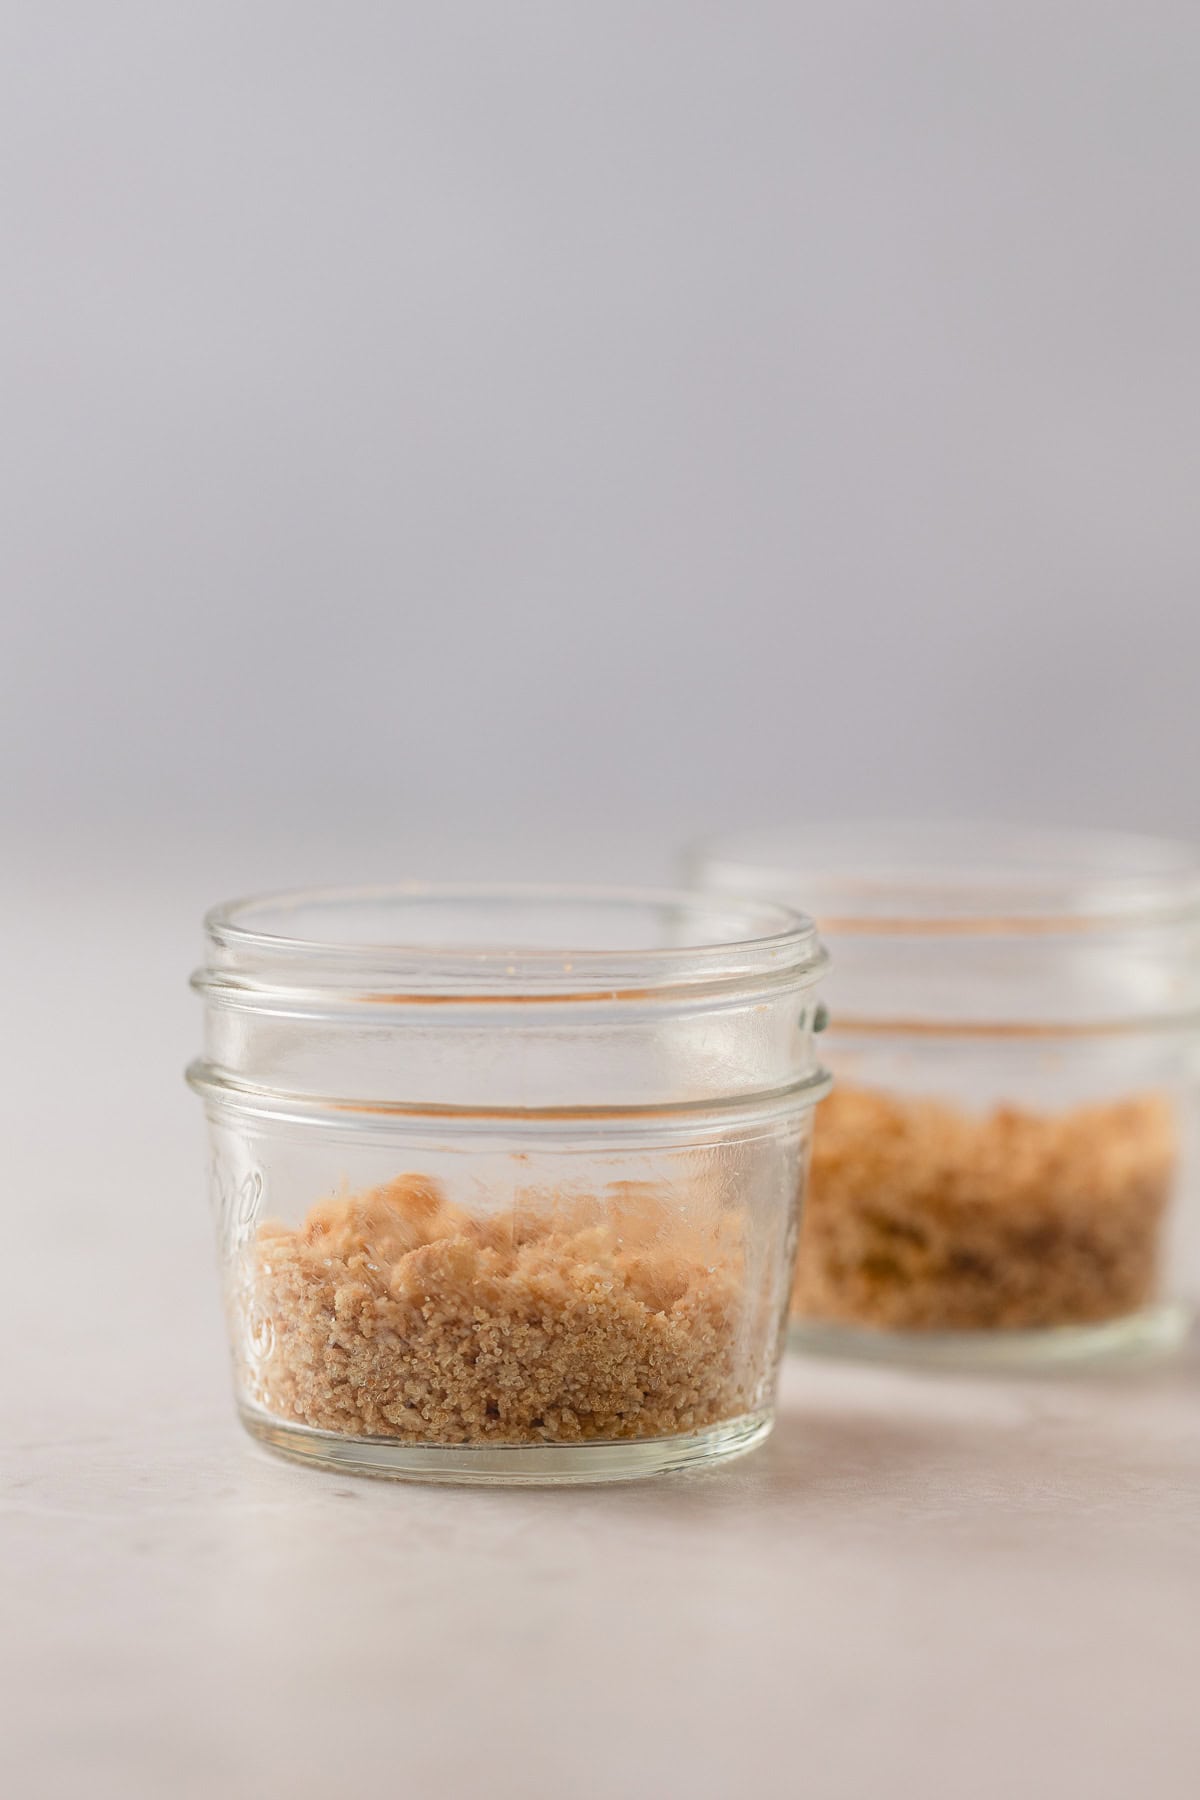
Crust Layer
Once the mixture has chilled prepare the graham cracker crust. Mix the graham cracker crumbs, sugar, and melted butter together. Divide evenly among eight 4-oz mason jars.
Assemble the jars by scooping the filling evenly into the crust-lined jars.

Top with a piped rosette of whipped cream. Sprinkle with additional lime zest and/or lime slices if desired.

How to Make Key Lime Pie Jars Ahead of Time
How to Make Ahead: These jars will keep for five days in the refrigerator, but I suggest assembling the jars up to 24-48 hours in advance for the ideal flavor and texture. Add the whipped cream rosettes just before serving.
Note that I suggest chilling the filling for 6 hours before assembling the jars. You can chill it longer, even overnight, if that fits your schedule better.
How to Freeze: I have not frozen these jars, but if you have leftovers you can’t finish you could certainly try it. I think it would work fine!
Don’t forget! Try some of my other mason jar dessert recipes too!
If you loved this recipe, leave a comment and a 5-star rating!
I would so appreciate it!

Key Lime Pie Mason Jar Desserts (no bake)
Ingredients
Key Lime Pie Filling
- 2/3 cup heavy whipping cream
- 2 tablespoons granulated sugar
- 8 ounces cream cheese, softened
- 7 ounces sweetened condensed milk (half of a standard can)
- 1/4 cup bottled lime juice (I use Santa Cruz Organic)
- zest of 1-2 limes (to taste) (I use Persian limes)
Crust Layer
- 1/2 cup graham cracker crumbs about 3.5 full sheets
- 1 1/2 tablespoons sugar
- 2 tablespoons unsalted butter, melted
Instructions
Key Lime Pie Filling
- Use a hand mixer with the whisk attachment to whip the heavy whipping cream with the sugar until stiff peaks form. Set aside.
- Use a hand mixer with the beater attachments to whip the softened cream cheese until smooth. Then, add the sweetened condensed milk and mix until smooth. Slowly add lime juice, mixing after each addition. Mix until smooth. Note: If using a different brand of lime juice (or fresh limes) I suggest taste-testing the mixture a few times as you add the lime juice to ensure the flavor is just right. Fresh limes tend to be bolder and brighter than store-bought juice.
- Use a spatula to gently fold in the lime zest to taste. Add as much as you like–you may not want the full amount. Fold in about 3/4 cup of the whipped cream (reserving the rest for topping the jars) until the mixture is smooth. Chill for 6 hours (longer or even overnight is fine).
Crust Layer
- After mixture has chilled, prepare the crust. In a small bowl, mix the graham cracker crumbs, sugar, and melted butter together thoroughly. Divide mixture evenly among eight 4-oz mason jars and gently wiggle each jar to even out the crust. I avoid packing it down as it makes it hard to eat later.
- Scoop the filling evenly into the crust-lined jars, about 1/3 cup of filling per jar. Fill a piping bag with the remaining whipped cream (use a large star tip) and pipe a star or rosette on top of each jar. Sprinkle with additional lime zest if desired.
Notes
Nutrition
Fellow Crumbl Fans!
Join my list and get a weekly email with fresh Crumbl news, delicious copycat recipes, and more!

Hey, it’s Ellen here! This recipe is a favorite because I love how cute these little desserts are (and delicious too) and they are wonderful when you want an easy-to-serve individual dessert option at large gatherings. If you give it a try I’d love to hear your thoughts!
I made these for a picnic back in May 2025 and now my niece wants them served as part of the desserts at her wedding this upcoming weekend. 🙂 They are balanced and delicious- Thank you!
Aw, thank you so much for this kind review! =)
Hello from New Hampshire,
Have you tried using fresh lemon juice instead of bottled lime juice? I like the Santa Cruz lime juice but I like fresh lemon too.
Thanks,
Martha
Nelson, NH
Hi there! I haven’t, but that does sound like a yummy adaption. I will have to try it next time I make this recipe. If you give it a try, let us know! =)
~Ellen