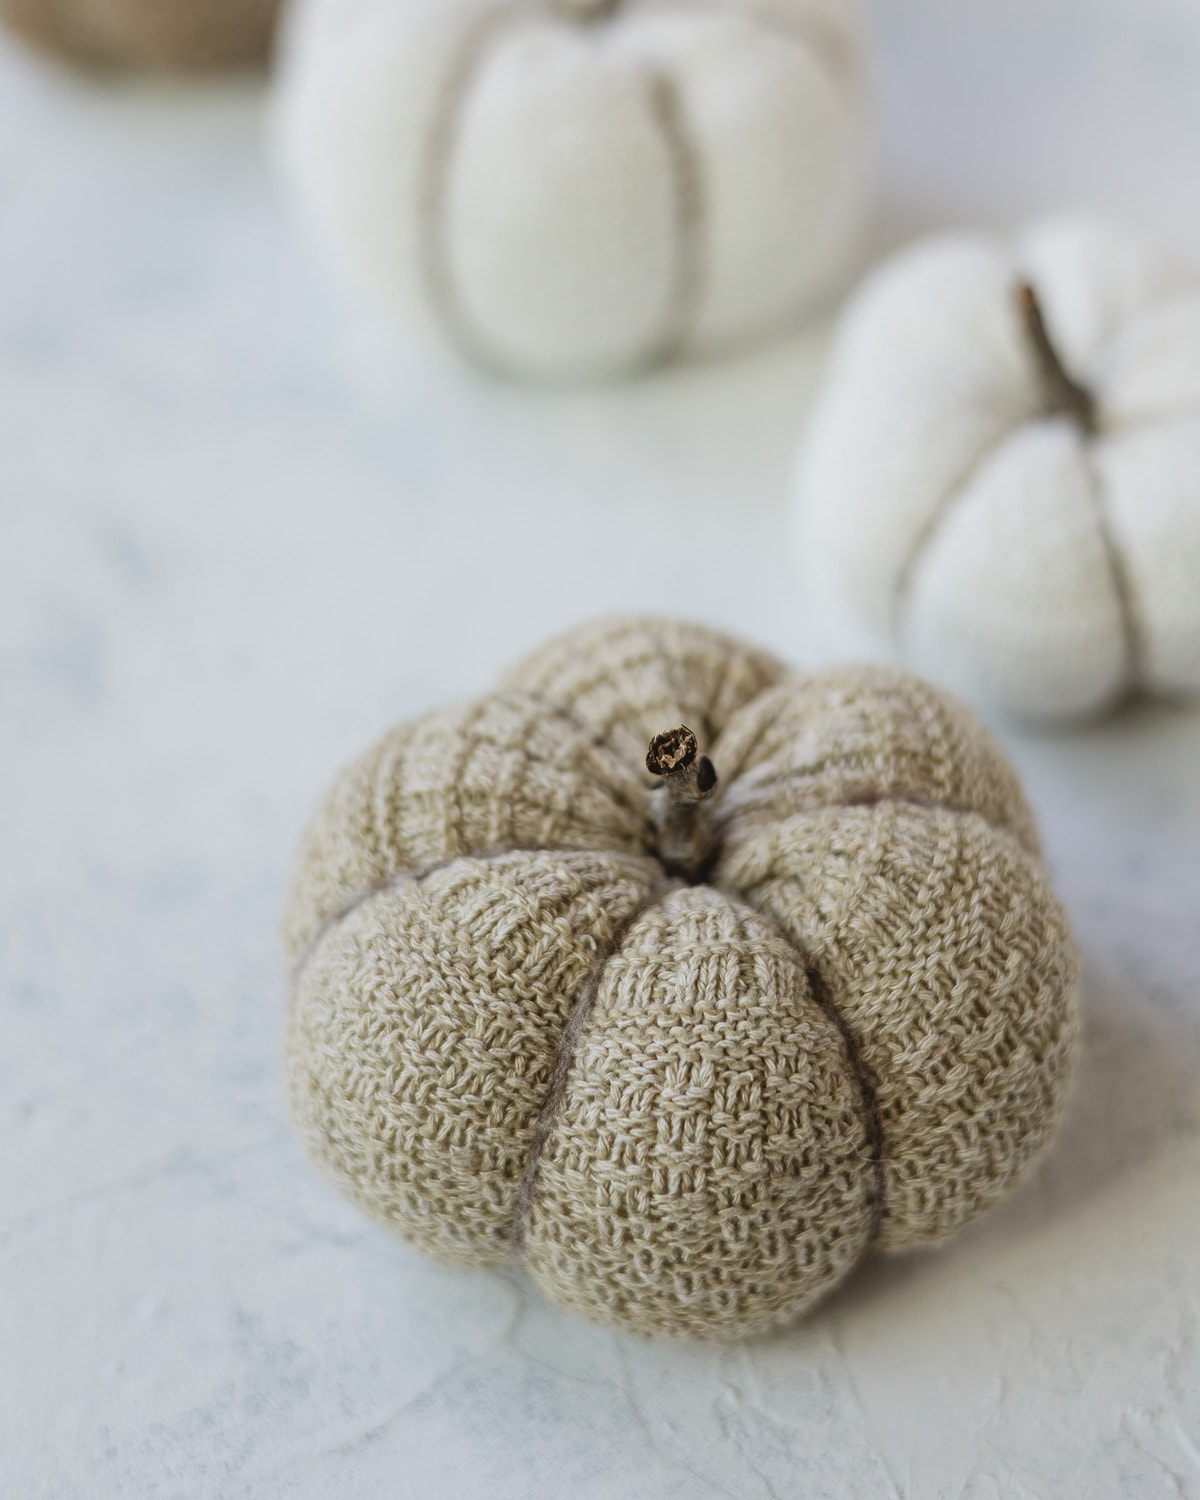
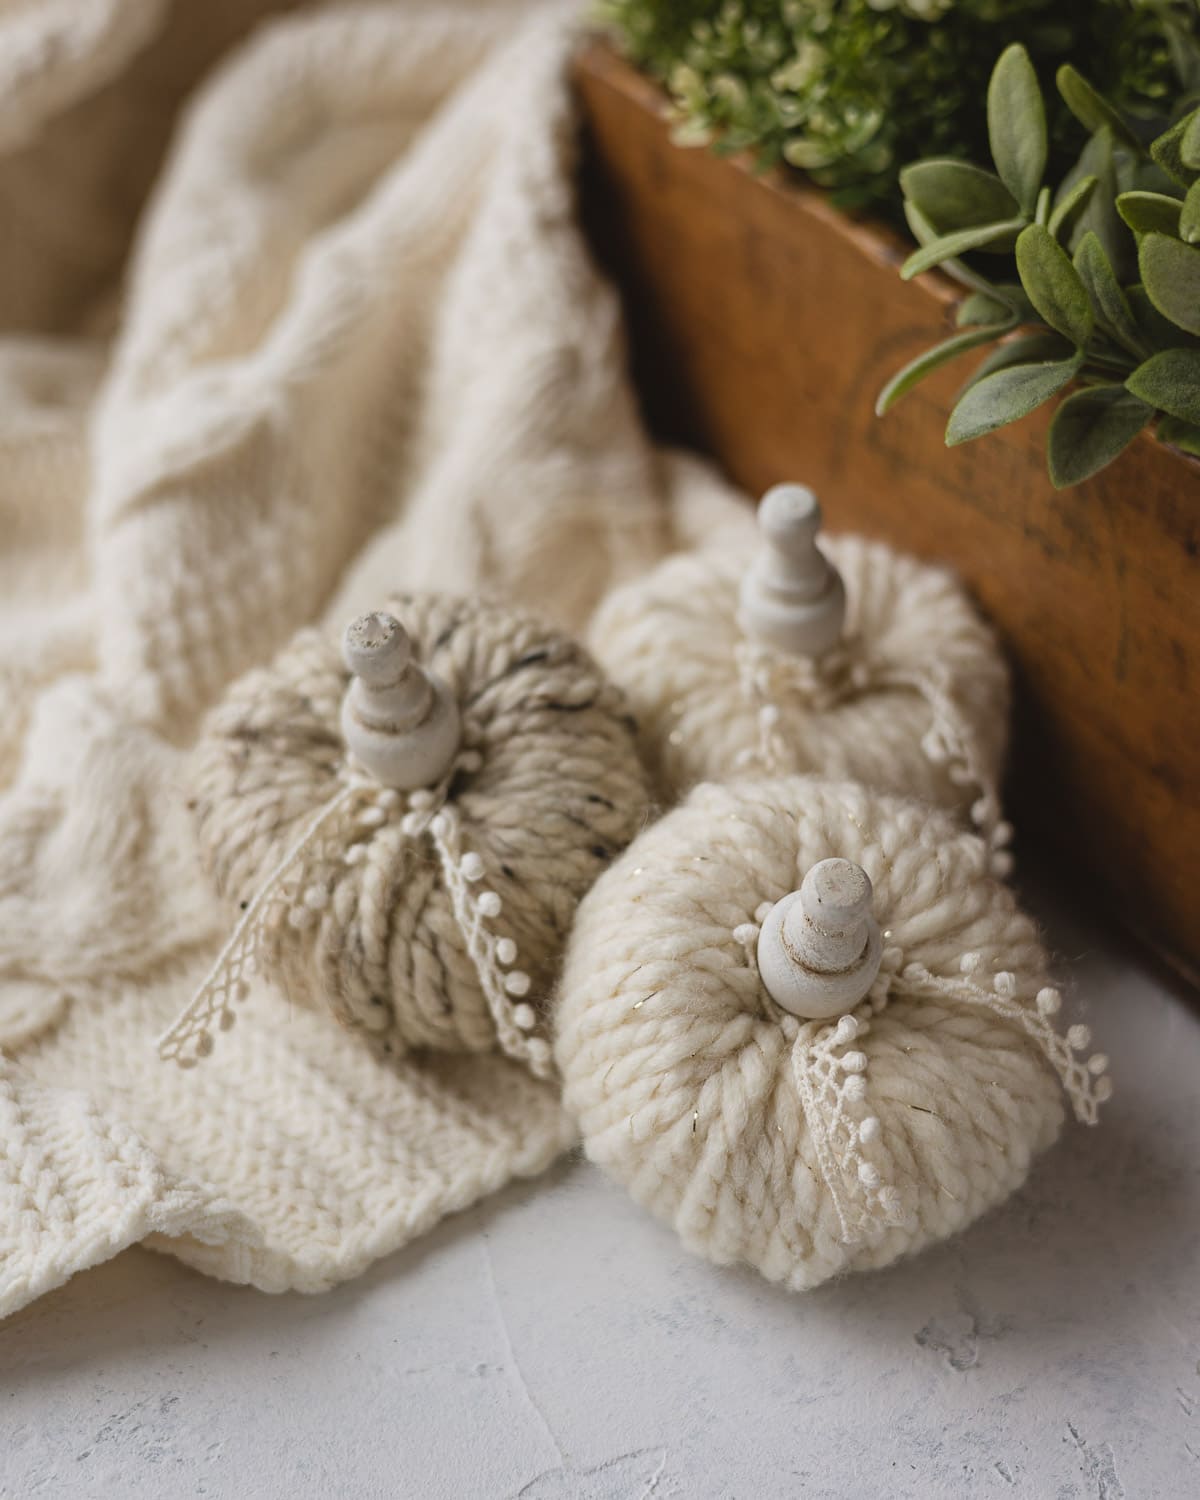
10-Minute Sock Pumpkins Tutorial + Video!
Learn how to make my easy 10-Minute DIY sock pumpkins! All you need to make this cute fall craft is a sock, a needle & thread, doll needle, stuffing, and yarn. These sweet pumpkins are a quick craft that is great for making at parties or decorating your home on a budget!
Please note that this post contains affiliate links which allow me to earn a small commission when a purchase is made at no additional cost to you. As an Amazon Associate I earn from qualifying purchases. Read more here.
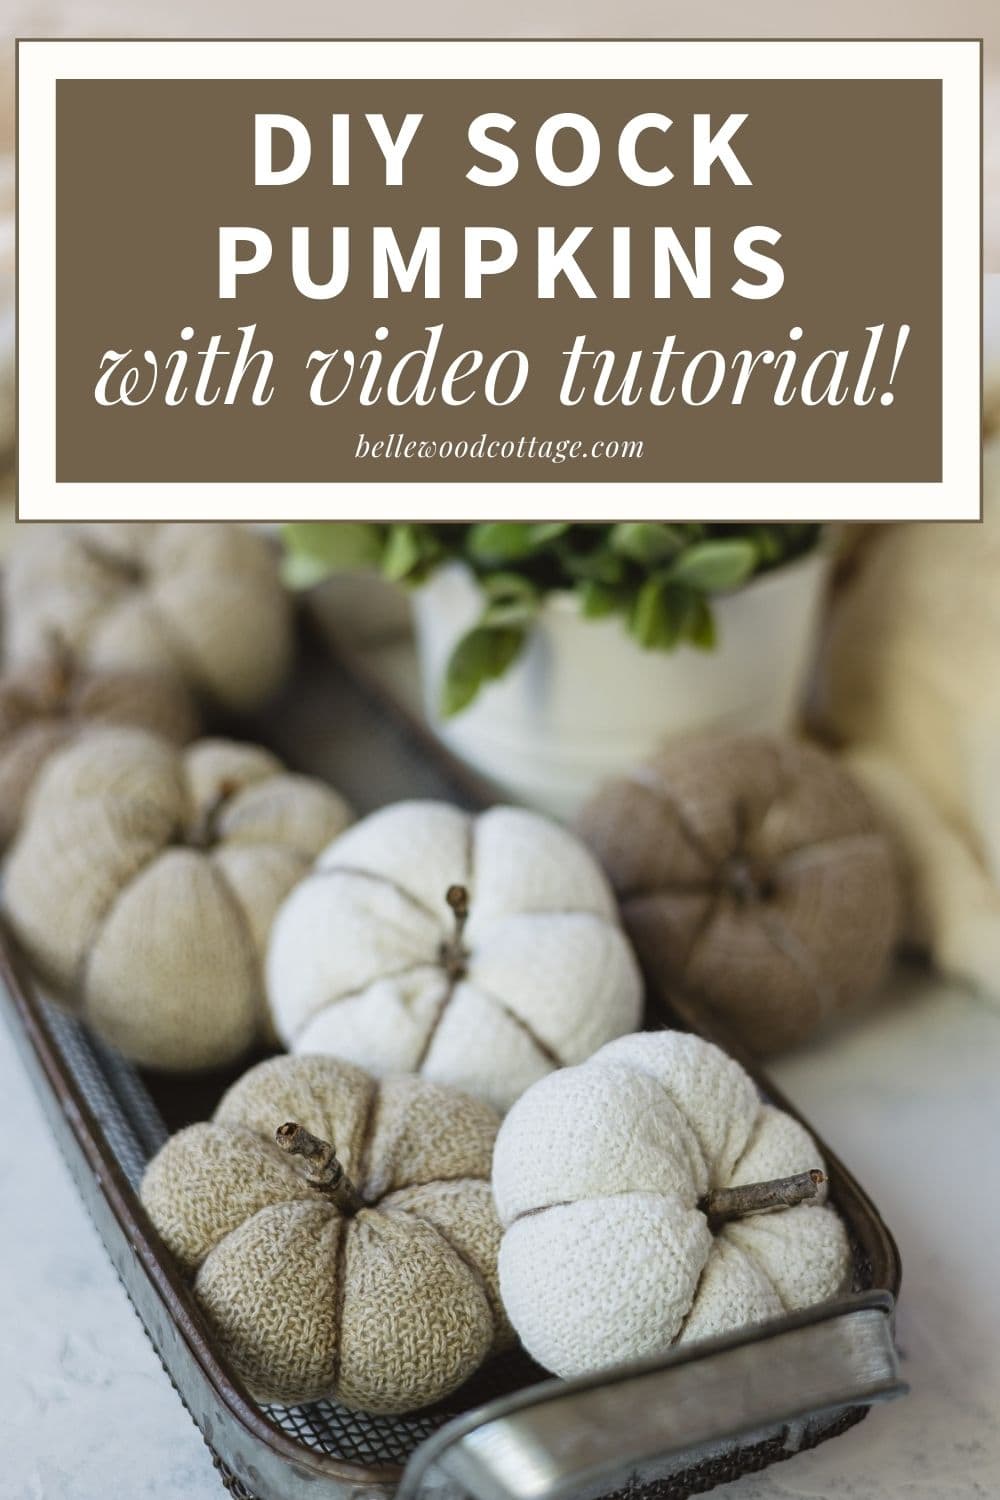
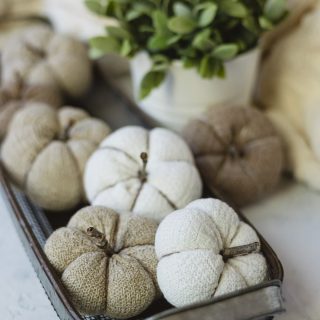
If you love inexpensive DIY home décor ideas, I think you’ll love these pumpkins. Buy a 3-pack of socks for a few dollars and you can make a whole basketful of cute sock pumpkins.
Even better, grab some of your favorite socks that have developed holes (we’ll be cutting away the heel and toe so those holes don’t matter!) and re-use them to create these little pumpkins.
Looking for more pumpkin crafts?
Check out my list of 15+ DIY Pumpkin Craft Ideas.
Since you can get two pumpkins per sock (using crew length or longer socks), each pair of socks will net you four pumpkins. It’s quick, easy, and affordable! Plus, since socks come in every color you can imagine, it’s a snap to match colors to your established fall home décor.
I’ve got a full video tutorial for you, plus step-by-step instructions, photos and printable instructions. Everything you need to craft your own sock pumpkins!
What People Are Saying:
“Ellen, this is such a cute and clever DIY. I absolutely love it. It would be a nice craft for a mother and her children or even a school teacher.”
from Patricia, a reader on the blog
Why You’ll Love This Craft
- It’s quick! Each pumpkin can be made in about 10 minutes or less.
- Great for parties: It’s a simple and fast craft that works great for facilitating at a party or Bible study. Sign up for my email list and grab the free printable below for a handy cheat-sheet!
- Waste not, want not: Recycle old socks easily with this cute tutorial. Socks with holes in them are perfect because the heel and toe are removed before crafting!
FREE Printable PDF
Join my email list and get the FREE Printable PDF for these sock pumpkins! Plus weekly emails with more relaxing craft ideas, freebies, sewing tutorials, and more!
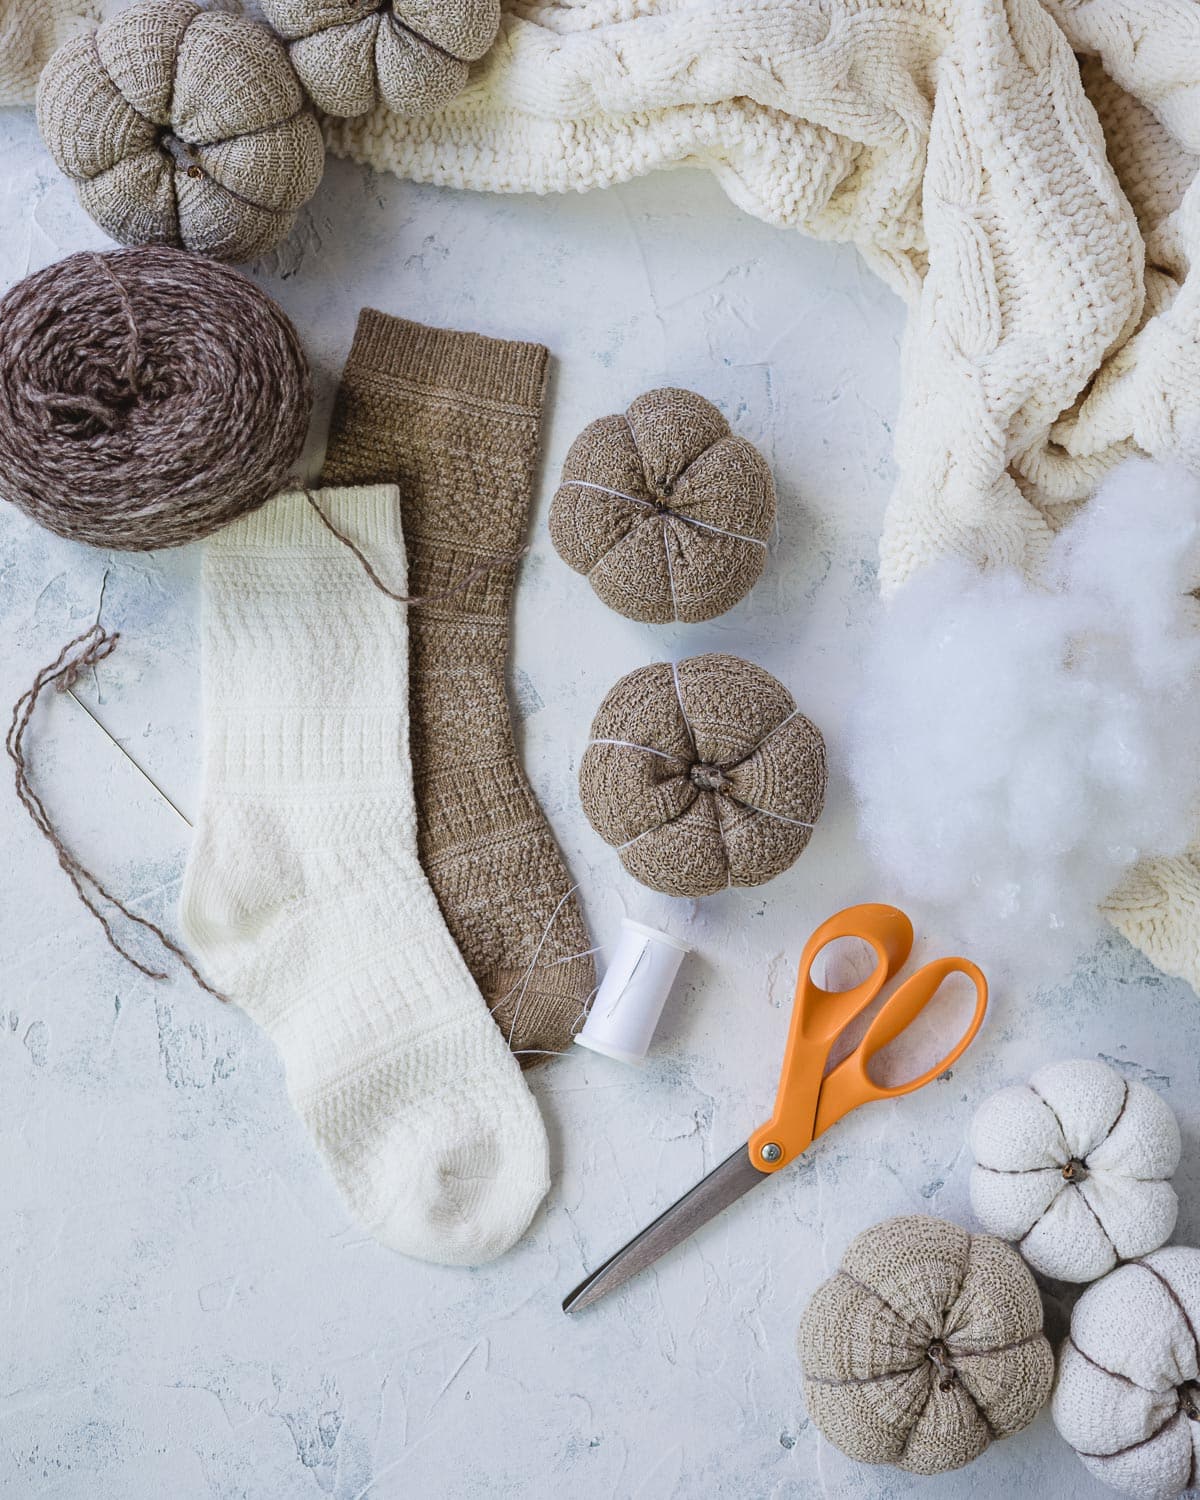
Supplies You Need for Making Sock Pumpkins
Sock pumpkins are a great way to repurpose old socks that have developed holes, but you can also buy brand-new socks if you like. I chose a pack with multiple coordinating colors in a pretty textured knit. This large pack of fall socks on Amazon is similar and comes in beautiful colors!

Besides socks, you’ll need a few other basic sewing supplies.
Here’s the complete supply list:
- socks – (I suggest women’s crew socks, like these textured socks and these ribbed socks)
- a needle and thread
- polyester filling
- a lightweight to medium-thick yarn (I like using a fingering, sport, or worsted weight)
- a larger doll needle (about 3″ long) or a plastic yarn needle in a pinch (a little harder to work with, but can be done)
- dry twigs to use for the stem (alternatively, use cinnamon sticks or a small roll of felt!)
- glue gun
What Kind of Socks to Use?
You can really use any kind of sock, but I use women’s crew socks to make my sock pumpkins and here’s why: once you cut away the heel section and the toe (cutting the toe is optional) you’ll have two pieces of sock that are nearly the same size and already a great ratio for turning into pumpkins.
You can use ankle or no-show socks too, but if you are buying new socks, I would skip these as you’ll only net one pumpkin per sock.
As for longer socks (like knee-high socks), these are great because you can get three (or more) pumpkins per sock. You’ll just have to figure out how many cuts you want to make in the leg of the sock.
Something else to keep your eye out for are socks where the pattern goes all the way around the sock (even on the foot part). These aren’t as common since typically the foot of the sock is knit flat, but they look so great for pumpkins.
There are so many cute socks out there. Trying browsing through women’s fall crew socks on Amazon and see what you find. I found several packs I would love to try this craft with!

Ready to get started? Find my tutorial video and complete instructions ahead!
How to Make DIY Sock Pumpkins Step-by-Step
Follow the instructions, and/or watch the video! You can also print the instructions for later at the end of the tutorial, or fill in the subscribe box in this post and get the printable PDF emailed to you.
Cut a Crew Sock in Two Pieces
If you are using a crew sock (roughly the same amount of fabric in the leg section and the foot section), cut out the heel area and the toe. You could technically leave the toe in if you want, but the shape of the pumpkin would be a little different and I don’t like having the big seam for the toe showing.
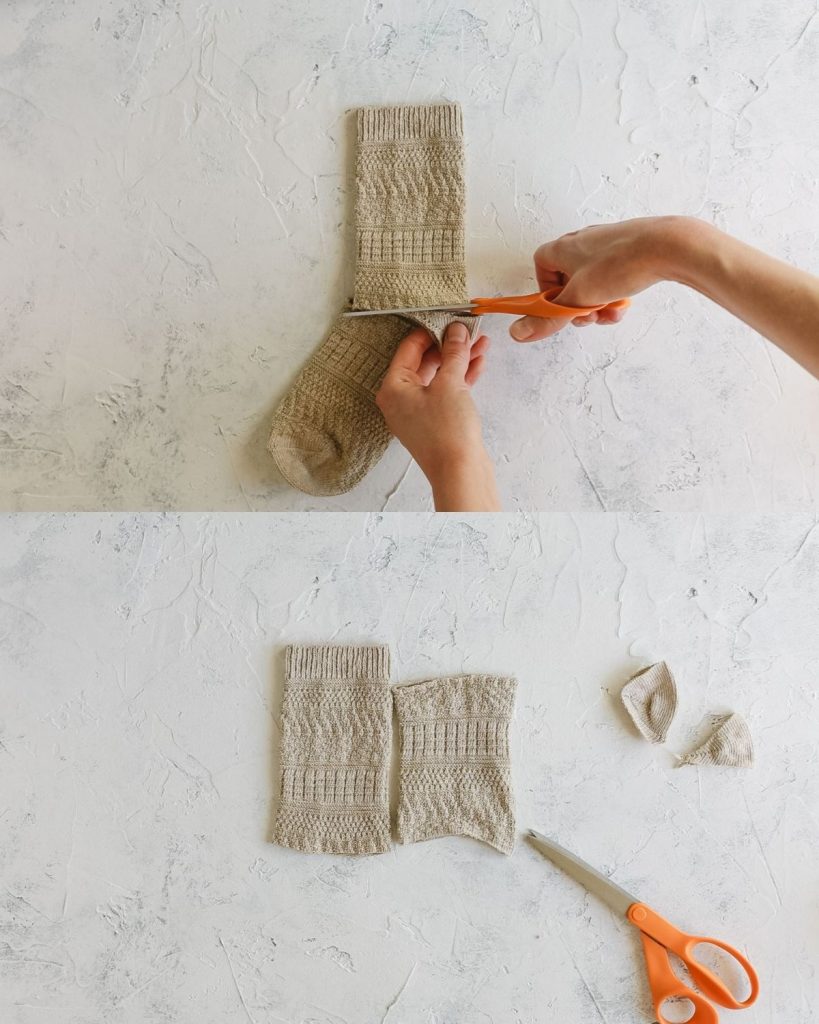
Note: If you are using a shorter sock, you will cut away the heel, cuff, and toe and have one piece of sock for a pumpkin. Longer socks will yield more than two pumpkins as you can cut the leg into multiple pieces.
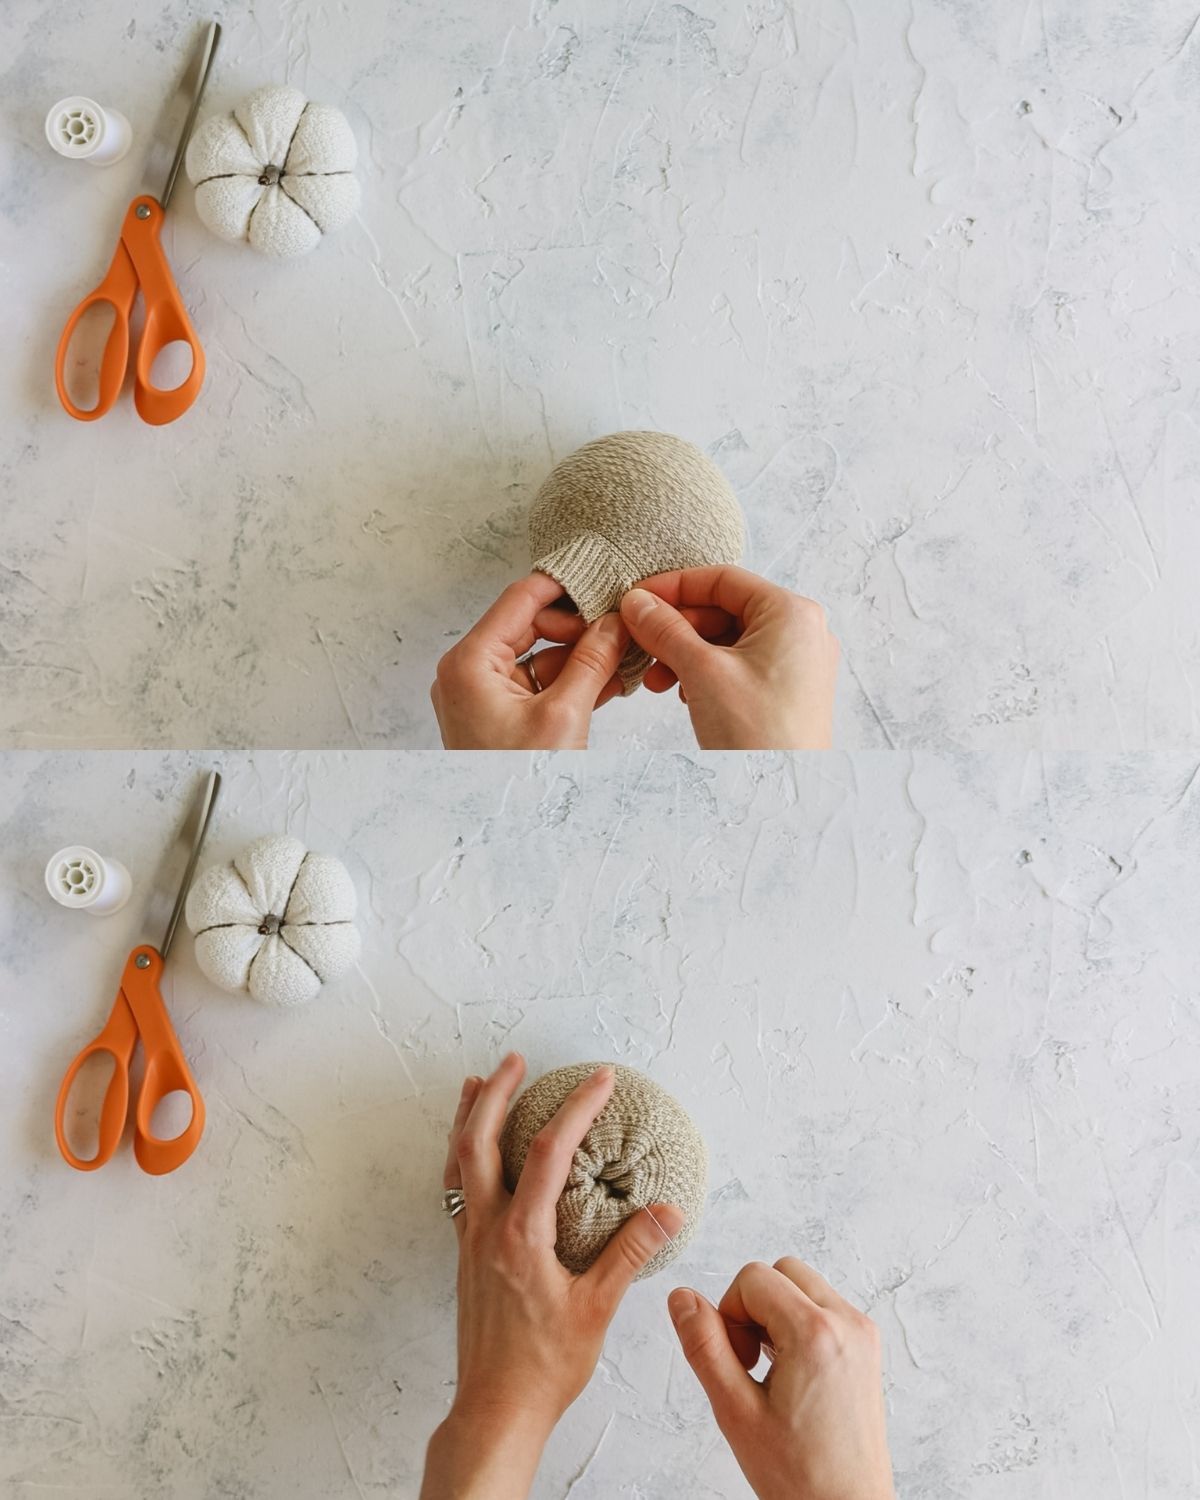
Sew the Sock Closed
Select one of the pieces you are left with and using a needle threaded with a doubled and knotted thread, sew a gathering stitch all the way around the tube of the sock. Leave about 3/4″ seam allowance as you stitch the gathering stitch (I’ll show you why in a minute).
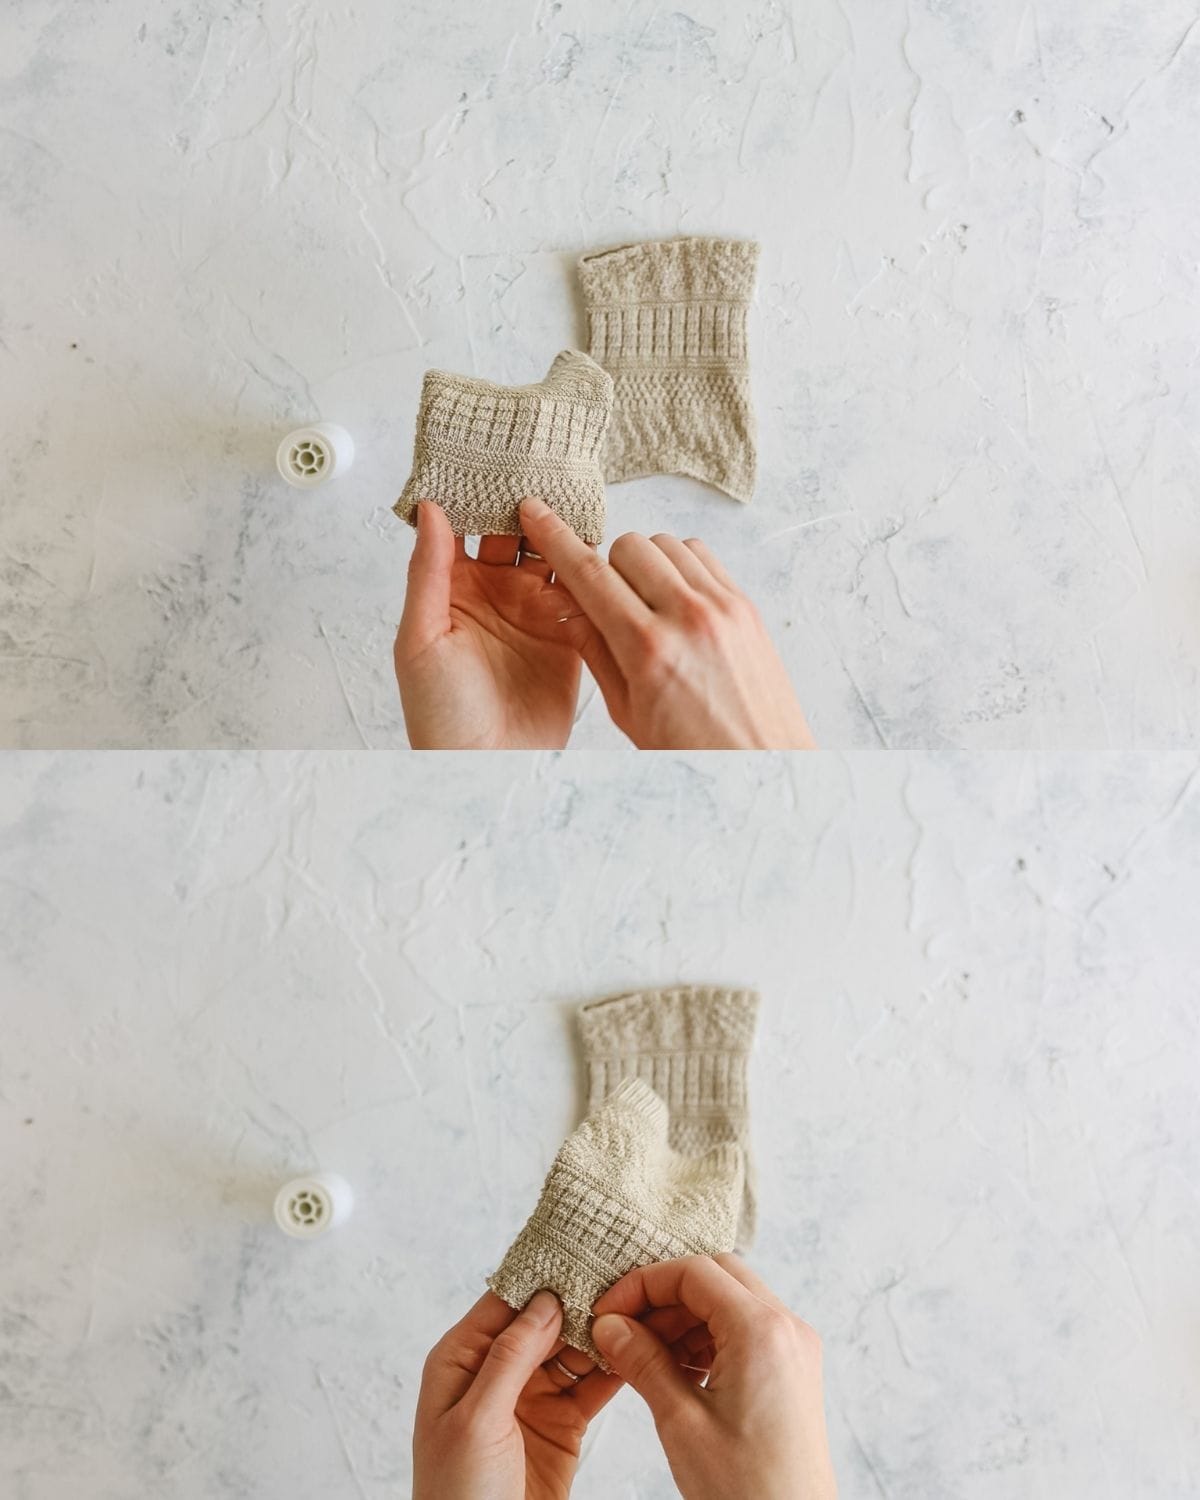
Note: to prevent my thread from slipping out of the sock I pull the thread through almost all the way and then I bring my needle between the two strands of thread and pull tight, forming another knot on the inside of the sock. This extra step before I start sewing prevents the knot from slipping through the knit fabric of the sock.
After you sew a gathering stitch all the way around the tube, begin to push the fabric and pull the thread to gather the sock together. When you’ve almost closed the gap, push the edges into the tube to hide, finish tightening the thread and take a couple stitches to secure the gathers.
Knot your thread and bury the knot as you pull your needle and thread out of the sock.
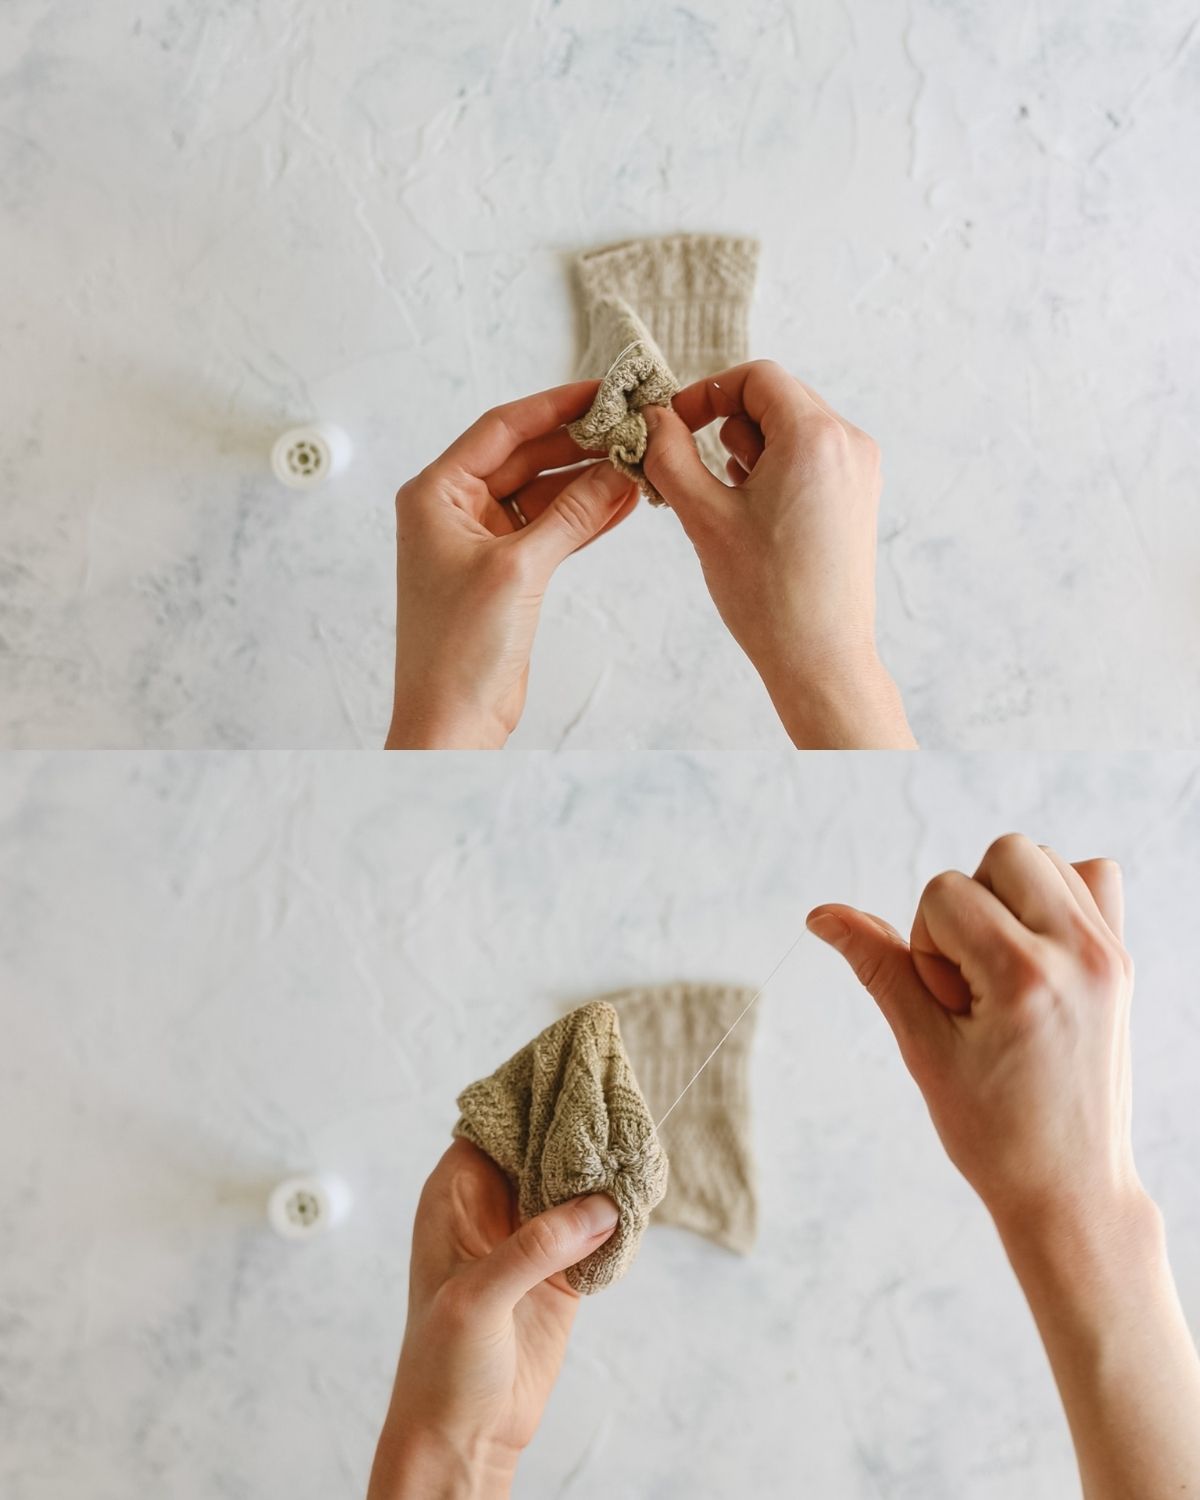
Stuff the Sock Pumpkin
Stuff the sock with several handfuls of polyester filling, leaving a 3/4″ gap or so at the top to finish closing the pumpkin.
Sew the Pumpkin Closed
Repeat the gathering process, this time around the top of the sock.
Stitch around at about the 3/4″ mark and then pull the stitching closed while tucking in the seam allowance.
Take a few stitches to secure, knot and bury your thread.
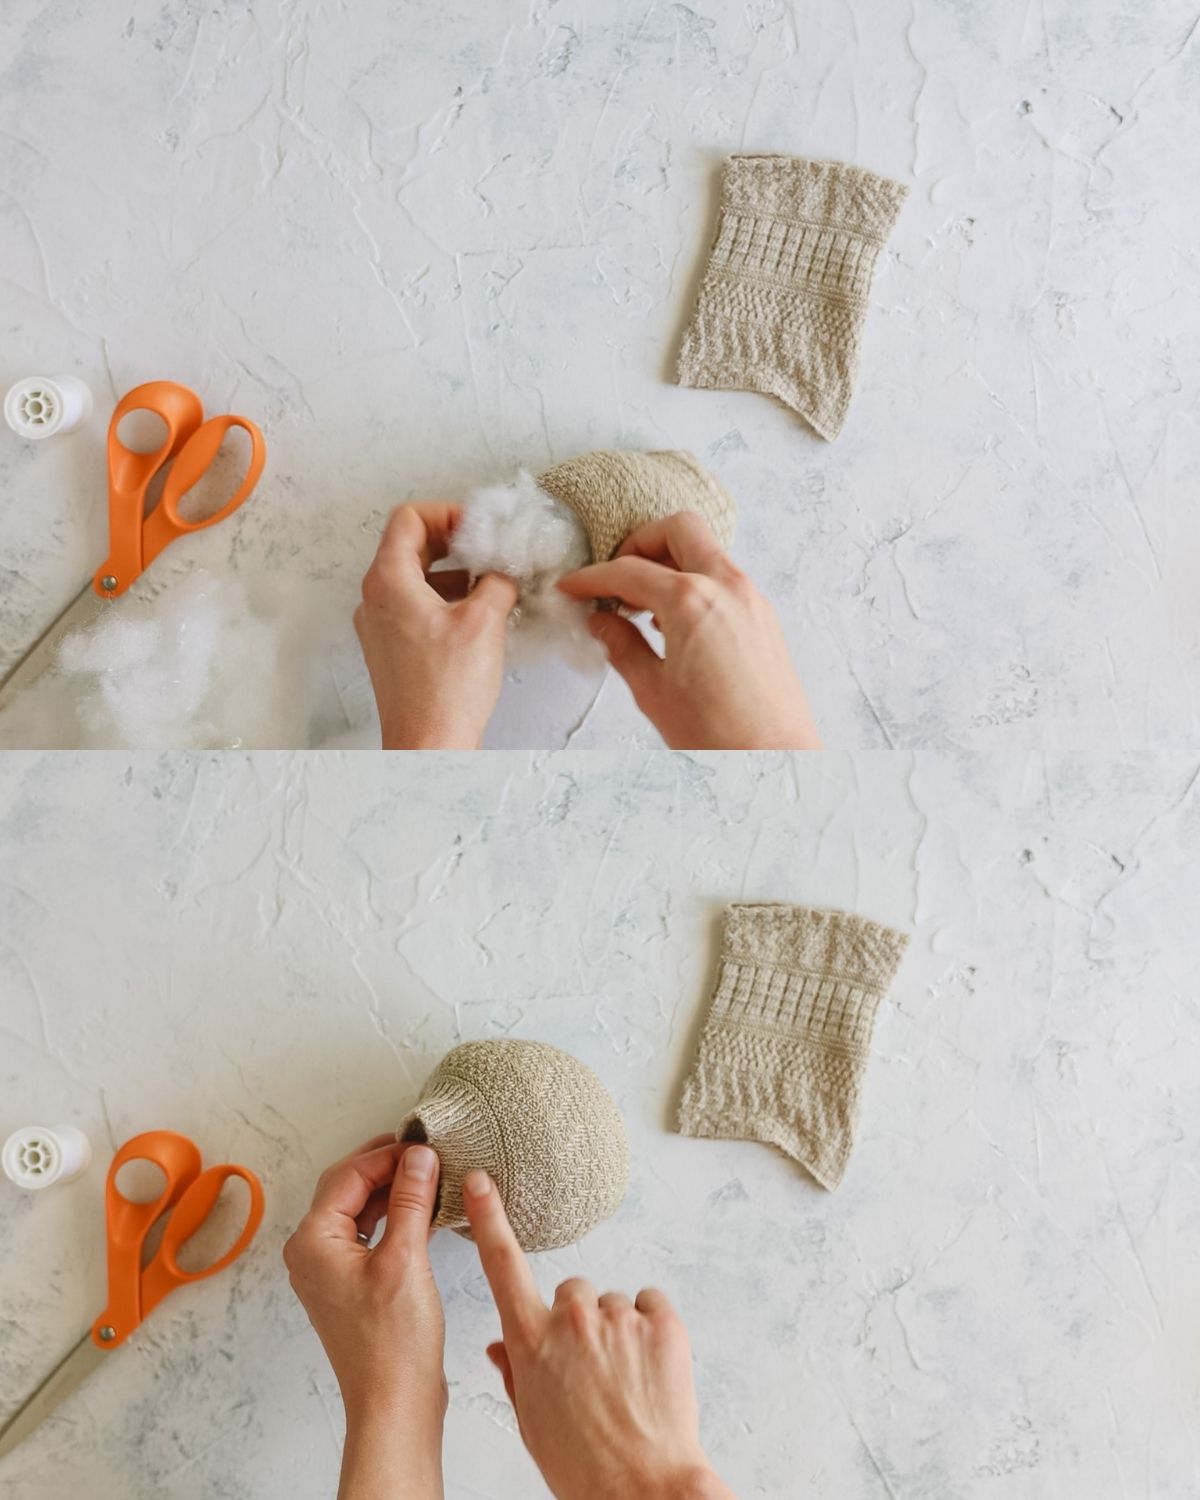
Sew In Grooves
Now, thread a doll needle with a single length of yarn about 3-4′ long and tie a thick knot at one end.
Why a doll needle? The longer needle makes it a lot easier to sew through the pumpkin. If you don’t have one, just trying wrapping the pumpkin with the yarn and then tying it off.
Bring the yarn up through the center of the pumpkin, hiding the knot as you do so.
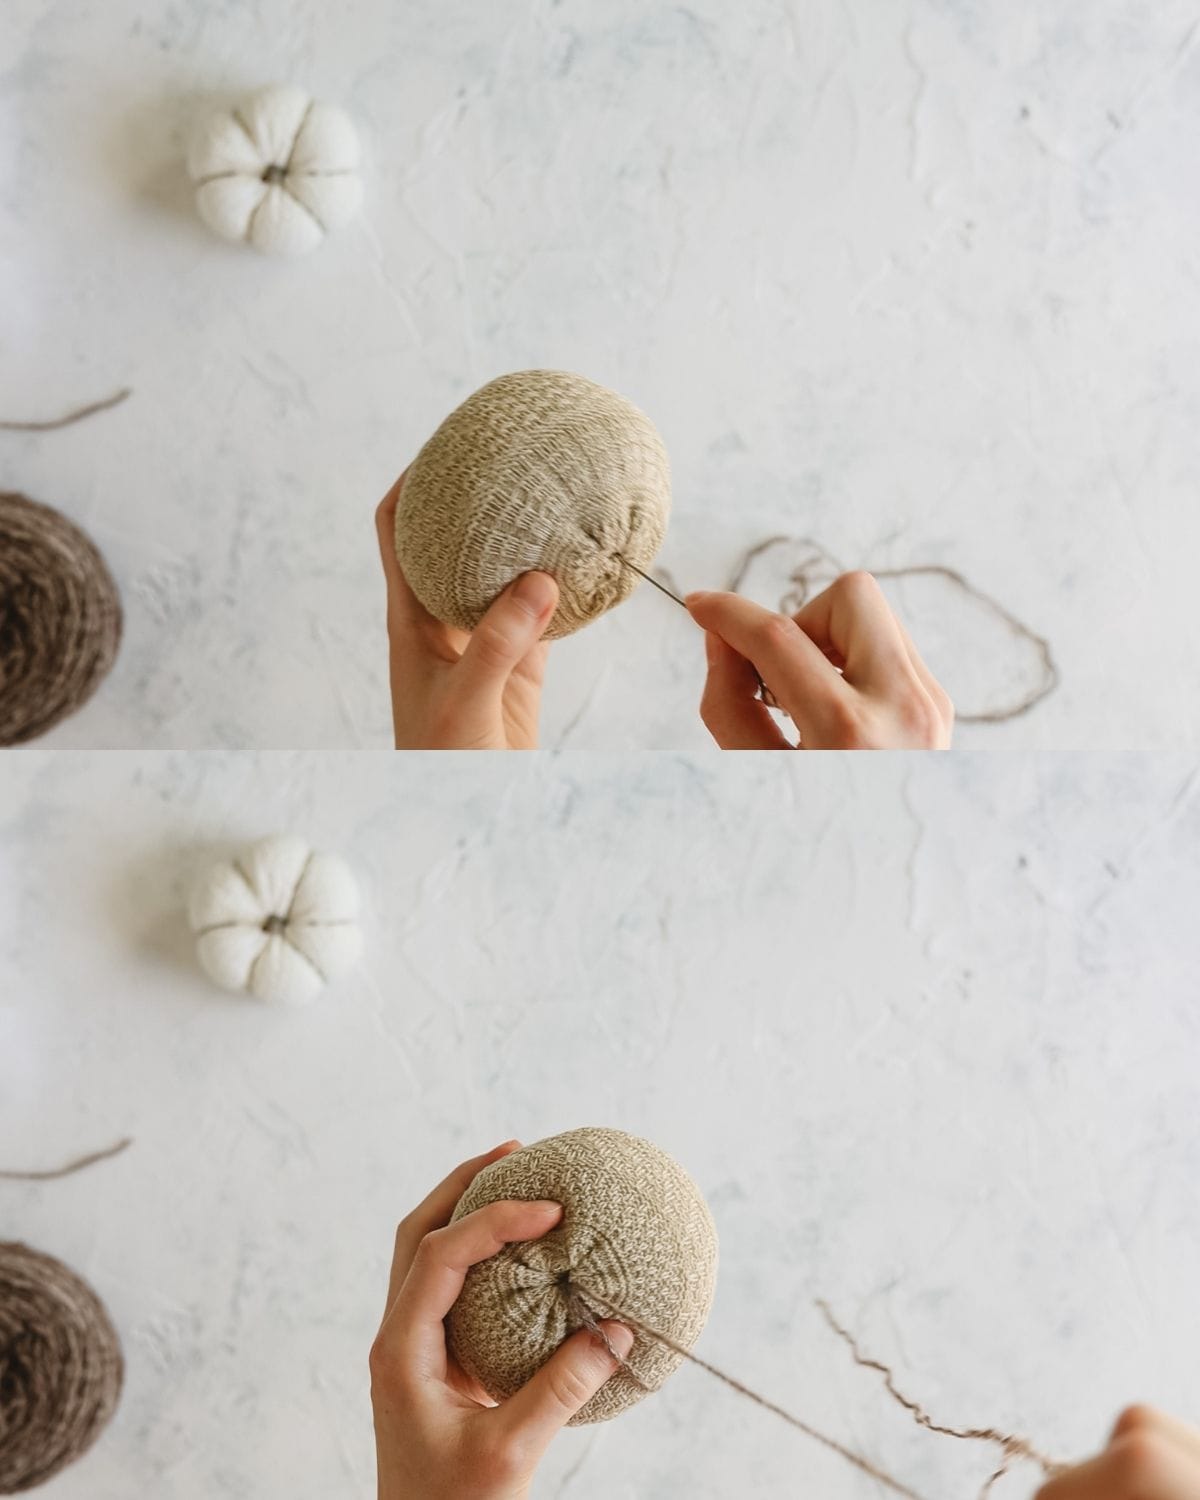
Wrap the yarn around and down the side of the pumpkin and bring it back up through the center. Pull as tight as you want to form the grooves of the pumpkin.
Repeat to make more grooves.
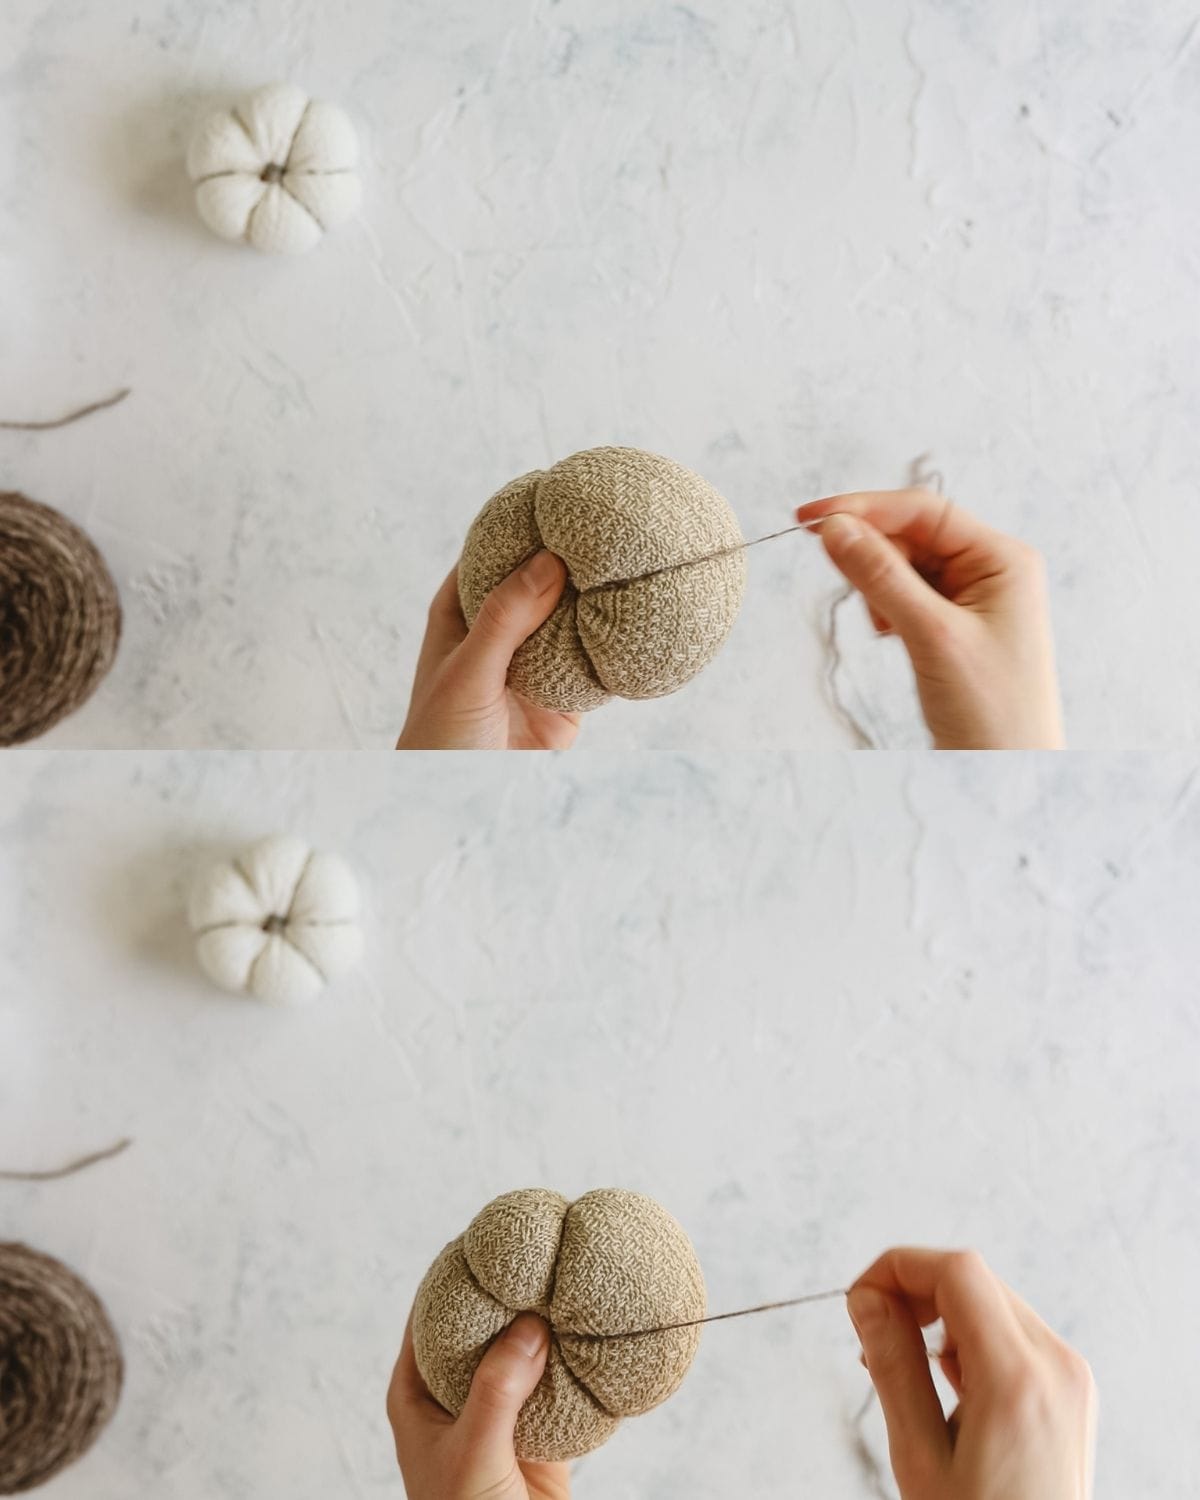
When finished, take a few hidden stitches in the center to secure, then knot off your thread and bury it as you stitch the needle and thread out of the pumpkin.
Add a Stem
Heat a small glue gun and prepare a small twig for the stem. I usually break off an inch or two. Add a little glue to the bottom edge of the twig and insert into the top of your pumpkin. Let dry.
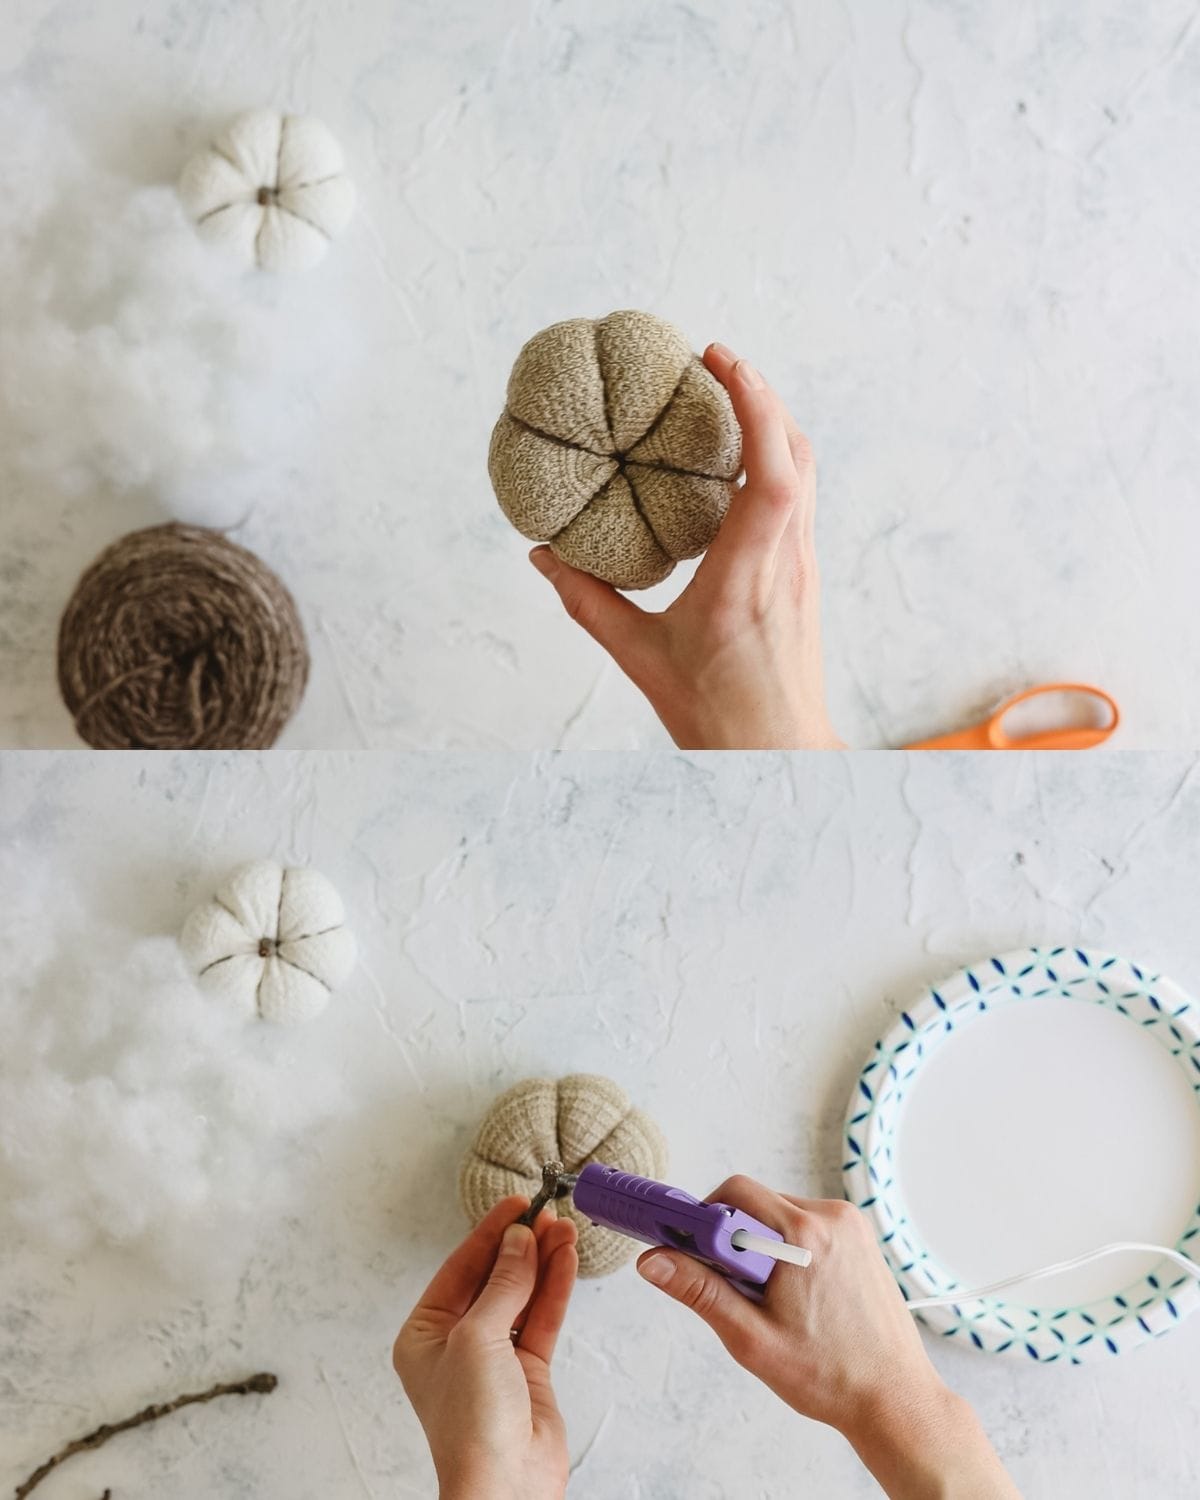
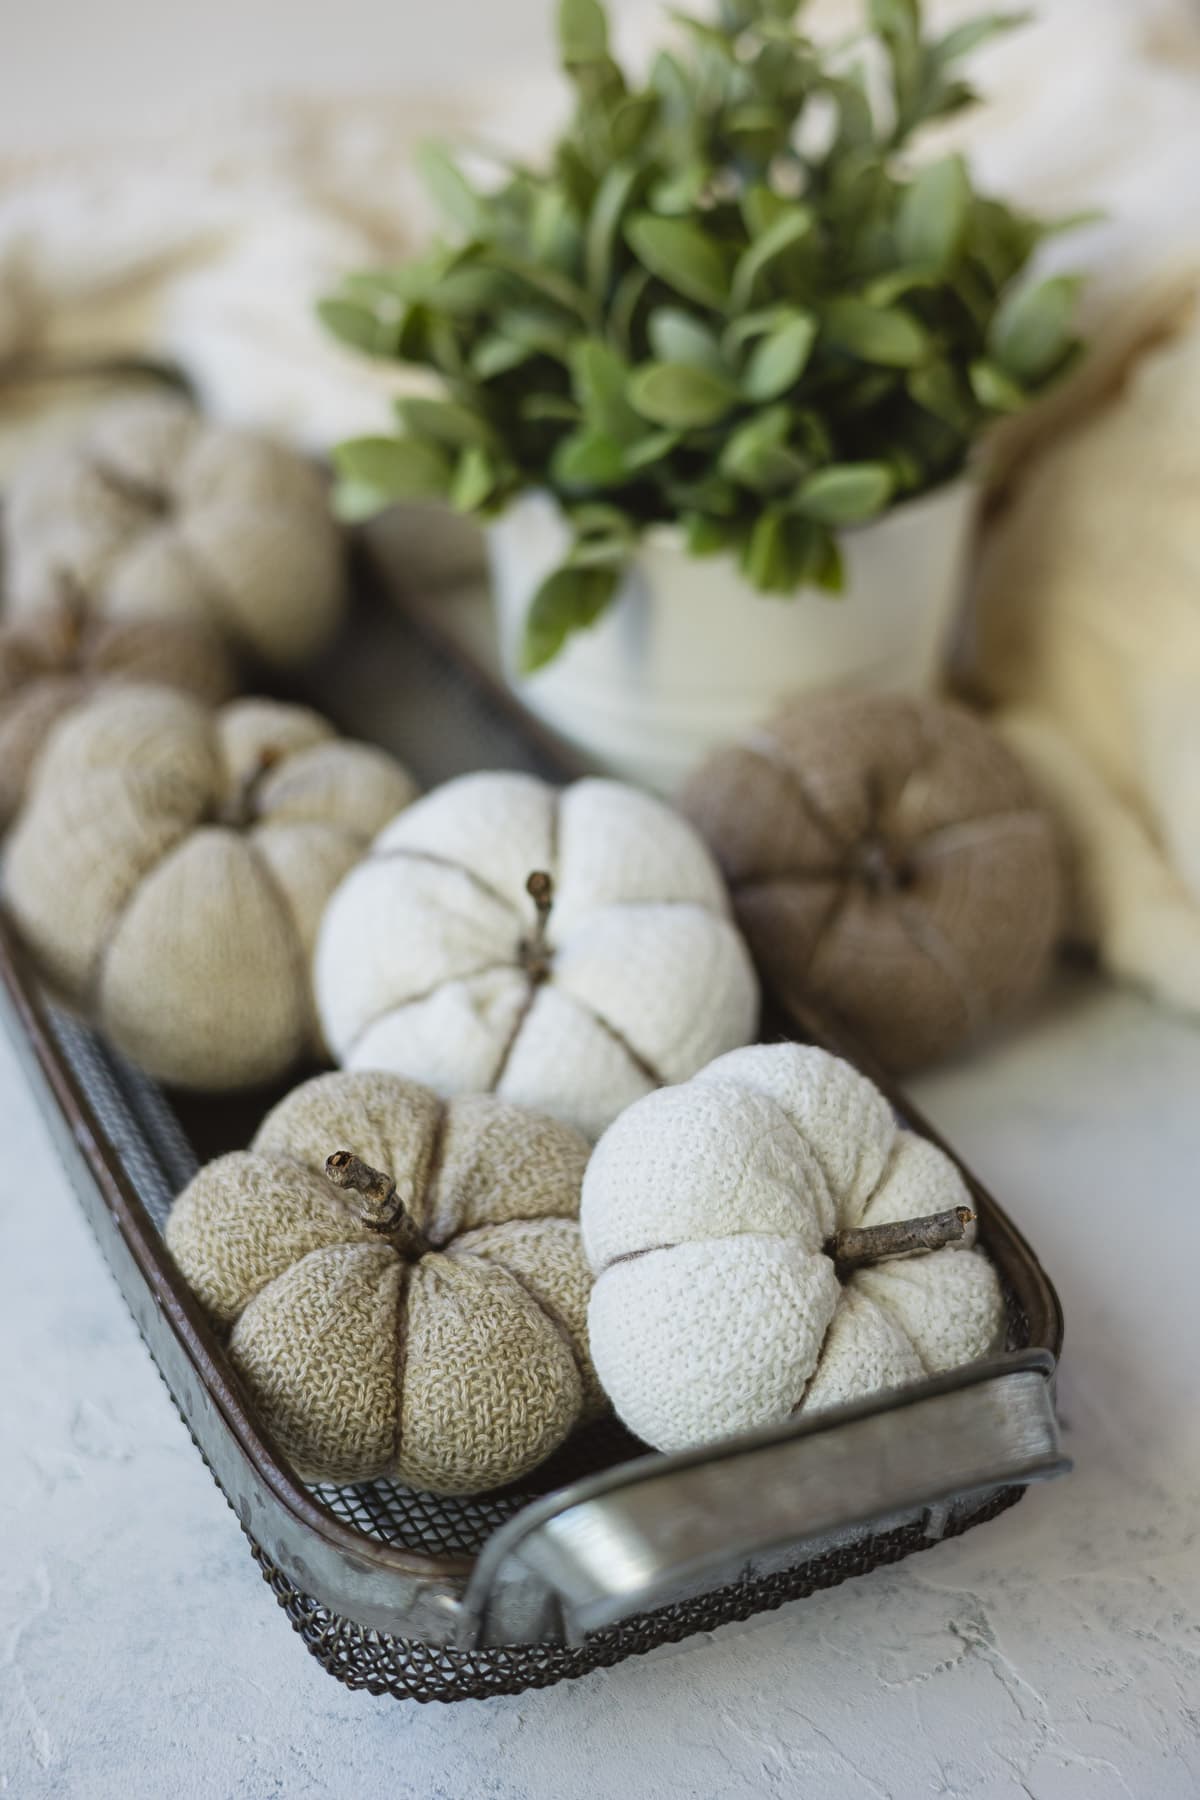
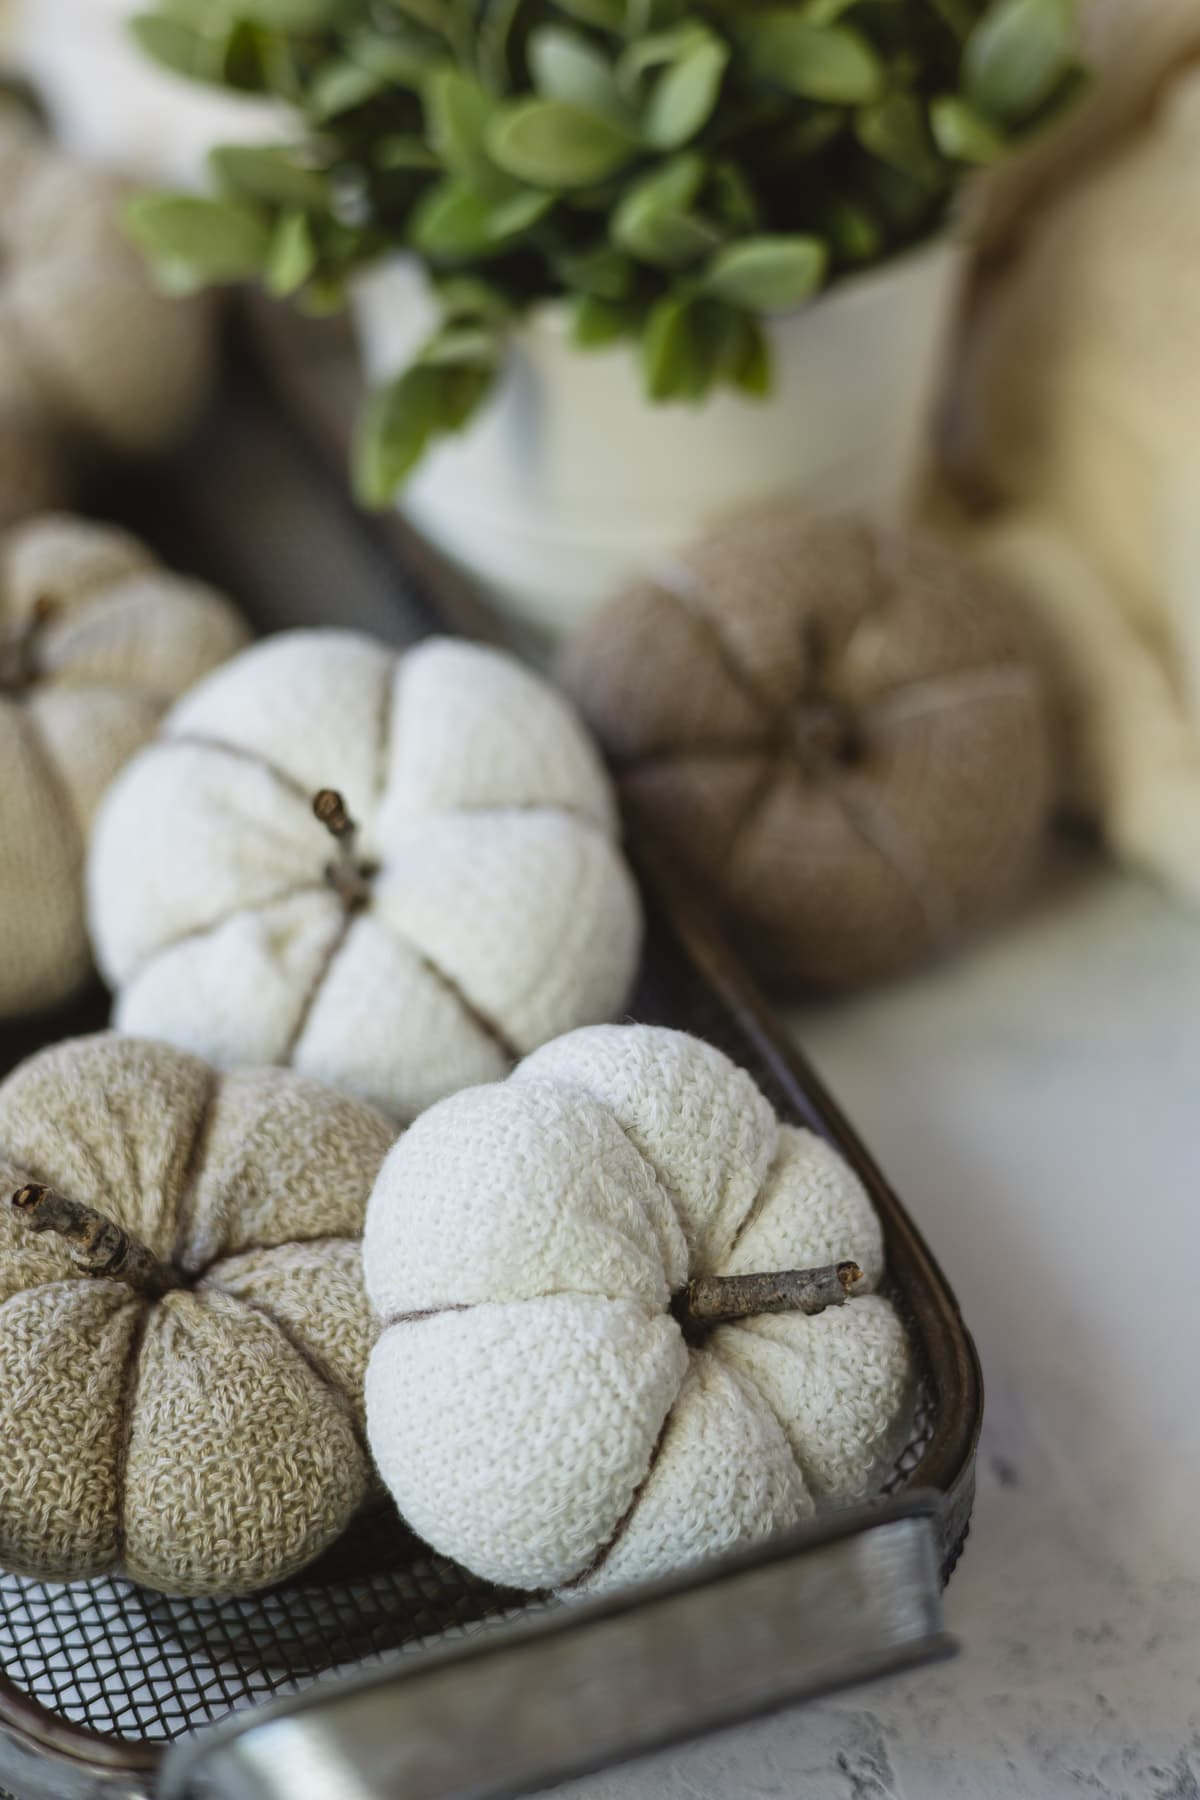
All done! Repeat to create more DIY sock pumpkins and embellish them as desired.
FREE Printable PDF
Join my email list and get the FREE Printable PDF for these sock pumpkins! Plus weekly emails with more relaxing craft ideas, freebies, sewing tutorials, and more!
FAQ
One women’s crew sock (where the foot and leg are roughly the same length) will yield two pumpkins. You can use any type of sock though. Tiny baby socks would make adorable doll house pumpkins.
You can grab a bag of polyester stuffing and it may just last you for years! It goes a long way. A 32-ounce bag of stuffing (such as the one I linked) should make at least 10 pumpkins. Each pumpkin will need 2-3 handfuls of stuffing, packed.
More Pumpkin Tutorials to Try
Fall crafts are so much fun! So, don’t stop here! Also try my mini ticking stripe pumpkins (which are perfect for fall farmhouse décor). And if you happen to have scraps of drop cloths leftover from making curtains then use them for drop cloth pumpkins.
Weekly Crafting Fun!
Join my list and get a weekly email with relaxing craft ideas, freebies, sewing tutorials, and more!
And if you need a really, really quick fall craft, pick up ready-made pumpkins and decorate them with yarn or washi tape!
DIY Sock Pumpkins
Supplies
- socks (one women's crew sock will yield two pumpkins)
- a needle and thread
- polyester filling (a 32-ounce bag will yield at least 10 pumpkins)
- light to medium-thick yarn I like a fingering, sport, or worsted weight
- a larger doll needle about 3″ long or a plastic yarn needle in a pinch (a little harder to work with, but can be done)
- dry twigs to use for the stem
- glue gun
Instructions
Cut a Crew Sock in Two Pieces
- If you are using a crew sock (roughly the same amount of fabric in the leg section and the foot section), cut out the heel area and the toe. You can technically leave the toe in if you want, but the shape of the pumpkin would be a little different and I don’t like having the big seam for the toe showing in the finished pumpkin.
Sew the Sock Closed
- Select one of the sock pieces you are left with and using a needle threaded with a doubled and knotted thread, sew a gathering stitch all the way around the tube of the sock. Leave about a 3/4″ of a seam allowance for your gathering stitch (I’ll show you why in a minute).Note: to prevent my thread from slipping out of the sock I pull the thread through almost all the way and then I bring my needle between the two strands of thread and pull tight forming a small slip knot on the inside of the sock and prevent the knot from slipping.
- After you work your gathering stitch all the way around the tube, begin to push the fabric and pull the thread to gather the sock together. When you’ve almost closed the gap, push the edges into the tube to hide, finish tightening the thread and take a couple stitches to secure the gathers.
- Knot your thread and bury the knot as you pull your needle and thread out of the sock.
Stuff the Pumpkin
- Stuff the sock with a few handfuls of polyester filling, leaving a 3/4″ gap or so at the top to finish closing the pumpkin.
Sew the Pumpkin Closed
- Repeat the gathering process, this time around the top of the sock.
- Stitch around at about the 3/4″ mark and then pull the stitching closed while tucking in the seam allowance.
- Take a few stitches to secure, knot and bury your thread.
Sew In Grooves
- Now, thread a doll needle with a single length of yarn about 3-4′ long and tie a thick knot at one end.
- Bring the yarn up through the center of the pumpkin, hiding the knot as you do so. Tip: if you don't have a long doll needle, you can simple wrap the yarn around the pumpkin and tie it off.
- Wrap the yarn around and down the side of the pumpkin and bring it back up through the center. Pull as tight as you want to form the grooves of the pumpkin.
- Repeat to make more grooves.
- When finished, take a few hidden stitches in the center to secure, then knot off your thread and bury it as you stitch the needle and thread out of the pumpkin.
Add a Stem
- Heat a small glue gun and prepare a small twig for the stem. I usually break off an inch or two. Add a little glue to the bottom edge of the twig and insert into the top of your pumpkin. Let dry.
- All done! Embellish your sock pumpkin as desired!
Notes
- stick with tightly woven socks for the best appearance (loosely woven socks will show the stuffing)
- recycle old socks with holes in the heel/toe since those areas will be cut away anyways
- use felt instead of a twig for a cute stem–you could even cut a little leaf design and add that too
- embellish with embroidery, beads, or sparkling gems for a different look
Weekly Crafting Fun!
Join my list and get a weekly email with relaxing craft ideas, freebies, sewing tutorials, and more!


Ellen, this is such a cute and clever DIY. I absolutely love it. It would be a nice craft for a mother and her children or even a school teacher. Thanks for sharing and I am looking forward to trying this.
Love these. I had so many cute cream and beige socks that had holes in the toe so I cut the heels & toes off. Then when wearing a coat with wide sleeves I’d slip the sock tubes onto my arms under my long sleeves & coat for extra warmth. So glad to find a new use for them (since you only need a few “sleeve socks”!)
This is such a nice way to repurpose socks! I’ve tried a few DIY fall projects now with my kids and they all ended up in me scheduling a carpet cleaning because of the messes haha. This seems relatively mess-free and straight-forward, can’t wait to try it out!